You Don’t Need a Photographer. You Need the Right Prompt.
No matter how many photos you take, finding a perfect professional one feels almost impossible. Bad lighting, awkward angles, that one photo where you looked great but your background was a mess. Sound familiar?
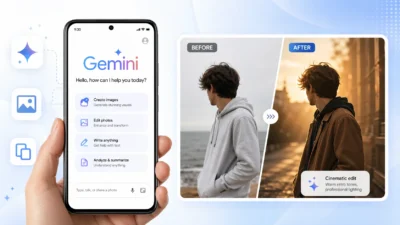
Here is the good news. You can transform a simple selfie into a studio quality headshot using nothing but Google Gemini AI and the right prompt. No camera equipment. No booking a photographer. No spending hundreds of dollars on a professional shoot.
I have seen this work firsthand. One Reddit user shared exactly what most people feel the first time they try this: “I uploaded a casual photo of me on my couch in a t-shirt and my jaw literally dropped when I saw the results. It kept the most perfect details of my face.” That reaction is common once you understand how to write a gemini prompt for professional photo results that actually hold up.
The key word there is “right prompt.” A vague instruction gives you a generic result. A well built prompt gives you something that looks like it came out of a real studio session.
What this article gives you:
- 20 tested Gemini AI prompts for professional photos organized by use case
- A simple breakdown of what makes a prompt actually work
- Step by step instructions for using Gemini even if you have never tried it before
- Gender specific sections for men and women
- A dedicated section for LinkedIn profile photos
- Honest fixes for when your results do not look right
One thing worth saying upfront: Gemini AI produces genuinely impressive professional headshots when you give it specific instructions. Gemini works best when you upload a clear, well lit photo of yourself and pair it with a detailed prompt. The more specific your prompt, the better your result. You will see exactly how to do that throughout this article.
What Gemini AI Actually Does When You Send It Your Selfie
When you upload a photo to Google Gemini and give it a prompt, you are using Gemini image generation, not the text chatbot most people know. These are two different tools under the same name.
The image generator works by analyzing your uploaded photo and your written instructions at the same time. Your photo tells Gemini what your face looks like. Your prompt tells Gemini everything else: the lighting, the clothing, the background, the mood, even the camera angle.
Here is the part most people miss. Gemini does not just edit your photo. Gemini creates a completely new AI image that combines your facial features with the scene you described in your image prompt. The better your original photo and the more detailed your prompt, the more realistic your final result will look.
To access this feature, you need to open Google Gemini and select the “Create Images” option. On the mobile app, you will see a plus icon where you can upload your photo. If you are using the web version on a browser, the process looks slightly different but the core steps stay the same.
Google recently introduced the Nano Banana image generator as the underlying model that powers professional photo creation in Gemini. This is what makes Gemini AI photo realistic results possible without needing advanced photo editing skills. The Nano Banana model is specifically designed to maintain facial consistency while applying professional studio elements like soft lighting, neutral backgrounds, and sharp focus.
The quality of what you get back depends entirely on two things: the clarity of your input photo and the specificity of your prompt. A blurry selfie with a vague instruction like “make me look professional” will give you a generic result. A clear, well lit photo paired with detailed instructions about lighting, clothing, framing, and background will give you something that genuinely looks like a professional AI headshot generator produced it.
That is why the prompts in this article matter. Each one gives Gemini the exact details it needs to produce studio quality results.
How to Use a Gemini Prompt for a Professional Photo (Step by Step)
Using a Gemini prompt for a professional photo is straightforward once you know the exact path to follow. Most beginners skip a critical step or two and end up frustrated when their results look nothing like what they expected. I am going to walk you through the entire process so you avoid those mistakes.
Step 1: Get Your Input Photo Right Before You Start
Before you even open Gemini, you need the right starting photo. The quality of your input photo directly affects how realistic your final AI headshot generator result will look.
Here is what works best. Take a clear, well lit selfie where your face is the main focus. Natural daylight from a window works better than overhead indoor lighting. Position your phone at or slightly above eye level and make sure your face is fully visible.
Avoid wearing hats, sunglasses, or anything that covers part of your face. Gemini needs to see your full facial structure to maintain realistic skin texture AI details in the final image. If your original photo is blurry, too dark, or taken from a strange angle, even the best professional headshot prompt will struggle to produce good results.
One user shared a helpful tip: “Upload various selfies, one front and one side shot” if you want Gemini to better understand your face from multiple angles. This is optional but can improve face consistency across different generated images.
Even a casual kitchen selfie or a couch photo works perfectly fine. You do not need a professional setup. You just need clarity and good lighting. Some people run their photo through a free background removal tool before uploading to Gemini, which can help the AI focus entirely on your face, but this step is not required.
Step 2: Find the Right Mode in Gemini
Open Google Gemini in your browser or download the Gemini app on your phone. Once you are in, you need to navigate to the image creation feature, which is separate from the regular text chatbot.
Look for the option that says “Tools” and click it. From there, select “Create Images.” This activates the Nano Banana image generator, which is the specific model designed for creating realistic photos.
If you are using the mobile app, you will see a plus icon at the bottom of the screen. Tap it and choose the image upload option. On desktop, the layout looks slightly different, but the gemini tools create images path is the same.
Here is a detail most guides miss. If you have access to Gemini 3 Pro, use it instead of the standard version. Multiple users have confirmed that Gemini 3 Pro produces the best face consistency and the most realistic professional headshots. One Reddit user said their results with Gemini 3 Pro were so good their “jaw literally dropped.”
For complex headshot prompts with detailed instructions, enable “Thinking” mode. This setting is usually found in the bottom left corner of the interface. Thinking mode gives Gemini AI more processing power to handle long, detailed prompts without missing key elements.
Step 3: Upload Your Photo AND Paste Your Prompt Together
This is the single biggest mistake beginners make, and I want to save you from it right now.
Do not click send immediately after uploading the photo. You must paste your text prompt into the chat box along with the image.
Both your photo and your written prompt need to be in the same message before you hit send. If you upload the photo first and press send without adding the prompt, Gemini will just analyze your photo and describe it back to you. That does nothing.
Here is the correct process. Click the upload button or the plus icon and select your photo. The photo will appear in the chat box but do not send yet. Now click into the text box and paste your full AI photo editing prompt. Once both the photo and the text are visible in the message box together, then you hit send.
If you are copying prompts from another source like a Reddit thread or YouTube description, make sure you delete any introductory text. For example, if the copied text says “Here is the prompt you requested…” delete that part. Gemini should only receive the actual image description, not any extra commentary around it.
This applies to both the mobile app and the desktop web version. The interface looks a little different on each platform, but the core rule stays the same: photo plus prompt in one message.
Step 4: Refine and Download Correctly
After you send your photo and prompt together, Gemini will take about 20 to 30 seconds to process and generate your image. Be patient during this step. Gemini image generation is not instant, especially for detailed professional headshot requests.
Once the first image appears, I recommend generating three to four variations by clicking the regenerate button or slightly tweaking your prompt and sending again. Not every result will be perfect. Generating multiple versions gives you options to choose from.
Here is where Gemini gets really useful. You can refine your result by chatting with the AI after the first image is created. Try saying things like “zoom in so my face shows better” or “change the pose” or “remove the glasses” or “change the clothing to a white blazer.” Gemini will adjust the image based on your follow up instructions without needing to start from scratch.
When you find the version you want to keep, download it the right way. Click the dedicated download icon that appears below or next to the image. Do not take a screenshot. Screenshots reduce image quality significantly. The download icon gives you the full resolution file, which is what you need for a professional LinkedIn profile or resume photo.
That is the complete workflow. Follow these four steps exactly and you will avoid the most common beginner mistakes that cause poor results.
How to Write a Gemini Prompt for a Professional Headshot (What Each Part Does)
Learning how to write a Gemini prompt for a professional headshot means understanding the five core elements that transform a vague instruction into a detailed image prompt that actually works. Most people copy prompts without knowing what each part does, which makes customization impossible. Once you understand prompt anatomy, you can build your own prompts for any professional scenario.
The framework I use follows a simple rule: lock the face first, then apply the style. This approach comes from experienced prompt engineers who discovered that telling Gemini what must stay the same before describing the professional setting prevents the AI from drifting away from your actual appearance. Every great professional headshot prompt includes five key elements, and each one serves a specific purpose.
Element 1: Framing (How Much of You Gemini Shows)
Framing instructions tell Gemini how to crop the final image. Without this instruction, Gemini defaults to unpredictable framing that might cut off the top of your head or show too much of your torso.
The most professional headshot framing is chest up. This matches what you see in real corporate photography and LinkedIn profile photos. A good framing instruction looks like this:
“The subject is framed from the chest up, with ample headroom above the head, ensuring the top of the head is not cropped.”
That single sentence tells Gemini exactly where to position you in the frame. The headroom detail matters because AI image generators sometimes crop too tightly at the top, which makes the photo feel claustrophobic. Professional portrait photography always includes negative space above the subject’s head.
If you want a tighter shot that focuses more on your face, you can specify “shoulders and above” instead. For a more relaxed business casual look, “waist up” works well. The key is being explicit about the framing rather than letting Gemini guess.
Element 2: Lighting (The Single Biggest Quality Factor)
Lighting is the element that most separates amateur looking results from professional studio quality images. Multiple experienced users across Reddit and LinkedIn confirmed that specifying lighting details made the biggest noticeable difference in realism.
Here are the three main headshot lighting prompt styles and when to use each:
Soft diffused studio lighting is the safest choice for corporate and executive headshots. This instruction tells Gemini to create even, flattering light without harsh shadows. A typical phrase looks like this: “Shot with bright and airy soft, diffused studio lighting, gently illuminating the face and creating a subtle catchlight in the eyes.”
Natural window light works well for creative professionals or more casual business portraits. This style feels warmer and less formal. Specify “soft natural light from the front” or “golden hour lighting” to get this effect.
Dramatic rim lighting creates a moodier, editorial look. Use this for personal branding photos or creative portfolio headshots where you want more visual impact than a standard corporate shot.
One Reddit user put it perfectly: “Being very specific about lighting prevents the AI from defaulting to generic corporate images.” When you tell Gemini exactly how the light should hit your face, you control the entire mood of the photo.
Element 3: Background (The #141414 Tip Nobody Else Will Tell You)
The background might seem like a small detail, but it makes the difference between a photo that looks professionally shot and one that looks AI generated.
Neutral backgrounds make the subject stand out and signal professionalism. In real portrait photography, studio backdrops are almost always solid colors without distracting patterns or objects. Your AI prompt should mirror this.
Here is the trick that consistently produces the cleanest results. Specify the exact background color using a hex code rather than a vague description like “dark background.” The hex code #141414 produces a neutral dark gray that looks professional without being pure black.
A good background instruction looks like this: “The background is a solid #141414 neutral studio background with no distractions.”
Why does specifying a hex code work better than just saying “dark gray”? Because Gemini interprets color names inconsistently. “Dark gray” might come out charcoal, slate, or even close to black depending on how the AI interprets the phrase. A hex code is a precise instruction that removes all ambiguity.
This detail comes from two independent Reddit users who tested dozens of background variations and both landed on #141414 as the most consistently professional looking option. That kind of convergent testing is exactly what separates useful prompt engineering from guessing.
Element 4: Lens and Depth of Field (The Counterintuitive AI Photography Trick)
This element feels strange at first because Gemini is not a camera. But specifying camera lens type and aperture settings tells the AI to render the image in a way that mimics those photographic effects.
An 85mm lens portrait prompt produces the characteristic shallow depth of field effect where your face stays perfectly sharp while the background blurs into soft bokeh. This is the signature look of professional portrait photography, and it is one of the most obvious visual signals that separates a headshot from a regular photo.
A typical instruction looks like this: “Captured on an 85mm f/1.8 lens with a shallow depth of field, exquisite focus on the eyes, and beautiful, soft bokeh.”
Breaking that down: the 85mm focal length creates natural looking facial proportions without distortion. The f/1.8 aperture creates the shallow depth of field that blurs the background. The focus instruction tells Gemini where sharpness should be concentrated.
This approach is validated by three completely independent sources. One user testing ChatGPT prompts found that specifying “Canon EOS R5 with 85mm f/1.2L lens” produced dramatically more professional results. A Reddit commenter discovered separately that “85mm portrait look made a noticeable difference in realism.” A LinkedIn post with thousands of shares used the exact same 85mm lens instruction.
When three different people arrive at the same conclusion through independent testing, that is a strong signal the technique works.
Element 5: Mood and Identity Lock (Face First, Style Second)
This final element is the most critical for making sure your AI generated photo actually looks like you. Without an identity lock instruction, Gemini might produce a professional looking headshot of someone who only vaguely resembles you.
The face first framework works like this. First, tell Gemini what must stay the same. Then describe the professional style you want applied. A good identity lock instruction looks like this:
“Maintain the exact facial structure, identity, and key features of the person in the input image. Keep realistic skin texture with natural detail.”
That instruction anchors the AI to your uploaded photo before any stylistic transformation happens. Without it, Gemini interprets your professional styling instructions as suggestions to create an idealized version of you, which drifts away from your actual appearance.
One detail worth noting: avoid asking for a specific smile. AI models struggle to maintain accurate facial features when you request smile adjustments. Instead, use phrases like “natural expression” or “warm, approachable expression” or “confident, professional demeanor.” These mood descriptions guide the overall feel without forcing the AI to reconstruct your mouth and cheeks, which is where Gemini AI photo realistic results most often fail.
This insight comes from multiple prompt engineers. One comment on an AI discussion forum explained it clearly: “Describe the face realistically. Tell the model what must stay the same. Apply style after identity.” Another user with extensive testing experience confirmed: “AI models are not good at maintaining facial features like smile, so avoid that.”
When you combine all five elements in a single prompt, you give Gemini everything it needs to produce a truly professional result. Framing sets the composition. Lighting controls the mood and quality. Background keeps the focus on you. Lens settings create the professional photography look. Identity lock keeps your face accurate.
Master these five ai professional photo prompt elements and you will never need to blindly copy prompts again. You become the prompt author.
20 Gemini Prompts for Professional Photos (Organized by Use Case)
Every prompt in this section is built using the five elements from Section 4: framing, lighting, background, lens, and identity lock. Each one includes the #141414 background, the 85mm lens specification, and the face-lock instruction that keeps your actual appearance intact. You can Gemini prompt copy paste any of these directly into your chat alongside your uploaded photo.
I organized these prompts by profession rather than by style or gender because that is how people actually search for them. You know your job. You know the impression you need to make. Find your category and start there.
Every prompt below produces a studio quality headshot when paired with a clear, well lit input photo.
LinkedIn and Job Application Prompts (4 Prompts)
LinkedIn is the most common reason people look for a professional headshot, and the platform rewards photos that feel approachable and confident rather than stiff and corporate. These four prompts cover the most common LinkedIn profile photo scenarios.
Prompt 1: The Approachable Hire-Me Look
Edit this image to create a premium LinkedIn profile photograph with the following specifications:

Core Requirements
Preserve identity: Maintain exact facial structure, features, bone structure, eye shape, nose, mouth, and all distinctive characteristics of the original subject
Resolution: Minimum 2000x2000px, 300 DPI, professional print-quality
Output format: Clean, web-optimized file with natural skin retouching (no over-smoothing or artificial enhancement)
Composition & Framing
Professional headshot framing: chest to top of head
Subject positioned slightly off-center using rule of thirds
Generous headroom (at least 10-15% of frame above head)
Clean vertical orientation with shoulders at natural 15-20° angle for dimensionality
Camera angle: straight-on to slightly below eye level for approachable, confident feel
Expression & Presence
Direct eye contact with camera, eyes engaged and alive
Genuine Duchenne smile (eyes and mouth) - authentic, not forced
Confident, warm, and professionally approachable demeanor
Relaxed jaw and natural facial expression
Subtle catchlights visible in both eyes at 10-11 o'clock position
Wardrobe
Tailored navy or charcoal blazer/suit jacket (well-fitted, structured shoulders)
Crisp, pressed button-down shirt in white, light blue, or subtle pattern
Professional business-casual aesthetic
Ensure collar sits properly and clothing is wrinkle-free
Background
Solid neutral studio background in #141414 (deep charcoal) or similar professional tone
Perfectly uniform, gradient-free backdrop
Complete separation between subject and background through depth
No distracting elements, textures, or patterns
Lighting Setup
Main light: Large softbox or octabox at 45° angle (Rembrandt or loop lighting pattern)
Soft, diffused wraparound illumination with gentle falloff
Fill light: Subtle, prevents harsh shadows while maintaining dimension
Hair/rim light: Optional subtle edge separation from background
Bright and airy overall feel with even, flattering skin tones
No hot spots, harsh shadows, or uneven lighting on face
Technical Camera Settings
Lens: 85mm prime focal length simulation
Aperture: f/1.8-f/2.2 for creamy background separation
Focus: Tack-sharp on eyes (critical focus point)
Depth of field: Shallow with smooth, natural bokeh throughout background
Focus plane: Both eyes sharp, gradual falloff to shoulders/background
Image Quality & Detail
Crystal-clear detail and sharpness on eyes, eyelashes, and iris
Visible fabric texture and weave on blazer and shirt
Natural skin texture with pores, fine lines preserved (authentic, not overly retouched)
Individual hair strands visible with natural texture and movement
No digital noise, compression artifacts, or soft focus areas
Color & Post-Processing
Clean, modern cinematic color grade
Slightly warm color temperature (4500-5200K) for inviting feel
Balanced skin tones (avoid yellow, green, or magenta casts)
Rich blacks without crushing, smooth tonal transitions
Subtle contrast with lifted shadows and controlled highlights
Professional-level skin retouching: blemish removal while maintaining natural texture
Slight vignette to draw eye to subject (very subtle, barely noticeable)
Overall Aesthetic
Polished, corporate-professional yet approachable and human. Editorial quality comparable to Fortune 500 executive portraits. Modern, timeless style that will remain current. Confident without arrogance, professional without stiffness, warm without casualness.

Avoid: Over-processed skin, artificial smoothing, harsh shadows, distracting backgrounds, awkward cropping, unnatural colors, visible retouching, stiff/forced expressions, poor lighting, soft focus, digital artifacts
Prompt 2: The Executive LinkedIn Profile
Edit this image to create a premium executive-level LinkedIn headshot with the following specifications:

Core Requirements
Preserve identity: Maintain exact facial structure, bone architecture, eye shape and color, nose, mouth, jawline, ears, and all distinctive characteristics of the original subject
Resolution: Minimum 3000x3000px, 300 DPI, gallery-quality professional standard
Output format: Pristine, publication-ready file with sophisticated retouching that preserves character and authenticity
Composition & Framing
Executive headshot framing: mid-chest to crown of head
Subject positioned using rule of thirds with eyes in upper third
Generous headroom and breathing room (15-20% negative space above head)
Body at elegant three-quarter angle (30-45° rotation from camera)
Shoulders positioned with front shoulder slightly forward for dimensional depth
Camera height: Precisely at eye level for authoritative, equal-footing perspective
Vertical/portrait orientation optimized for LinkedIn's 400x400px minimum display
Expression & Executive Presence
Direct, unwavering eye contact with camera - commanding yet approachable
Confident, composed expression (not smiling or barely perceptible professional smile)
Authoritative demeanor with subtle warmth - leadership without intimidation
Engaged eyes that convey intelligence, competence, and trustworthiness
Relaxed but purposeful facial muscles - natural executive poise
Chin positioned neutrally (slightly lifted for authority without arrogance)
Sharp, defined catchlights in both eyes at 10 o'clock position
Posture & Body Language
Squared, confident shoulders with excellent upright posture
Neck elongated, head positioned with executive bearing
Front shoulder slightly forward, back shoulder angled away
Natural, relaxed hands (if visible at bottom of frame)
Overall stance communicates leadership, stability, and executive confidence
Wardrobe - Executive Attire
Suit: Premium dark navy business suit (tom ford, armani, or equivalent quality appearance)
Impeccable tailoring with structured shoulders and perfect fit
Shirt: Crisp, pristine white dress shirt with stiff, properly positioned collar
Optional: Sophisticated tie in complementary tone (burgundy, navy, silver) with perfect knot
Fabric should show quality through subtle sheen and texture
Zero wrinkles, lint, or imperfections
Lapels sitting naturally, jacket buttoned appropriately
Overall aesthetic: C-suite executive, board-ready professional
Background
Solid, perfectly uniform studio background in #141414 (deep charcoal/near black)
Alternative acceptable tones: #2A2A2A (medium charcoal) or #1A1A1A (rich black)
Completely seamless and gradient-free
Substantial subject-background separation (minimum 6-8 feet implied distance)
Clean, distraction-free corporate environment aesthetic
No textures, patterns, objects, or environmental elements visible
Professional Lighting Setup
Key light: Large parabolic softbox or beauty dish at 30-45° angle
Classic Rembrandt or loop lighting pattern for executive portraits
Bright, airy quality while maintaining dramatic dimension
Fill light: Gentle fill from opposite side (2:1 or 3:1 ratio) to preserve face modeling
Rim/hair light: Subtle edge light separating subject from background, adding polish
Background light: Optional subtle gradient on backdrop for depth
Perfectly even skin illumination with smooth tonal gradation
No hot spots, uneven patches, or harsh shadow transitions
Bright and luminous overall atmosphere conveying optimism and forward-thinking leadership
Technical Camera Specifications
Lens: 85mm prime focal length simulation (executive portrait standard)
Aperture: f/1.8-f/2.0 for elegant background separation
Focus point: Precision focus on nearest eye (critical sharpness requirement)
Depth of field: Shallow with both eyes in sharp focus plane, gradual falloff to ears/shoulders
Bokeh character: Creamy, smooth, circular out-of-focus areas - elegant and sophisticated
Perspective: Natural, flattering compression with no distortion
Shot simulation equivalent to medium format sensor for exceptional detail and tonal range
Image Quality & Detail Excellence
Eyes: Razor-sharp focus with visible iris detail, individual eyelashes, natural eye color depth
Skin: Preserved natural texture showing character - pores, fine lines, authentic skin quality
Fabric: Visible weave pattern and texture of suit material, crisp shirt cotton texture
Hair: Individual strands visible with natural texture, volume, and realistic light interaction
Sharpness: Exceptional clarity throughout focus plane without artificial oversharpening
Noise: Completely clean file, zero digital noise or grain
Dynamic range: Rich tonal gradation from deep shadows to bright highlights without clipping
Color Grading & Post-Processing
Color science: Clean, modern cinematic grade with executive sophistication
Temperature: Slightly warm (4800-5400K) for approachable professionalism
Skin tones: Perfectly balanced, natural, healthy appearance (no color casts)
Contrast: Refined and elevated - rich blacks, controlled whites, smooth midtone transitions
Saturation: Subtle desaturation for timeless, prestigious aesthetic
Tonal curve: Gentle S-curve for dimension and contemporary feel
Retouching standard: Executive-level skin work
Remove temporary blemishes and distractions
Preserve natural skin texture, pores, and character lines
Subtle under-eye refinement while maintaining authenticity
Even skin tone without artificial smoothing or "plastic" appearance
Vignette: Very subtle darkening at frame edges (barely perceptible)
Sharpening: Strategic sharpening on eyes, facial features; appropriate for web and print
Color Palette
Suit: Deep navy #1B2845 to #0A1628
Shirt: Pure white #FFFFFF to soft white #FAFAFA
Background: #141414 or coordinating neutral
Skin tones: Natural, healthy, perfectly color-balanced
Overall harmony: Sophisticated, prestigious, timeless corporate palette
Overall Aesthetic & Mood
Executive Presence: Fortune 500 CEO, board director, senior leadership caliber. Conveys authority, competence, trustworthiness, and strategic vision. Modern yet timeless - will remain current for 3-5 years. Commands respect while remaining approachable. Photography quality equivalent to:

Annual report executive portraits
Wall Street Journal / Forbes profile imagery
Premium corporate communications materials
High-end executive branding photography
Emotional tone: Confident without arrogance, authoritative without coldness, professional without stiffness, polished without artificiality. Projects leadership, reliability, expertise, and executive gravitas.

Strictly Avoid
❌ Overly retouched "plastic" skin
❌ Artificial smoothing or blur filters
❌ Harsh or unflattering shadows
❌ Distracting background elements
❌ Cropped head or awkward framing
❌ Unnatural or oversaturated colors
❌ Visible retouching artifacts
❌ Stiff, uncomfortable, or forced expressions
❌ Poor posture or closed body language
❌ Soft focus or technical imperfections
❌ Overly casual appearance
❌ Dated or trendy styling that will age poorly
❌ Green, yellow, or magenta color casts

Technical benchmark: Match the quality standard of executive portraits by photographers like Peter Hurley, Martin Schoeller (corporate work), or Platon (business editorial) - polished, sophisticated, timeless professional imagery
Prompt 3: The Industry Expert and Media-Ready Profile
Edit this image to create a premium media-ready professional profile photograph with the following specifications:

Core Requirements
Preserve identity: Maintain exact facial structure, bone architecture, eye shape and color, nose proportions, mouth shape, distinctive features, and all identifying characteristics of the original subject
Resolution: Minimum 2500x2500px, 300 DPI, broadcast and publication-quality standard
Output format: Media-ready file optimized for digital platforms, press kits, conference materials, and broadcast graphics
Versatility: Image must work across TV graphics, podcast artwork, website bios, conference programs, and social media platforms
Composition & Framing
Professional media headshot framing: mid-chest to crown with natural breathing room
Subject positioned using rule of thirds with eyes in upper-middle third
Generous headroom above head (15-20% negative space) - never cropped at top
Body at subtle angle (15-25° rotation) for dimensional interest while maintaining approachability
Shoulders relaxed and naturally positioned, front shoulder slightly forward
Camera height: Eye level to slightly below for relatable, accessible perspective
Vertical/portrait orientation with 4:5 or 1:1 aspect ratio compatibility
Framing allows comfortable crop flexibility for various platform requirements
Expression & Media Presence
Direct, steady eye contact with camera - engaged and present
Knowledgeable, articulate expression - the look of someone who has something important to say
Confident but approachable demeanor - expert without elitism
Subtle, genuine smile or composed, thoughtful expression (not stern, not overly casual)
Eyes that convey intelligence, credibility, experience, and trustworthiness
Face showing active engagement - slight animation suggesting mid-conversation energy
Relaxed but purposeful facial muscles - natural expert poise
Expression that translates well to thumbnail sizes and various contexts
Sharp, defined catchlights in both eyes at 10-11 o'clock position for broadcast polish
Posture & Body Language
Open, confident posture with squared shoulders
Upright positioning with natural, comfortable bearing
Neck elongated with head at natural, engaged angle
Body language that communicates: "I'm here to share expertise"
Approachable energy - someone you'd want to hear speak or be interviewed
Subtle forward lean (implied) suggesting engagement and connection
Overall stance: authority meets accessibility
Wardrobe - Smart Business Casual
Blazer/Jacket: Polished, well-fitted blazer in:
Navy, charcoal, warm gray, or sophisticated neutral
Structured but not overly formal
Clean lines, modern cut, excellent fit through shoulders
Could be traditional suit jacket or contemporary sports coat
Shirt: Clean, pressed open-collar shirt (no tie)
White, light blue, soft gray, or subtle pattern
Collar sits naturally without tie
Top button unbuttoned for approachable professionalism
Could be dress shirt or high-quality button-down
Overall aesthetic: NPR contributor, TED speaker, industry thought leader, subject matter expert
Zero wrinkles, lint, or wardrobe malfunctions
Colors that work well on camera and across various backgrounds
Professional polish without corporate stiffness
Background
Solid, perfectly uniform studio background in #141414 (deep charcoal)
Alternative professional tones: #1A1A1A to #2A2A2A (rich blacks to medium charcoals)
Completely seamless, no texture, gradient, or variation
Clean subject-background separation (6-10 feet implied distance)
Neutral backdrop that won't distract in any media context
Background suitable for easy graphic overlays (logos, chyrons, text)
No environmental elements, objects, or contextual details
Professional Lighting Setup - Broadcast Quality
Key light: Large octabox or scrim at 30-45° angle for flattering dimensionality
Loop lighting or modified Rembrandt pattern (soft shadow under nose)
Bright, clean, even illumination - broadcast standard lighting
Fill light: Generous fill ratio (2:1 or less) for minimal shadow, open look
Face evenly illuminated without harsh contrast or dramatic shadows
Hair/rim light: Subtle separation light defining subject from background
Eye light: Lower reflector or fill ensuring beautiful catchlights in both eyes
Overall: Soft, diffused, wraparound lighting quality
Bright and airy feel while maintaining professional polish
Color temperature: Daylight balanced (5500K) for neutral, clean look
No hot spots, uneven patches, or unflattering shadows
Even skin tone illumination suitable for various skin tones
Technical Camera Specifications
Lens: 85mm prime focal length simulation (portrait standard)
Aperture: f/1.8-f/2.2 for subject isolation while maintaining facial sharpness
Focus point: Tack-sharp precision focus on nearest eye (critical)
Depth of field: Shallow with entire face in acceptable sharpness, gradual falloff to shoulders/background
Bokeh quality: Smooth, creamy, circular out-of-focus rendering
Perspective: Natural compression, flattering proportions, zero distortion
Image quality: Professional sensor simulation with excellent dynamic range and color depth
Image Quality & Technical Excellence
Eyes: Critically sharp with visible iris detail, texture, natural highlights, individual lashes
Skin: Natural, authentic texture preservation:
Visible pores and skin texture (real, not smoothed)
Character lines and natural features maintained
Healthy, realistic skin quality
Fabric: Clear texture detail on blazer weave, shirt cotton, visible material quality
Hair: Individual strands visible, natural texture, realistic light interaction
Overall sharpness: Exceptional clarity in focus plane without artificial oversharpening
File cleanliness: Zero noise, grain, compression artifacts, or digital aberrations
Dynamic range: Smooth tonal transitions, rich shadows, controlled highlights
Color accuracy: True-to-life color rendering across all elements
Color Grading & Post-Processing
Color approach: Clean, modern, broadcast-professional color science
Temperature: Neutral to slightly warm (5200-5600K) for natural, inviting feel
Skin tones: Perfectly balanced, healthy, accurate (critical for media use)
No yellow, green, orange, or magenta casts
Natural, flattering rendering across various skin tones
Contrast: Polished and refined - not flat, not overly contrasty
Lifted shadows for open, broadcast-friendly look
Controlled highlights preventing any clipping
Smooth midtone transitions
Saturation: Natural, slightly refined - colors present but not oversaturated
Tonal curve: Gentle adjustment for dimension and contemporary polish
Professional retouching standards:
Remove temporary blemishes, distractions, hot spots
Preserve authentic skin texture and character
Subtle under-eye refinement maintaining natural appearance
Even skin tone without artificial smoothing
Frequency separation technique for professional polish
Final result: polished but authentic
Vignette: Extremely subtle edge darkening (barely detectable)
Sharpening: Strategic on eyes and key facial features; web and print optimized
White balance: Perfectly neutral for maximum versatility across platforms
Color Palette Harmony
Blazer: Navy #1B3A5F, Charcoal #3A3A3A, Warm Gray #4A4A48
Shirt: White #FFFFFF, Light Blue #D5E5F2, Soft Gray #E8E8E8
Background: #141414 (primary) or harmonious neutral
Skin tones: Natural, accurate, healthy across all ethnicities
Overall palette: Professional, clean, broadcast-safe, cross-platform compatible
Overall Aesthetic & Mood
Media Professional / Thought Leader: Quality standard for conference speakers, podcast guests, expert commentators, authors, consultants, and industry leaders. Someone you'd see interviewed on quality news programs, featured on reputable podcasts, speaking at industry conferences, or quoted in publications.

Visual references:

NPR/PBS contributor headshots
TED speaker profiles
LinkedIn Learning instructor portraits
Conference keynote speaker photos
Book jacket author photos
Corporate thought leadership imagery
Bloomberg/CNBC expert contributor graphics
Emotional tone: Credible expertise with human warmth. Intelligent and authoritative without being intimidating. Professional polish without corporate stiffness. Approachable thought leader. Someone viewers/readers would trust and want to learn from.

Versatility requirements: Image must work effectively:

In conference programs and promotional materials
As podcast cover art and episode graphics
In press kits and media releases
On professional websites and bios
Across all social media platforms
In TV broadcast graphics and chyrons
In thumbnail sizes and full-size applications
With text overlays and graphic treatments
Platform Optimization
Colors and contrast work on light and dark backgrounds
Details visible even at small thumbnail sizes (200x200px)
Face positioning allows for various crops and aspect ratios
Suitable for square (1:1), portrait (4:5), and standard (3:4) crops
Background allows easy graphic integration and text overlay
Professional quality maintained across digital and print applications
Strictly Avoid
❌ Overly retouched, artificial-looking skin
❌ Heavy makeup appearance or obvious smoothing filters
❌ Harsh, unflattering lighting or shadows
❌ Distracting background elements or patterns
❌ Tight cropping or cut-off head
❌ Unnatural, oversaturated, or shifted colors
❌ Visible retouching artifacts or halos
❌ Overly stiff, uncomfortable, or forced expressions
❌ Too casual or too corporate - find the middle ground
❌ Soft focus or technical imperfections
❌ Dated styling or trendy looks that age quickly
❌ Color casts (especially green, yellow, magenta)
❌ Expressions that look unprofessional at thumbnail size
❌ Extreme depth of field (ears/nose out of focus)
❌ Distracting catchlights or lighting reflections

Quality Benchmarks
Match the professional standard of media-ready portraits by:

Major podcast networks (NPR, Wondery, Gimlet)
Conference photography (TED, SXSW, industry events)
Corporate thought leadership campaigns
Professional speaker bureaus
High-quality author photos
Broadcast contributor headshots
Final result: A polished, versatile, media-ready portrait that communicates expertise and authority while remaining warm and accessible. Professional enough for any context, approachable enough to build trust and connection. Timeless quality that will remain current for 3-5 years across evolving platform requirements
Prompt 4: The Approachable Small Business Owner
Edit this image to create a premium, approachable LinkedIn business profile photograph with the following specifications:

Core Requirements
Preserve identity: Maintain exact facial structure, bone architecture, eye shape and color, nose proportions, mouth characteristics, distinctive features, and all identifying elements of the original subject
Resolution: Minimum 2400x2400px, 300 DPI, professional web and print quality
Output format: LinkedIn-optimized file with natural, authentic retouching that preserves genuine character and warmth
Primary goal: Project trustworthiness, reliability, and genuine human connection over corporate formality
Composition & Framing
Professional business headshot framing: mid-chest to crown with comfortable space above
Subject positioned using rule of thirds with eyes in natural upper-middle placement
Relaxed, natural headroom (12-18% breathing space above head) - organic, not calculated
Body at comfortable, natural angle (10-20° rotation) suggesting ease and openness
Shoulders relaxed and naturally positioned - no tension or stiffness
Camera height: Eye level for equal, relatable connection perspective
Vertical/portrait orientation optimized for LinkedIn's profile display (400x400px minimum)
Framing feels natural and uncontrived - documentary quality with professional polish
Composition allows subject to feel present and engaged, not posed
Expression & Approachable Presence
Direct, genuine eye contact with camera - warm and engaged
Open, authentic smile that reaches the eyes (Duchenne smile) - real, not manufactured
Expression conveys: "I'm someone you can trust and work with"
Warm, inviting energy - the colleague or partner people want to collaborate with
Eyes showing kindness, intelligence, and genuine interest in connection
Face reflecting relaxed confidence - comfortable in their own skin
Subtle animation suggesting natural conversation energy
Expression that feels like catching someone in a genuine, happy moment
Approachable warmth without sacrificing professional credibility
Clear, defined catchlights in both eyes at 10-11 o'clock position adding life and warmth
Posture & Body Language
Open, relaxed posture with natural shoulder positioning
Comfortable, upright bearing without rigidity
Body language communicating: "I'm easy to work with and reliable"
Slight forward presence suggesting engagement and genuine interest
No defensive or closed positioning - open chest, relaxed arms
Natural head tilt (very subtle) can add warmth and approachability
Overall stance: professional competence with human warmth
Energy of someone who builds relationships, not just transactions
Wardrobe - Smart Casual Business
Blazer/Jacket: Well-fitted, quality blazer in approachable tones:

Navy, warm charcoal, soft gray, camel, or earth tones
Structured but not stiff - professional but relaxed
Modern, contemporary cut with clean lines
Could be traditional blazer, sports coat, or unstructured jacket
Fabric with subtle texture (not overly corporate or shiny)
Shirt options (NO TIE - this is critical):

Option 1: Clean crew-neck t-shirt or fine-knit sweater (modern professional)
Solid colors: white, light gray, soft blue, warm neutrals
High-quality fabric with good drape
Option 2: Simple, clean collared shirt (open collar, relaxed)
Oxford cloth, chambray, or quality cotton
Colors: white, light blue, soft patterns
Top 1-2 buttons casually unbuttoned
Collar sits naturally without tie
Overall aesthetic:

Tech professional, creative industry leader, modern business consultant
Someone you'd meet for coffee to discuss a project
Professional competence without corporate stuffiness
Approachable expert, collaborative partner, trusted advisor
Quality standards:

Zero wrinkles, pilling, or fabric imperfections
Clean, well-maintained appearance
Colors that feel warm and inviting on camera
Fit that looks natural, not overly tailored
Background
Solid, perfectly uniform studio background in #141414 (deep charcoal)
Alternative warm-compatible tones: #1A1A1A to #252525 (rich blacks to soft charcoals)
Can consider slightly warmer charcoal (#1C1816) for enhanced warmth
Completely seamless with no texture, patterns, or distractions
Subject-background separation (6-8 feet implied) for natural depth
Neutral backdrop that enhances subject without competing
Background darkness allows face and expression to be the focal point
Creates professional context without environmental distractions
Professional Lighting Setup - Warm & Natural
Lighting philosophy: Soft, diffused, natural-style illumination suggesting window light or golden hour warmth
Key light: Large soft source (octabox or scrim) at 30-45° angle
Loop or butterfly lighting pattern for friendly, open look
Wrapped, gentle light quality - nothing harsh or dramatic
Slightly warmer color temperature (4800-5600K) for inviting feel
Fill light: Generous fill creating minimal shadow contrast (1.5:1 to 2:1 ratio)
Open, friendly lighting with soft shadows
Face evenly illuminated with gentle modeling
Rim/hair light: Subtle separation from background - soft edge definition
Eye light: Lower reflector or fill ensuring warm, inviting catchlights
Overall effect:
Warm, inviting, naturally lit appearance
Professional crispness with human warmth
Suggests natural daylight rather than studio artifice
Skin tones rendered warm, healthy, and inviting
No harsh shadows, hot spots, or unflattering contrast
Lighting that makes the subject look their best, naturally
Technical Camera Specifications
Lens: 85mm prime focal length simulation (natural portrait perspective)
Aperture: f/1.8-f/2.2 for gentle subject-background separation
Focus point: Precise, critical focus on nearest eye
Depth of field: Shallow with face comfortably sharp, gentle falloff to shoulders
Both eyes in sharp focus plane
Gradual, natural blur to background
Face features (nose, ears) in acceptable sharpness
Bokeh quality: Smooth, gentle, organic out-of-focus rendering
Perspective: Natural, flattering compression - no distortion
Overall feel: Professional camera work that doesn't call attention to itself
Image Quality & Authentic Detail
Eyes: Sharp, clear focus with visible iris detail, natural eye color, life and warmth

Individual eyelashes visible
Natural highlights and catchlights
Eyes conveying genuine warmth
Skin: Natural, authentic texture - real person, not retouched avatar:

Visible pores and natural skin texture
Character lines, smile lines preserved (these add warmth)
Healthy, realistic skin quality showing authenticity
Natural variations in tone and texture
Fabric: Clear detail on clothing texture, material quality visible

Hair: Individual strands, natural texture, realistic light interaction

Sharpness: Excellent clarity where needed without artificial edge enhancement

Cleanliness: No digital noise, artifacts, or compression issues

Dynamic range: Smooth tonal gradations, gentle contrast, no clipping

Color Grading & Post-Processing - Warm & Natural
Color philosophy: Warm, inviting, naturally graded with human connection

Temperature: Warm color balance (4500-5400K)

Slight warmth in highlights and skin tones
Inviting, friendly feel without orange cast
Natural warmth suggesting sunlight or golden hour
Skin tones:

Warm, healthy, naturally vibrant
Accurate color with enhanced warmth
No yellow, green, orange, or magenta casts
Skin looks healthy, vital, and natural
Contrast: Gentle, open contrast

Lifted shadows for friendly, open feel
Controlled highlights maintaining detail
Smooth, gradual tonal transitions
Not flat, but not dramatically contrasty
Saturation: Natural, slightly enhanced for vibrancy

Colors feel alive but not oversaturated
Skin tones slightly enriched
Overall palette feels warm and inviting
Tonal curve:

Gentle adjustments favoring warm midtones
Slightly lifted blacks for open, friendly feel
Warm highlights without blown-out areas
Professional retouching - Light touch:

Remove temporary blemishes (pimples, scratches, hot spots)
Preserve character lines, smile lines, natural features
Minimal under-eye work - keep it natural
Even skin tone subtly without artificial smoothing
Maintain authentic texture - this is critical for trust
Brighten eyes naturally without looking manipulated
Clean up stray hairs without over-styling
Goal: "Best version of yourself" not "different person"
Additional refinements:

Very subtle vignette drawing eye to face (barely noticeable)
Slight overall warmth in color grade
Strategic sharpening on eyes and key features
Optimized for web display and LinkedIn platform
Color Palette - Warm & Inviting
Blazer options:

Navy #2B4162 (warm navy)
Charcoal #3E3E3E (soft charcoal)
Warm Gray #4A4641 (earth-tone gray)
Camel/Tan #9B826F (approachable earth tone)
Shirt/sweater options:

Soft White #F8F8F6 (warm white)
Light Blue #D4E4ED (friendly blue)
Warm Gray #E0DDDA (neutral earth)
Cream #EDE8DF (warm neutral)
Background: #141414 or warm-toned dark neutral

Skin tones: Warm, healthy, naturally vibrant

Overall harmony: Warm, inviting, natural palette suggesting approachability and trust

Overall Aesthetic & Mood
Trustworthy Professional / Collaborative Partner: The person people want to work with. Someone who combines professional competence with genuine human warmth. Not the corner office executive, but the talented professional you'd trust with your project, the consultant you'd hire, the colleague you'd grab coffee with to brainstorm ideas.

Visual references:

Modern tech company team pages
Consultant and coach profile photos
Creative agency team portraits
Modern professional services headshots
Contemporary business casual LinkedIn profiles
Startup founder profiles
Freelancer and solopreneur branding
Emotional tone:

Trustworthy without being stuffy
Professional without being distant
Competent without being intimidating
Warm without being overly casual
Reliable, genuine, collaborative, human
"I'm good at what I do AND I'm great to work with"
Key differentiators from corporate/executive portraits:

Warmer, more genuine smile
Less formal attire
Warmer color grading
More natural, less dramatic lighting
Emphasis on approachability over authority
Human connection over corporate polish
LinkedIn Platform Optimization
Face clearly visible at 400x400px thumbnail size
Expression readable even at small sizes
Warm, inviting energy translates to profile page
Colors work well on LinkedIn's light and dark themes
Framing allows for various crops and aspect ratios
Professional quality that stands out in search results and connection requests
Image that makes people want to click "Connect" and start a conversation
Use Case Scenarios
This image should work perfectly for:

LinkedIn profile photo (primary use)
Professional website bio page
Email signature
Digital business cards
Zoom/Teams profile pictures
Conference name tags
Professional social media (Twitter, Instagram business accounts)
Consulting or freelance marketing materials
Team pages and "About Us" sections
Speaker bios for webinars or panels
Strictly Avoid
❌ Corporate stiffness or formal intimidation
❌ Overly retouched, plastic-looking skin
❌ Heavy smoothing or artificial beauty filters
❌ Cold, harsh, or dramatic lighting
❌ Stiff, uncomfortable, or forced smiles
❌ Overly formal corporate attire (ties, power suits)
❌ Cool, sterile, or lifeless color grading
❌ Distracting backgrounds or busy patterns
❌ Tight cropping cutting off head
❌ Unnatural or oversaturated colors
❌ Visible retouching halos or artifacts
❌ Expressions that look serious, stern, or unapproachable
❌ Poor posture or closed body language
❌ Green, yellow, or magenta color casts
❌ Soft focus or technical imperfections
❌ Overly trendy styling that will date quickly
❌ Flash photography look or harsh studio lighting feel
❌ Dead eyes or lack of genuine warmth

Quality Benchmark
Match the professional standard of modern business portraits that balance polish with authenticity:

High-quality LinkedIn profiles that get engagement
Modern consulting firm team photos
Tech industry professional headshots
Contemporary business coaching materials
Successful freelancer branding photography
Approachable expert profiles
Final result: A polished, professional LinkedIn profile photo that immediately communicates "I'm competent, reliable, and genuinely nice to work with." The kind of photo that makes people want to connect, collaborate, and build a professional relationship. Warm enough to feel human and trustworthy, professional enough to command respect and credibility. A perfect balance of approachability and competence that will serve well for 3-5 years across evolving professional contexts.

The ultimate test: When someone views this profile, they should think: "This person looks like someone I'd trust with my business/project" AND "This person seems like someone I'd actually enjoy working with
Corporate, Legal, and Finance Prompts (4 Prompts)
These prompts use formal attire and authoritative mood language suited for law firms, financial institutions, banking, and C-suite corporate environments. The corporate headshot AI results from these prompts are intentionally conservative and timeless rather than trendy.
Prompt 5: The C-Suite Corporate Executive
Edit this image to create a premium C-suite corporate executive portrait with the following specifications:

Core Requirements
Preserve identity: Maintain exact facial structure, bone architecture, eye shape and color, nose proportions, mouth characteristics, jawline definition, ears, and all distinctive identifying features of the original subject
Resolution: Minimum 3000x3000px, 300 DPI, museum-quality archival standard
Output format: Publication-ready file for annual reports, boardroom display, corporate communications, and premium executive materials
Primary objective: Project commanding leadership presence, corporate authority, and refined executive gravitas
Composition & Framing
Executive portrait framing: mid-to-upper-chest through crown with substantial headroom
Subject precisely positioned using rule of thirds with eyes in upper third
Generous, clean headroom and negative space above head (18-25% of frame)
Body positioning: Square to camera, frontal orientation (0-5° rotation maximum)
Shoulders parallel to camera plane
Symmetrical, commanding frontal presence
No casual angles - formal, authoritative stance
Camera height: Precisely at eye level or 2-3 inches below for subtle authority projection
Vertical/portrait orientation with classical executive portrait proportions
Composition conveys stability, strength, and executive command
Framing suitable for large-format printing (boardroom walls, annual reports, lobby displays)
Expression & Executive Authority
Direct, unwavering eye contact with camera - penetrating and commanding
Composed, authoritative expression - serious executive demeanor
No smile or minimal closed-lip professional expression (subtle if present)
Expression projecting: confidence, control, strategic vision, and decisive leadership
Eyes conveying intelligence, competence, authority, and executive gravitas
Facial muscles relaxed but purposeful - natural command presence
Slight intensity in gaze without aggression - calm, controlled power
Jaw positioned with subtle strength - confident without tension
Expression remains approachable enough to inspire trust while maintaining clear authority
Sharp, precisely positioned catchlights in both eyes at 10 o'clock position
Posture & Executive Bearing
Impeccable upright posture - spine straight, shoulders back
Squared, symmetrical shoulder positioning - formal and commanding
Chest forward, core engaged - executive presence from the ground up
Neck elongated with head held high - natural authority
Chin level, neither raised nor lowered - confident neutral position
Body language communicating: absolute competence, leadership, and control
No casual lean or relaxed angles - formal executive bearing
Overall stance: boardroom-ready, C-suite executive, corporate leadership presence
Energy of someone who makes major decisions and commands rooms
Wardrobe - Premium Executive Formal
Suit: Premium charcoal or black business suit

Colors: Charcoal #2C2C2C to #3A3A3A, or True Black #0A0A0A to #1A1A1A
Luxury fabric: fine wool, Super 120s-180s wool, subtle micro-pattern acceptable
Impeccable tailoring: Brioni, Tom Ford, Kiton, Armani quality aesthetic
Structured shoulders with perfect fit
Clean, sharp lapels (notch or peak) sitting naturally
Jacket properly buttoned (top button for two-button, middle for three-button)
Visible subtle sheen indicating quality fabric
Zero wrinkles, pulls, or imperfections
Shirt: Crisp, pristine white dress shirt

Pure white #FFFFFF or soft white #FAFAFA
Premium cotton: Egyptian cotton, Sea Island cotton appearance
Stiff, properly positioned collar in perfect condition
Collar points sharp and even
Visible quality through fabric texture
Absolutely wrinkle-free, immaculate presentation
Tie: Conservative silk tie - executive appropriate

Colors: Deep burgundy #6B1C23, Navy #1A2F4D, Charcoal #3C3C3C, or Silver-gray #7A7A7A
Premium silk with subtle texture or micro-pattern
Conservative pattern: solid, regimental stripe, or subtle geometric
Perfect tie knot: Full Windsor or Half Windsor, symmetrical and dimpled
Appropriate length (tip touching top of belt buckle)
Tie bar optional (simple, elegant if included)
Pocket square (optional): White linen, conservative fold

Overall aesthetic:

Fortune 100 CEO, Board Chairman, Senior Partner, Managing Director
Corporate power dressing - traditional with contemporary refinement
Impeccable grooming and presentation
Every detail considered and perfect
Background
Solid, perfectly uniform studio background in #141414 (deep charcoal)
Alternative premium tones: #0F0F0F (near black) to #1F1F1F (rich charcoal)
Cool-neutral or slightly cool-toned background (no warm undertones)
Absolutely seamless, no texture, gradient, or variation
Substantial subject-background separation (8-12 feet implied distance)
Clean, sophisticated backdrop suggesting corporate environment
Background suitable for high-end reproduction and large-format printing
Darkness adds drama and focuses complete attention on subject
Professional Lighting Setup - Dramatic Executive
Lighting philosophy: Dramatic yet professional studio lighting with controlled shadows conveying gravitas and executive presence

Key light: Large parabolic softbox or beauty dish at 35-50° angle

Modified Rembrandt or dramatic loop lighting pattern
Creates dimension, depth, and executive gravitas through controlled shadow
Soft yet defined - not flat, not harsh
Slightly elevated for subtle authority projection
Fill light: Moderate fill maintaining shadow depth (3:1 to 4:1 ratio)

Preserves facial modeling and dimension
Shadows present but controlled - adds gravitas without being unflattering
Face shows depth and executive presence through light and shadow
Rim/hair light: Defined separation light creating strong subject-background separation

Edge lighting on shoulders and hair
Adds polish, dimension, and premium quality
Can be slightly stronger for dramatic effect
Background light (optional): Subtle gradient on backdrop for additional depth

Overall lighting effect:

Dramatic yet professional and polished
Soft studio lighting with controlled, purposeful shadows
Conveys gravitas, command, and executive authority
More dimensional than flat corporate lighting
Face well-illuminated with sophisticated shadow work
Cool-neutral color temperature (5200-5800K)
Professional polish with dramatic sophistication
No harsh shadows, but shadows are present and purposeful
Technical Camera Specifications
Lens: 85mm prime focal length simulation (executive portrait standard)
Aperture: f/1.8-f/2.0 for sophisticated background separation and subject isolation
Focus point: Absolute precision focus on nearest eye (critical sharpness)
Depth of field: Shallow with optimal facial sharpness
Both eyes in razor-sharp focus plane
Face (nose to ears) in acceptable sharpness range
Gradual, elegant falloff to shoulders and background
Bokeh character: Sophisticated, smooth, circular out-of-focus rendering - refined and elegant
Perspective: Natural compression with executive-flattering proportions, zero distortion
Image capture simulation: Medium format digital sensor quality
Exceptional dynamic range
Superior tonal gradation
Premium color depth and rendition
Image Quality & Technical Excellence
Eyes: Critically sharp, exceptional detail

Visible iris texture, natural color depth and variation
Individual eyelashes clearly defined
Natural eye highlights and catchlights
Depth and dimension in eye rendering
Skin: Natural, authentic executive skin texture

Preserved pores and natural skin texture (not smoothed away)
Character appropriate for executive age and experience
Professional retouching that maintains authenticity
Natural variations and realistic skin quality
Refined but never artificial
Suit fabric: Exquisite detail and texture

Visible weave pattern of premium wool
Subtle fabric sheen indicating quality
Sharp detail on lapels, collar, and shoulders
Fabric drape and structure clearly rendered
Shirt: Crisp cotton texture visible, pristine appearance

Tie: Sharp detail on silk texture, pattern, and tie knot

Tie dimple clearly defined
Fabric quality and sheen visible
Hair: Individual strands, natural texture, professional grooming visible

Overall sharpness: Exceptional clarity throughout focus plane

No artificial oversharpening or halos
Natural, optical sharpness quality
File quality:

Zero digital noise or grain
No compression artifacts or aberrations
Clean, pristine digital file
Dynamic range:

Rich, deep shadows with detail preservation
Controlled highlights without clipping
Smooth tonal gradations throughout
Premium tonal depth and dimensionality
Color Grading & Post-Processing - Cool Neutral Executive
Color philosophy: Clean, sophisticated, cool-neutral color science with polished contemporary finish

Temperature: Cool-neutral color balance (5400-6000K)

Slight coolness in overall tone
Professional, refined, corporate aesthetic
No warmth - maintain cool sophistication
Clean, modern color rendering
Skin tones:

Cool-neutral and perfectly balanced
Natural, healthy, executive-appropriate
No yellow, orange, green, or magenta casts
Refined and polished while remaining natural
Professional executive skin tone rendering
Contrast: Refined, polished, dimensional

Rich blacks without crushing (#000000 to #0A0A0A in deepest areas)
Controlled whites maintaining detail
Strong but smooth tonal separation
Dimensional depth through shadow and highlight control
Contemporary contrast curve - not flat, not overdone
Saturation: Refined, slightly desaturated for timeless sophistication

Colors present but muted and elegant
Skin tones naturally rendered with subtle refinement
Suit color rich but not oversaturated
Tie color present but conservative
Overall palette: sophisticated, executive, timeless
Tonal curve:

Gentle S-curve for dimension and polish
Lifted blacks slightly for modern look (faded black aesthetic)
Controlled highlights for premium feel
Cool-toned shadows
Neutral-to-cool highlights
Professional retouching - Executive standard:

Remove temporary blemishes and distractions
Preserve natural skin texture and executive character
Age-appropriate retouching (maintain distinguished features)
Subtle under-eye refinement without over-softening
Even skin tone professionally while maintaining texture
Frequency separation for polished, natural results
Enhance eyes subtly - clarity without manipulation
Sharpen suit and tie details for premium appearance
Clean up any wardrobe imperfections (lint, wrinkles, threads)
Goal: Distinguished, polished executive - not artificial or overdone
Additional refinements:

Subtle vignette drawing focus to face (controlled, professional)
Possible slight background darkening for additional drama
Strategic sharpening on eyes, suit details, and key features
Optimized for both digital display and large-format printing
Color grading that reproduces accurately across media
Color Palette - Cool Neutral Executive
Suit:

Charcoal: #2C2C2C to #3A3A3A
Black: #0A0A0A to #1A1A1A
Cool-toned, no warmth
Shirt:

Pure White: #FFFFFF
Soft White: #FAFAFA to #F5F5F5
Tie options:

Burgundy: #6B1C23 to #8B2635
Navy: #1A2F4D to #2B4162
Charcoal: #3C3C3C to #4A4A4A
Silver-gray: #7A7A7A to #8C8C8C
Background: #141414 (primary) or cool-toned dark neutral

Skin tones: Natural, cool-neutral, executive-appropriate

Overall palette: Cool, sophisticated, timeless, corporate, authoritative

Overall Aesthetic & Mood
C-Suite Executive / Corporate Leadership: Fortune 500 CEO, Board Chairman, Senior Managing Partner, Global Executive. Someone who commands boardrooms, makes billion-dollar decisions, leads thousands, and represents corporate excellence at the highest level.

Visual references:

Annual report executive portraits (Fortune 100 companies)
Boardroom official portraits
Wall Street Journal/Financial Times executive features
Harvard Business Review leadership profiles
Corporate website C-suite leadership pages
Bloomberg Businessweek cover portraits
Premium executive search firm materials
Law firm senior partner portraits
Investment bank managing director photos
Emotional tone:

Commanding authority without aggression
Confident competence and strategic vision
Leadership gravitas and executive presence
Trustworthy and reliable at the highest level
Sophisticated, refined, distinguished
Corporate power with professional polish
Respect-commanding but not unapproachable
Traditional excellence with contemporary refinement
Key characteristics:

Authority over approachability (but maintains professionalism)
Gravitas over warmth (but not cold)
Command over collaboration (but inspires confidence)
Traditional over trendy (timeless executive aesthetic)
Formal over casual (corporate leadership standard)
Cool over warm (sophisticated color palette)
Dramatic over flat (dimensional lighting)
Polished over authentic (while maintaining realism)
Corporate Use Cases
This portrait must work effectively for:

Annual reports and shareholder communications
Boardroom and executive office display (large format prints)
Corporate website C-suite leadership pages
Press releases and media kits
LinkedIn executive profiles
Conference and speaking engagement materials
Book jacket author photos (business leadership books)
Industry award nominations and recognition
Executive search and recruitment materials
Corporate legacy and historical archives
Premium business publications and features
Technical Display Requirements
Exceptional quality at large format sizes (24x36" and larger)
Perfect reproduction in print (CMYK) and digital (RGB)
Works on light and dark backgrounds
Maintains quality across various aspect ratio crops
Face clearly visible at small thumbnail sizes
Professional appearance across all corporate contexts
Suitable for high-end reproduction and archival purposes
Color accuracy and consistency across media
Strictly Avoid
❌ Casual or relaxed expressions (warm smiles, friendly demeanor)
❌ Overly retouched, artificial plastic-looking skin
❌ Casual or business-casual attire
❌ Warm color grading or warm lighting
❌ Flat, dimensionless lighting
❌ Angled or three-quarter body positioning
❌ Distracting backgrounds or environmental elements
❌ Tight cropping cutting off top of head
❌ Oversaturated or unnatural colors
❌ Visible retouching artifacts or halos
❌ Poor posture or slouching
❌ Wrinkled, ill-fitting, or low-quality clothing
❌ Messy grooming or unkempt appearance
❌ Soft focus or technical imperfections
❌ Trendy styling that will date quickly
❌ Green, yellow, magenta, or warm color casts
❌ Overly dramatic noir lighting (maintain professionalism)
❌ Expressions that appear unfriendly or hostile
❌ No tie or open collar (maintain formality)

Quality Benchmarks
Match the professional standard of premium executive portraits:

Photographers: Peter Hurley (corporate executive work), Platon (business portraits), Martin Schoeller (corporate commissions), Nadav Kander (business editorial)
Publications: Harvard Business Review, Fortune, Forbes, Wall Street Journal executive features
Corporate: Fortune 100 annual reports, major law firm partner portraits, investment bank leadership photos
Standard: Museum-quality archival prints, boardroom-worthy presentation, publication-grade excellence
Final result: A commanding, sophisticated corporate executive portrait that projects authority, competence, and refined leadership presence. Timeless quality that will serve for 5-10 years in corporate communications, large enough and sharp enough for boardroom display, polished enough for premium publications, and authoritative enough to represent C-suite excellence. The portrait should immediately communicate: "This is a leader who commands respect, makes important decisions, and represents corporate excellence at the highest level."

The ultimate test: This portrait should look appropriate hanging in a Fortune 500 boardroom, featured in a major business publication, or representing executive leadership in an annual report to shareholders. It should project the gravitas and polish expected of senior corporate leadership while maintaining the authenticity and professionalism that inspires confidence and trust
Prompt 6: The Legal Professional
Edit this image to create a premium law firm partnership-quality professional headshot with the following specifications:

Core Requirements
Preserve identity: Maintain exact facial structure, bone architecture, eye shape and color, nose proportions, mouth characteristics, jawline definition, distinctive features, and all identifying elements of the original subject
Resolution: Minimum 3000x3000px, 300 DPI, archival quality for law firm marketing and legal directories
Output format: Professional legal directory-ready file optimized for Martindale-Hubbell, Best Lawyers, Super Lawyers, and prestigious law firm communications
Primary objective: Project uncompromising legal authority, trustworthiness, and professional credibility worthy of partnership-level representation
Composition & Framing
Classic legal professional headshot framing: upper-chest through crown with formal proportions
Subject positioned using traditional rule of thirds with eyes in upper third
Professional headroom and clean negative space above head (15-20% of frame)
Body positioning: Square and frontal to camera (0-3° rotation maximum)
Shoulders perfectly parallel to camera plane
Symmetrical, authoritative frontal presentation
No casual angles - formal, measured stance
Squared positioning conveys stability and trustworthiness
Camera height: Precisely at eye level for equal authority and respect
Vertical/portrait orientation with classical professional proportions
Composition suggests reliability, precision, and legal competence
Framing suitable for law firm websites, legal directories, and partnership announcements
Expression & Legal Authority
Direct, steady eye contact with camera - unwavering and trustworthy
Serious, composed expression - professional legal demeanor
No smile or minimal, conservative closed-lip expression (barely perceptible if present)
Expression projecting: competence, integrity, reliability, and legal authority
Eyes conveying intelligence, trustworthiness, attention to detail, and legal acumen
Facial expression that inspires client confidence and opposing counsel respect
Measured, controlled composure - the face of legal counsel you trust with critical matters
Slight gravitas without intimidation - approachable competence
Expression appropriate for courtroom, boardroom, and client meetings
Sharp, precisely positioned catchlights in both eyes at 10 o'clock position
Posture & Professional Bearing
Impeccable upright posture with squared, confident shoulders
Formal, measured bearing - the posture of legal authority
Chest forward with confident but not aggressive stance
Neck elongated with head held at precise, neutral angle
Chin level and controlled - neither raised nor lowered
Body language communicating: reliability, competence, legal authority, and trustworthiness
Posture suggesting careful attention to detail and professional precision
Overall stance: courtroom-ready, partnership-worthy, client-confidence inspiring
Energy of someone who handles complex legal matters with expertise and care
Wardrobe - Classic Legal Professional
Suit: Premium dark business suit in traditional legal colors

Preferred: Navy #1B2951, Charcoal #2C2C30, Dark Gray #3A3A3E, or Black #0F0F13
Classic, conservative cut with traditional proportions
Premium wool fabric: fine worsted wool, subtle texture acceptable
Excellent tailoring suggesting attention to quality and detail
Traditional lapel style (notch lapel preferred, peak acceptable for senior partners)
Proper button stance (top button for two-button, middle for three-button)
Conservative, timeless styling that won't date
Visible quality through fabric drape and subtle sheen
Shirt: Crisp, pristine dress shirt in conservative colors

Primary: White #FFFFFF or Soft White #FAFAFA
Alternative: Light Blue #E8F0F8 (very conservative shade)
Premium cotton with perfect collar positioning
Stiff, well-pressed collar in excellent condition
Conservative collar style (spread or straight point)
Absolutely immaculate presentation
Tie: Conservative silk tie - legal profession appropriate

Colors: Navy #1A2D4A, Burgundy #6B1F26, Forest Green #1E4D3B, or Silver-Gray #6B6B6D
Patterns: Solid, regimental stripe, small geometric, or conservative paisley
Premium silk with traditional pattern scale
Perfect tie knot: Full Windsor or Half Windsor, perfectly centered and dimpled
Appropriate length and professional presentation
Classic, timeless design that conveys established professionalism
Accessories (if applicable):

Simple, conservative cufflinks
Classic watch with leather band
No visible jewelry beyond wedding ring and watch
Overall aesthetic:

Senior partner, managing partner, general counsel, federal judge
Conservative legal establishment - Cravath, Skadden, Kirkland & Ellis standard
Traditional professional credibility
Court-appropriate at all levels
Client-confidence inspiring
Background
Solid, perfectly uniform studio background in #141414 (deep charcoal)
Alternative professional tones: #0D0D0F (near black) to #1C1C1E (rich charcoal)
Cool-neutral undertones (no warmth) - professional legal aesthetic
Absolutely seamless and uniform - no texture, pattern, or variation
Substantial subject-background separation (8-10 feet implied distance)
Clean, sophisticated backdrop suggesting established legal practice
Background darkness adds gravitas and focuses attention on professional qualifications
Suitable for high-quality reproduction in legal publications and firm materials
Professional Lighting Setup - Classic Legal
Lighting philosophy: Classic, controlled studio lighting with structured shadows conveying precision, authority, and traditional professionalism

Key light: Large softbox or parabolic reflector at 35-45° angle

Classic Rembrandt or loop lighting pattern
Structured, controlled shadows that add dimension and authority
Professional studio quality with precise light placement
Soft but defined - creates legal gravitas through careful shadow work
Fill light: Controlled fill maintaining shadow structure (3:1 to 4:1 ratio)

Preserves facial modeling and professional dimension
Shadows present and purposeful - adds authority without harshness
Face clearly illuminated with distinguished shadow work
Conservative lighting approach - nothing dramatic or artistic
Rim light: Clean separation lighting defining subject edges

Professional polish and separation from background
Subtle but present - adds quality and refinement
Conservative application - functional, not dramatic
Background control: Even, neutral background illumination

Overall lighting characteristics:

Classic professional studio lighting approach
Controlled, precise, measured illumination
Traditional lighting ratio and shadow structure
Cool-neutral color temperature (5400-5800K)
Professional polish with conservative shadow work
Face well-lit with authoritative dimension
Lighting conveys competence, precision, and legal authority
No artistic flourishes - purely professional approach
Technical Camera Specifications
Lens: 85mm prime focal length simulation (professional portrait standard)
Aperture: f/1.8-f/2.2 for professional subject isolation with maintained sharpness
Focus point: Absolute precision focus on nearest eye (critical for legal credibility)
Depth of field: Conservative shallow depth with complete facial sharpness
Both eyes in razor-sharp focus
Entire face (ears to nose tip) in acceptable sharpness
Professional falloff to shoulders and background
Clean, professional bokeh without distraction
Perspective: Natural, professional compression with zero distortion
Technical quality: Medium format digital quality simulation
Exceptional dynamic range and tonal gradation
Superior color accuracy and depth
Professional optical characteristics
Image Quality & Legal Professional Standards
Eyes: Exceptionally sharp with complete clarity

Visible iris detail and natural color depth
Individual eyelashes clearly defined
Natural highlights and professional catchlights
Eyes projecting intelligence and trustworthiness
Skin: Natural, professional skin texture

Age-appropriate texture preservation (distinguished, not retouched away)
Professional retouching maintaining authenticity
Conservative approach - refined but natural
Character lines and professional maturity preserved
Healthy, professional skin tone
Suit detail: Exceptional fabric and construction detail

Visible premium wool weave and texture
Sharp lapel edges and precise tailoring lines
Quality fabric characteristics clearly rendered
Professional construction and fit details
Shirt: Crisp cotton texture with pristine presentation

Tie: Sharp silk texture, pattern detail, and precise knotting

Professional tie dimple and knot structure
Quality silk characteristics visible
Hair: Professional grooming with natural texture

Conservative styling appropriate for legal practice
Individual strands visible with professional polish
Overall sharpness: Exceptional clarity throughout focus plane

Professional optical sharpness without artificial enhancement
Clean, precise detail rendition
File integrity: Perfect technical quality

Zero noise, compression artifacts, or technical flaws
Clean, archival-quality digital file
Professional color depth and tonal range
Color Grading & Post-Processing - Legal Professional
Color philosophy: Timeless, conservative, cool-measured color science with traditional professional finish

Temperature: Cool-neutral to slightly cool (5600-6200K)

Traditional professional color balance
Conservative, established aesthetic
No warmth - maintain cool professionalism
Timeless color approach that won't date
Skin tones: Conservative, natural, professional

Cool-neutral and perfectly balanced
Professional, healthy appearance
No color casts - accurate natural rendering
Age-appropriate professional skin tone
Conservative retouching approach
Contrast: Measured, professional, dimensional

Rich blacks with controlled depth
Clean whites with detail preservation
Professional tonal separation
Conservative contrast curve - measured and precise
Traditional professional contrast standards
Saturation: Conservative, slightly muted for timeless appeal

Subdued, professional color palette
Suit colors rich but not oversaturated
Tie colors present but conservative
Skin tones natural with professional refinement
Overall: distinguished, conservative, timeless
Professional retouching - Conservative legal standard:

Remove temporary blemishes and distractions only
Preserve natural skin texture and professional character
Conservative under-eye work maintaining authenticity
Professional skin evening without artificial smoothing
Age-appropriate retouching preserving distinguished features
Clean up wardrobe imperfections (lint, wrinkles)
Enhance suit and tie sharpness for professional presentation
Approach: Distinguished professional - not artificially enhanced
Color refinements:

Subtle professional vignette (barely perceptible)
Strategic sharpening on eyes and professional details
Optimized for legal directory reproduction and firm materials
Conservative color grading maintaining professional standards
Color Palette - Traditional Legal Professional
Suit options:

Navy: #1B2951 to #243B5E
Charcoal: #2C2C30 to #3A3A3E
Dark Gray: #3A3A3E to #4A4A4E
Black: #0F0F13 to #1A1A1D
Shirt:

White: #FFFFFF to #FAFAFA
Light Blue: #E8F0F8 to #DDE9F3
Tie:

Navy: #1A2D4A to #243B5E
Burgundy: #6B1F26 to #7A2B32
Forest: #1E4D3B to #2B5A47
Gray: #6B6B6D to #7A7A7C
Background: #141414 (primary) or cool-toned professional neutral

Skin tones: Natural, conservative, professionally appropriate

Overall palette: Cool, traditional, conservative, timeless, authoritative

Overall Aesthetic & Mood
Senior Legal Professional / Partnership-Level Authority: Managing partner of prestigious firm, federal appellate judge, general counsel of Fortune 500, senior litigation partner. Someone who handles the most complex legal matters, appears before the highest courts, and commands respect in any legal setting.

Visual references:

AmLaw 100 firm partnership announcements
Martindale-Hubbell AV-rated attorney profiles
Best Lawyers and Super Lawyers directory photos
Federal judiciary official portraits
Major law firm website partnership pages
Legal publication author photos
Bar journal leadership profiles
Court admission ceremony formal photos
Professional standards:

American Bar Association professional imagery guidelines
Martindale-Hubbell directory standards
Best Lawyers publication requirements
Super Lawyers profile specifications
Federal court admission photo standards
Emotional tone:

Authoritative competence inspiring client confidence
Traditional professional credibility and establishment credentials
Trustworthy reliability for complex legal matters
Conservative professionalism with distinguished experience
Courtroom authority and opposing counsel respect
Traditional legal excellence with contemporary polish
Measured gravitas appropriate for serious legal practice
Key characteristics:

Authority with accessibility - approachable but commanding
Traditional over trendy - timeless professional aesthetic
Conservative over casual - established legal professionalism
Measured over dramatic - controlled professional presentation
Trustworthy over warm - inspiring confidence over friendship
Precise over relaxed - attention to professional detail
Distinguished over youthful - experienced legal authority
Classic over contemporary - enduring professional standards
Legal Industry Applications
This portrait must excel in:

Law firm websites and marketing materials
Legal directories: Martindale-Hubbell, Best Lawyers, Super Lawyers, Chambers
Bar publications and professional journals
Court admissions and official legal documents
Partnership announcements and firm communications
Client pitch materials and credentials presentations
CLE and legal conference speaker materials
Professional LinkedIn profiles for legal practice
Law school alumni and guest lecturer materials
Expert witness and litigation support materials
Legal award nominations and recognition materials
Professional association leadership roles
Technical Legal Industry Standards
Print quality: Exceptional reproduction in legal publications
Digital optimization: Clear at thumbnail sizes for directory listings
Aspect ratio flexibility: Various crops for different platform requirements
Color accuracy: Consistent reproduction across print and digital media
Large format: Suitable for firm lobby and conference room display
Professional archives: Long-term quality for career documentation
Strictly Avoid
❌ Casual or overly warm expressions (smiles, friendly demeanor)
❌ Business casual or contemporary casual attire
❌ Warm color grading or informal lighting
❌ Trendy styling that will date the image
❌ Overly artistic or creative lighting approaches
❌ Casual body positioning or angled poses
❌ Bright, saturated colors inappropriate for legal practice
❌ Overly retouched, artificial appearance
❌ Poor grooming or unkempt professional presentation
❌ Distracting backgrounds or environmental elements
❌ Technical imperfections or soft focus
❌ Inappropriate accessories or jewelry
❌ Color casts (especially warm tones)
❌ Overly dramatic shadows or lighting
❌ Expressions appearing unfriendly or intimidating
❌ Modern, fashion-forward styling
❌ Visible retouching artifacts

Quality Benchmarks
Photographers: Corporate legal specialists, federal court official photographers, AmLaw firm photographers
Publications: American Lawyer, Legal Times, state bar journals, federal judiciary portraits
Standards:

Federal courthouse official portraits
Supreme Court justice formal photos
Major law firm partnership photography
Legal directory publication standards
American Bar Association professional guidelines
Final result: A distinguished, authoritative legal professional portrait that immediately communicates competence, trustworthiness, and establishment credentials. Quality and presentation worthy of the most prestigious legal settings - federal courtrooms, major law firm partnerships, legal publication features, and client confidence-building. Timeless professional aesthetic that will serve for 7-10 years while maintaining relevance and authority. The portrait should project the gravitas and traditional professionalism expected of senior legal counsel while remaining approachable enough to inspire client trust and confidence.

The ultimate test: This portrait should be appropriate for display in a federal courthouse, featured in AmLaw partnership announcements, suitable for Martindale-Hubbell AV rating profiles, and capable of inspiring complete client confidence in the most complex legal matters. It should project the establishment credibility and professional authority that clients seek when selecting counsel for their most important legal needs
Prompt 7: The Financial and Banking Professional
Edit this image to create a premium financial services/banking professional headshot with the following specifications:

Core Requirements
Preserve identity: Maintain exact facial structure, bone architecture, eye shape and color, nose proportions, mouth characteristics, jawline, distinctive features, and all identifying elements of the original subject
Resolution: Minimum 2800x2800px, 300 DPI, professional quality for financial marketing and client-facing materials
Output format: Financial services marketing-ready file optimized for wealth management materials, bank websites, investment advisory communications, and financial publication features
Primary objective: Project fiscal competence, trustworthiness, and reliable financial expertise that inspires client confidence
Composition & Framing
Professional financial advisor headshot framing: mid-chest through crown with clean proportions
Subject positioned using rule of thirds with eyes in upper-middle third
Clean professional headroom above head (12-18% of frame) - polished but not excessive
Body positioning: Square to camera or slight angle (5-15° rotation)
Shoulders positioned confidently but approachably
Open, trustworthy stance suggesting accessibility
Professional bearing without intimidation
Camera height: At eye level for equal, trustworthy connection
Vertical/portrait orientation optimized for financial services applications
Composition suggests reliability, competence, and financial stewardship
Framing suitable for wealth management brochures, bank marketing, and advisor profiles
Expression & Financial Authority with Approachability
Direct, steady eye contact with camera - trustworthy and engaged
Composed, confident expression with subtle warmth - balanced professional demeanor
Slight, genuine professional smile or composed confidence (not stern, not overly casual)
Expression projecting: competence, trustworthiness, financial expertise, and client care
Eyes conveying intelligence, reliability, attention to detail, and fiduciary responsibility
Facial expression that inspires confidence in financial decisions and long-term planning
Approachable authority - someone clients trust with their financial future
Professional warmth suggesting personal attention and client service excellence
Measured confidence without arrogance - humble expertise
Expression balancing authority with accessibility - approachable financial counsel
Sharp, precisely positioned catchlights in both eyes at 10-11 o'clock position
Posture & Professional Bearing
Confident, upright posture with approachable shoulder positioning
Professional bearing suggesting competence and reliability
Chest forward with confident but welcoming stance
Neck naturally elongated with head at engaging angle
Chin level and approachable - confident without superiority
Body language communicating: trustworthiness, expertise, client focus, and reliability
Posture suggesting careful stewardship of client assets and interests
Overall stance: boardroom-ready but client-accessible, advisory-focused
Energy of someone who guides financial decisions with expertise and care
Wardrobe - Financial Services Professional
Suit: Premium navy or charcoal business suit - conservative financial industry appropriate

Navy: #1B2D4A to #2A3F5F (traditional financial navy)
Charcoal: #2C2C32 to #3A3A42 (conservative charcoal)
Classic, conservative cut with professional proportions
Premium wool fabric with subtle quality indicators
Excellent tailoring suggesting attention to detail and quality
Traditional lapel style (notch lapel preferred)
Proper button stance and professional fit
Conservative styling appropriate for client meetings and board presentations
Fabric quality suggesting fiduciary responsibility and attention to detail
Shirt: Crisp, pressed white dress shirt - immaculate presentation

Pure White: #FFFFFF or Soft White: #FAFAFA
Premium cotton with excellent collar structure
Perfectly pressed and maintained - suggesting attention to detail
Conservative collar style (spread or straight point)
Pristine condition reflecting professional standards
Tie: Subtle, understated silk tie - conservative financial appropriate

Colors: Navy #1A2D4A, Burgundy #6B2024, Forest Green #1E3D2F, Silver-Gray #6A6A6C
Patterns: Solid, subtle stripe, small geometric, or conservative texture
Premium silk with traditional pattern scale
Understated elegance - not flashy or attention-seeking
Perfect tie knot: Half Windsor or Four-in-Hand, well-proportioned
Conservative length and professional presentation
Tie suggests competence without ostentation
Accessories (minimal and conservative):

Simple, quality watch with leather band or metal bracelet
Wedding ring if applicable
No visible jewelry beyond watch and wedding ring
Conservative cufflinks if French cuffs
Overall aesthetic:

Wealth manager, financial advisor, private banker, investment counselor
Trust company officer, portfolio manager, financial planning professional
Client-facing financial services professional
Conservative financial establishment - Morgan Stanley, Merrill Lynch, Wells Fargo standard
Trustworthy financial stewardship presentation
Background
Solid, perfectly uniform studio background in #141414 (deep charcoal)
Alternative professional tones: #121214 (near black) to #1E1E20 (rich charcoal)
Cool-neutral undertones appropriate for financial communications
Absolutely seamless and uniform - no texture, pattern, or distraction
Professional subject-background separation (6-8 feet implied distance)
Clean, sophisticated backdrop suggesting established financial practice
Background provides focus on professional qualifications and trustworthiness
Suitable for reproduction in financial marketing materials and client communications
Professional Lighting Setup - Clean & Bright Financial
Lighting philosophy: Clean, bright, polished studio lighting that creates trustworthy impression with professional polish

Key light: Large octabox or softbox at 30-40° angle

Loop or modified butterfly lighting pattern
Clean, even illumination with gentle modeling
Bright and polished - suggesting transparency and openness
Professional quality without dramatic shadows
Lighting that inspires confidence and trust
Fill light: Generous fill creating minimal shadow contrast (2:1 to 2.5:1 ratio)

Open, bright lighting approach
Face evenly illuminated with professional polish
Minimal shadows suggesting transparency and approachability
Clean, trustworthy lighting aesthetic
Rim light: Subtle separation lighting for professional polish

Clean edge definition from background
Professional quality and refinement
Subtle application maintaining clean aesthetic
Eye light: Additional catchlight source ensuring bright, engaging eyes

Lower reflector or small fill light
Eyes bright and engaging - inspiring confidence
Overall lighting characteristics:

Clean, bright, professional studio approach
Polished and trustworthy illumination
Even, controlled lighting with professional polish
Cool-neutral to slightly cool color temperature (5400-5800K)
Bright, clean aesthetic suggesting financial transparency
Face clearly illuminated with professional confidence
Lighting conveys reliability, competence, and trustworthiness
No harsh shadows or dramatic effects
Technical Camera Specifications
Lens: 85mm prime focal length simulation (professional portrait standard)
Aperture: f/1.8-f/2.2 for professional subject isolation with maintained facial sharpness
Focus point: Precision focus on nearest eye (critical for trust and engagement)
Depth of field: Professional shallow depth with complete facial clarity
Both eyes in sharp focus plane
Entire face in acceptable sharpness range
Clean, professional falloff to background
Refined, unobtrusive bokeh
Perspective: Natural compression with professional proportions
Image quality: Professional digital sensor simulation with excellent dynamic range
Image Quality & Financial Professional Standards
Eyes: Sharp, clear, and engaging

Visible iris detail with natural color depth
Individual eyelashes defined
Bright, trustworthy catchlights
Eyes projecting competence and reliability
Skin: Natural, professional skin texture

Age-appropriate texture preservation showing experience and maturity
Professional retouching maintaining authenticity
Conservative approach - polished but natural
Healthy, professional skin tone inspiring confidence
Suit detail: Clean fabric and tailoring detail

Visible premium fabric weave and quality
Sharp lapel lines and professional construction
Quality tailoring details clearly rendered
Professional presentation suggesting attention to detail
Shirt: Crisp cotton texture with immaculate presentation

Perfect pressing and maintenance visible
Quality fabric characteristics
Tie: Sharp silk detail with professional knotting

Clean tie pattern and texture
Professional knot structure and dimple
Quality silk characteristics
Hair: Professional grooming with natural texture

Conservative, professional styling
Well-maintained appearance suggesting personal attention to detail
Overall sharpness: Excellent clarity with professional polish

Natural sharpness without artificial enhancement
Clean, precise detail throughout focus plane
Color Grading & Post-Processing - Financial Professional
Color philosophy: Clean, neutral, professional color science with polished, trustworthy finish

Temperature: Neutral to slightly cool (5400-5800K)

Professional, clean color balance
Trustworthy, transparent aesthetic
Conservative color approach
Clean, modern professional look
Skin tones: Natural, healthy, professionally polished

Neutral and perfectly balanced
Professional, confident appearance
No color casts - accurate natural rendering
Healthy skin tone inspiring client confidence
Contrast: Clean, polished, professional

Controlled blacks with professional depth
Clean whites with detail preservation
Professional tonal separation
Modern contrast approach - clean and polished
Bright, clean aesthetic
Saturation: Natural, slightly refined for professional polish

Clean, professional color palette
Suit colors rich but conservative
Tie colors present but understated
Skin tones natural with professional enhancement
Overall: clean, trustworthy, professional
Professional retouching - Financial services standard:

Remove temporary blemishes and minor distractions
Preserve natural skin texture and professional character
Conservative under-eye work maintaining authenticity
Professional skin evening without over-smoothing
Age-appropriate retouching preserving experience indicators
Clean up any wardrobe imperfections
Enhance suit and tie details for professional presentation
Brighten eyes subtly for engagement and trust
Approach: Polished professional - trustworthy and authentic
Final refinements:

Subtle professional vignette (barely visible)
Strategic sharpening on eyes and professional details
Optimized for financial marketing reproduction
Clean color grading suitable for various financial communications
Color Palette - Financial Services Professional
Suit options:

Navy: #1B2D4A to #2A3F5F
Charcoal: #2C2C32 to #3A3A42
Dark Gray: #363638 to #444446
Shirt:

White: #FFFFFF to #FAFAFA
Very Light Blue: #F0F4F8 (subtle, conservative)
Tie:

Navy: #1A2D4A to #243B5E
Burgundy: #6B2024 to #7A2B32
Forest: #1E3D2F to #2B4A3C
Silver-Gray: #6A6A6C to #787878
Background: #141414 (primary) or neutral professional tone

Skin tones: Natural, healthy, professionally appropriate

Overall palette: Clean, neutral, conservative, trustworthy, professional

Overall Aesthetic & Mood
Trusted Financial Professional / Wealth Management Advisor: Senior financial advisor, wealth manager, private banker, portfolio manager, financial planning professional. Someone who manages significant client assets, provides trusted financial counsel, and guides important financial decisions.

Visual references:

Wealth management firm advisor profiles
Bank private banking marketing materials
Financial advisory firm websites
Investment management company communications
Financial planning association materials
CFA Institute professional standards
CFP Board professional imagery
Financial publication expert profiles
Industry standards:

CFP Board professional presentation guidelines
CFA Institute professional imagery standards
FINRA professional appearance expectations
SEC registered investment advisor presentations
Major financial firms professional standards
Emotional tone:

Trustworthy competence inspiring client confidence
Professional expertise with personal accessibility
Reliable financial stewardship and fiduciary responsibility
Conservative professionalism with client-focused warmth
Measured confidence appropriate for financial guidance
Transparent honesty and ethical financial practice
Experienced wisdom with approachable counsel
Key characteristics:

Trustworthy over impressive - inspiring confidence over awe
Approachable over authoritative - accessible expertise
Conservative over trendy - stable, reliable presentation
Clean over dramatic - transparent, honest aesthetic
Professional over casual - fiduciary responsibility level
Balanced over extreme - moderate, measured approach
Client-focused over self-promoting - service orientation
Experienced over youthful - mature financial wisdom
Financial Industry Applications
This portrait must excel in:

Wealth management and private banking materials
Financial advisory firm websites and marketing
Investment management company communications
Financial planning practice materials
Bank officer and relationship manager profiles
Insurance and annuity sales materials
Retirement planning specialist profiles
Estate planning and trust officer materials
Corporate benefits and 401k advisor materials
Tax planning and CPA financial services
Real estate investment advisor profiles
Financial publication expert commentary
Client-Facing Optimization
Professional quality inspiring confidence in financial decisions
Approachable expertise encouraging client consultation
Conservative presentation appropriate for all age demographics
Trustworthy appearance suitable for retirement and estate planning
Clean, transparent aesthetic suggesting honest financial counsel
Polished professionalism appropriate for high-net-worth clients
Balanced authority and accessibility for various client comfort levels
Strictly Avoid
❌ Overly aggressive or intimidating expressions
❌ Flashy, expensive, or ostentatious styling
❌ Casual or contemporary business casual attire
❌ Warm, artistic, or creative color grading
❌ Dramatic lighting or artistic shadows
❌ Overly youthful or inexperienced appearance
❌ Sales-focused or pushy energy
❌ Artificial or overly retouched appearance
❌ Bright, saturated, or attention-seeking colors
❌ Poor grooming or unkempt presentation
❌ Distracting backgrounds or props
❌ Technical imperfections or soft focus
❌ Inappropriate accessories or jewelry
❌ Expressions appearing unfriendly or cold
❌ Overly casual body language or posture
❌ Trendy styling that will quickly date

Quality Benchmarks
Industry standards: Major financial firms (Morgan Stanley, Merrill Lynch, Goldman Sachs Private Wealth), independent RIA firms, bank private banking divisions, insurance company advisor materials

Professional photography: Corporate financial headshot specialists, wealth management marketing photographers, bank corporate communications

Publications: Financial Planning Magazine, Investment News, Barron's advisor features, Journal of Financial Planning

Final result: A polished, trustworthy financial services professional portrait that immediately communicates competence, reliability, and client-focused expertise. Quality and presentation worthy of high-net-worth client communications, financial firm marketing materials, and professional financial publications. Clean, professional aesthetic that will remain current for 5-7 years while maintaining trust and credibility. The portrait should project the conservative professionalism and trustworthy expertise that clients seek when selecting financial counsel for their most important financial decisions and long-term planning.

The ultimate test: This portrait should inspire confidence when clients are considering entrusting their retirement savings, college funds, or estate planning to this financial professional. It should project the right balance of expertise and approachability that makes clients comfortable discussing their most important financial goals and concerns. The image should work equally well in wealth management brochures, bank marketing materials, and as the profile photo for a trusted financial advisor's LinkedIn or company website
Prompt 8: The Senior Consultant or Board-Level Advisor
Edit this image. I need a professional, high-resolution headshot for senior consulting or advisory board contexts, maintaining the exact facial structure, identity, and key features of the person in the input image. The subject is framed from the chest up with relaxed professional headroom. The person looks directly at the camera with a thoughtful, experienced expression that conveys wisdom and measured strategic confidence. They are wearing a classic tweed or fine wool sport coat over a high-quality dress shirt or lightweight sweater, projecting seniority and intellectual authority without stiffness. The background is a solid #141414 neutral studio. Shot with warm, soft studio lighting that flatters mature features and creates a subtle, dignified catchlight in the eyes. Captured on an 85mm f/1.8 lens with shallow depth of field, precise focus on the eyes, and smooth background bokeh. Observe clean fabric texture, natural skin detail, and individual hair strands. The atmosphere conveys earned authority, calm expertise, and professional trust. Warm cinematic color grading with subtle depth and balanced tonesStartup Founders and Tech Professionals (4 Prompts)
Tech and startup culture calls for a different visual tone than traditional corporate photography. These prompts use more casual attire and a modern, relaxed energy while keeping the same professional studio backdrop. Personal branding in the tech world rewards authenticity over formality.
Prompt 9: The Startup Founder
Edit this image to create a premium startup founder professional headshot with the following specifications:

Core Requirements
Preserve identity: Maintain exact facial structure, bone architecture, eye shape and color, nose proportions, mouth characteristics, distinctive features, and all identifying elements of the original subject
Resolution: Minimum 2500x2500px, 300 DPI, high-quality for digital platforms, press materials, and investor presentations
Output format: Startup ecosystem-ready file optimized for pitch decks, press kits, conference materials, tech publication features, and modern digital platforms
Primary objective: Project innovative vision, approachable leadership, and entrepreneurial energy that attracts investors, customers, and top talent
Composition & Framing
Modern entrepreneurial headshot framing: mid-chest through crown with natural, relaxed proportions
Subject positioned using rule of thirds with eyes in natural upper-middle placement
Relaxed, natural headroom (10-15% breathing space) - organic, contemporary feel
Body positioning: Casual, confident positioning suggesting energy and momentum
Slight lean or angle (15-25° rotation) suggesting forward progress
Dynamic positioning without losing professionalism
Open, engaging stance suggesting accessibility and innovation
Shoulders naturally positioned - confident but approachable
Camera height: Eye level to slightly below for relatable, accessible connection
Vertical/portrait orientation optimized for modern digital platforms
Composition feels authentic and uncontrived - documentary quality with professional polish
Framing suggests innovation, energy, and forward-thinking leadership
Expression & Visionary Presence
Direct, engaging eye contact with camera - visionary and passionate
Open, visionary expression with genuine confidence - innovative leadership energy
Genuine smile or inspired, forward-looking expression - optimistic and determined
Expression projecting: innovation, vision, determination, approachable ambition
Eyes showing intelligence, passion, forward-thinking vision, and entrepreneurial drive
Facial expression that inspires confidence in the future and exciting possibilities
Approachable ambition - someone who builds teams and attracts investment
Authentic enthusiasm for their mission and vision
Slight animation suggesting natural conversation about their passion
Expression that feels like catching someone in a moment of inspired vision
Energy of someone who sees opportunities and builds solutions
Clear catchlights in both eyes at 10-11 o'clock position adding life and engagement
Posture & Entrepreneurial Energy
Casual, confident lean suggesting energy and forward momentum
Dynamic posture with natural, engaged bearing
Slight forward lean (implied) suggesting drive and ambition
Body language communicating: "I'm building something amazing"
Energetic presence - someone who moves fast and thinks big
Natural positioning suggesting authenticity and approachability
Overall stance: pitch-ready, investor-accessible, team-inspiring
Energy of someone who attracts talent, investment, and customers
Posture suggesting movement, progress, and entrepreneurial drive
Wardrobe - Modern Entrepreneurial Professional
Blazer/Jacket: Smart casual blazer with contemporary, relaxed fit

Colors: Navy #2B3A4F, Charcoal #3A3A3E, Warm Gray #4A4A48, or Contemporary Earth tones
Modern, unstructured cut - professional but not corporate
Could be: contemporary blazer, sports coat, bomber-style jacket, or modern cardigan
Fabric with contemporary texture - not traditional suiting
Relaxed fit suggesting comfort and authenticity
Could be partially unbuttoned for casual confidence
Underlayer: Clean, minimal t-shirt or crew-neck - modern startup aesthetic

High-quality t-shirt options:
Premium cotton t-shirt in White #FFFFFF, Light Gray #E8E8E8, or Soft Black #2A2A2A
Fine-knit crew-neck sweater or pullover
Contemporary henley or polo (subtle, minimal branding acceptable)
Modern button-down (open collar, relaxed)
Key characteristics:
High-quality fabric with good drape
Clean, minimal design - no loud logos or graphics
Perfect fit - not tight, not baggy
Contemporary colors and textures
Overall aesthetic:

Tech founder, startup CEO, innovative entrepreneur
Silicon Valley/modern startup ecosystem standard
Y Combinator demo day, TechCrunch featured founder
Contemporary professional - thinks different, builds future
Quality without ostentation - focused on substance over status
Approachable leadership - someone who codes, creates, and inspires
Quality standards:

Clean, well-maintained appearance
Contemporary fit and styling
Colors that work well on camera and across digital platforms
Professional enough for investor meetings, casual enough for team leadership
Background
Solid, perfectly uniform studio background in #141414 (deep charcoal)
Alternative contemporary tones: #161618 to #202022 (modern charcoals)
Neutral backdrop that works across all startup applications
Completely seamless with no distractions from subject
Professional subject-background separation for depth
Background provides clean canvas for graphic overlays and text
Dark tone allows subject and vision to be the focus
Suitable for pitch deck integration and press materials
Professional Lighting Setup - Bright & Contemporary
Lighting philosophy: Bright, airy, contemporary lighting that feels energized and modern, suggesting innovation and forward-thinking

Key light: Large soft source (octabox or large scrim) at 25-35° angle

Loop or modified butterfly lighting pattern
Bright, clean, contemporary illumination
Open, energetic lighting quality
Slightly elevated for subtle confidence without authority
Modern studio aesthetic - clean and bright
Fill light: Generous fill creating minimal shadows (1.5:1 to 2:1 ratio)

Bright, open lighting approach
Contemporary, energetic feel
Face evenly illuminated with modern polish
Minimal contrast for fresh, contemporary look
Rim/hair light: Clean separation for modern polish

Contemporary edge definition
Subtle application maintaining bright aesthetic
Adds dimension and professional quality
Eye light: Bright, engaging catchlights

Lower fill or reflector for lively eyes
Eyes bright and passionate - inspiring confidence in vision
Overall lighting characteristics:

Bright, airy, contemporary studio approach
Energized and modern illumination
Clean, fresh lighting with contemporary polish
Slightly warm to neutral color temperature (5200-5600K)
Bright, optimistic aesthetic suggesting innovation
Face clearly illuminated with entrepreneurial energy
Lighting conveys innovation, energy, and forward-thinking
Contemporary studio aesthetic - modern and fresh
Technical Camera Specifications
Lens: 85mm prime focal length simulation (natural portrait perspective)
Aperture: f/1.8-f/2.2 for contemporary subject isolation
Focus point: Sharp precision focus on nearest eye
Depth of field: Shallow with face in sharp focus
Both eyes critically sharp
Face comfortably in focus plane
Smooth, contemporary falloff to background
Clean, modern bokeh characteristics
Perspective: Natural compression with contemporary proportions
Image quality: Contemporary digital sensor simulation with excellent dynamic range
Image Quality & Contemporary Standards
Eyes: Sharp, engaging, and passionate

Visible iris detail with natural depth
Individual lashes defined
Bright, inspiring catchlights
Eyes projecting vision and determination
Skin: Natural, authentic texture showing real person

Age-appropriate preservation of natural characteristics
Modern retouching maintaining authenticity
Contemporary approach - polished but genuine
Healthy, energetic skin tone
Blazer/Jacket: Contemporary fabric and styling detail

Modern fabric texture and quality
Contemporary cut and construction visible
Quality details suggesting attention to craft
T-shirt/Crew-neck: Premium fabric texture with perfect fit

Quality cotton or knit characteristics
Contemporary styling and drape
Hair: Natural texture with contemporary styling

Modern, professional grooming
Individual strands and natural movement
Contemporary hair texture and style
Overall sharpness: Excellent contemporary clarity

Natural sharpness without artificial enhancement
Clean, modern detail throughout focus plane
Color Grading & Post-Processing - Contemporary Startup
Color philosophy: Clean, contemporary color science with subtle warmth and modern finish

Temperature: Slightly warm to neutral (5200-5600K)

Contemporary, fresh color balance
Subtle warmth suggesting optimism and energy
Modern, digital-native aesthetic
Innovation-friendly color approach
Skin tones: Natural, healthy, energetic

Warm-neutral and vibrant
Youthful, energetic appearance
Natural color with contemporary enhancement
Skin tone suggesting vitality and passion
Contrast: Contemporary, clean, energetic

Lifted blacks for modern, fresh feel
Controlled highlights maintaining detail
Modern contrast curve - bright and contemporary
Fresh, energetic aesthetic
Clean, digital-friendly contrast
Saturation: Natural with contemporary vibrancy

Fresh, modern color palette
Slightly enhanced for digital platforms
Contemporary color richness
Modern, engaging color approach
Overall: fresh, contemporary, digitally optimized
Contemporary retouching:

Light touch maintaining authenticity and realness
Remove temporary blemishes only
Preserve natural character and energy
Minimal retouching for authentic feel
Modern approach - enhanced but genuine
Brighten eyes for engagement and passion
Clean up any wardrobe issues
Approach: Authentic, energetic, genuinely enhanced
Modern refinements:

Very subtle vignette (barely noticeable)
Contemporary sharpening approach
Optimized for digital platforms and social media
Modern color grading suitable for tech/startup applications
Color Palette - Contemporary Startup
Blazer options:

Navy: #2B3A4F to #3A4A5F
Charcoal: #3A3A3E to #4A4A4E
Warm Gray: #4A4A48 to #5A5A58
Contemporary Earth: #4F4A42 to #5F5A52
T-shirt/Crew-neck:

White: #FFFFFF to #F8F8F8
Light Gray: #E8E8E8 to #EEEEEE
Soft Black: #2A2A2A to #3A3A3A
Contemporary colors matching startup aesthetic
Background: #141414 or modern neutral tone

Skin tones: Natural, warm, energetic, contemporary

Overall palette: Fresh, modern, contemporary, optimistic, digitally friendly

Overall Aesthetic & Mood
Innovative Entrepreneur / Visionary Startup Leader: Tech founder, startup CEO, innovative entrepreneur, venture-backed leader. Someone who builds the future, attracts top talent, secures funding, and creates solutions that change industries.

Visual references:

Y Combinator Demo Day founder photos
TechCrunch Disrupt speaker profiles
Andreessen Horowitz portfolio founder headshots
Fast Company innovation leader features
Wired magazine entrepreneur profiles
Inc. Magazine 30 Under 30 photography
Tech conference keynote speaker photos
Startup accelerator program materials
Industry contexts:

Venture capital pitch decks and funding materials
Tech conference speaker profiles and marketing
Startup accelerator program materials and demos
Press coverage in tech publications and business media
Team recruitment and company culture materials
Customer-facing marketing and thought leadership
Emotional tone:

Visionary passion with practical execution
Approachable ambition inspiring team and investors
Innovative thinking with authentic leadership
Determined optimism about building the future
Entrepreneurial energy with strategic focus
Authentic confidence in mission and vision
Forward-thinking leadership with human warmth
Key characteristics:

Visionary over traditional - thinking differently about the future
Approachable over intimidating - attracts talent and builds teams
Energetic over stable - momentum and growth-focused
Contemporary over classic - modern, digital-native aesthetic
Authentic over polished - genuine leadership over corporate presentation
Innovation-focused over profit-focused - mission-driven leadership
Team-building over individual - collaborative, inspiring leadership
Forward-looking over traditional - building tomorrow, not preserving yesterday
Startup Ecosystem Applications
This portrait must excel in:

Pitch decks and investor presentations
Press kits and media materials
Conference speaker profiles and marketing
Company websites and about pages
Team recruitment and culture materials
Tech publication features and interviews
Social media profiles and thought leadership
Accelerator programs and demo materials
Customer-facing marketing and brand building
Partnership and business development materials
Awards and recognition submissions
Thought leadership content and speaking opportunities
Digital Platform Optimization
Optimized for modern digital platforms and social media
Works effectively in pitch deck presentations
Clear and engaging at various thumbnail sizes
Professional quality that stands out in tech ecosystems
Contemporary aesthetic appealing to investors, talent, and customers
Suitable for video calls, webinars, and virtual conferences
Scales well for conference materials and large-format displays
Investment and Business Context
Projects competence and vision that attracts venture capital
Suggests innovative thinking and market opportunity recognition
Conveys leadership ability to scale teams and operations
Balances visionary thinking with practical execution capability
Inspires confidence in ability to navigate startup challenges
Suggests authentic leadership that builds company culture
Projects energy and determination required for startup success
Strictly Avoid
❌ Traditional corporate formality or stuffiness
❌ Overly serious or intimidating expressions
❌ Formal business suits or traditional corporate attire
❌ Cool, sterile, or lifeless color grading
❌ Dramatic or artistic lighting effects
❌ Overly retouched or artificial appearance
❌ Static, passive, or low-energy posture
❌ Expensive, flashy, or ostentatious styling
❌ Poor grooming or unprofessional presentation
❌ Distracting backgrounds or busy elements
❌ Technical imperfections or soft focus
❌ Expressions that appear arrogant or unapproachable
❌ Overly casual or unprofessional appearance
❌ Dark, moody, or pessimistic aesthetic
❌ Traditional formal photography approaches
❌ Cold, corporate, or bureaucratic energy

Quality Benchmarks
Industry standards: Top tech accelerators (Y Combinator, Techstars, 500 Startups), leading venture capital firms (Andreessen Horowitz, Sequoia Capital, Kleiner Perkins), major tech conferences (TechCrunch Disrupt, Web Summit, SXSW)

Photography references: Modern startup photographer specialists, tech conference documentation, venture capital marketing photography, contemporary entrepreneur portraiture

Publications: TechCrunch, Fast Company, Wired, Inc. Magazine, Forbes 30 Under 30, Entrepreneur Magazine, VentureBeat founder features

Final result: A contemporary, energetic startup founder portrait that immediately communicates innovation, vision, and approachable leadership. Quality and presentation worthy of major tech conferences, venture capital presentations, and press coverage in leading business and technology publications. Modern, authentic aesthetic that will remain current for 3-5 years while maintaining relevance in the rapidly evolving startup ecosystem. The portrait should project the innovative thinking and entrepreneurial energy that attracts investors, top talent, and customers while building confidence in the founder's ability to execute their vision.

The ultimate test: This portrait should work effectively in a Series A pitch deck, inspire confidence when recruiting senior engineering talent, look natural in TechCrunch coverage, and convey the innovative vision and practical leadership that venture capitalists seek when making investment decisions. It should project the right balance of visionary thinking and execution capability that characterizes successful startup founders who build companies that change industries and improve lives
Prompt 10: The Tech Entrepreneur
Edit this image to create a premium tech entrepreneur profile photograph with the following specifications:

Core Requirements
Preserve identity: Maintain exact facial structure, bone architecture, eye shape and color, nose proportions, mouth characteristics, distinctive features, and all identifying elements of the original subject
Resolution: Minimum 2600x2600px, 300 DPI, high-quality for tech industry applications, social platforms, and professional communications
Output format: Tech ecosystem-ready file optimized for LinkedIn profiles, company websites, tech conference materials, product launch communications, and modern digital platforms
Primary objective: Project innovative thinking, accessible leadership, and tech industry authenticity that resonates with engineers, investors, and customers in the technology sector
Composition & Framing
Contemporary tech entrepreneur headshot framing: mid-chest through crown with natural, organic proportions
Subject positioned using rule of thirds with eyes in natural upper-middle placement
Ample natural headroom (12-18% breathing space) - relaxed, uncontrived feel
Body positioning: Casual, natural positioning suggesting authenticity and approachability
Slight natural lean (10-20° angle) suggesting engagement and accessibility
Relaxed, organic posture - not staged or formal
Open, approachable stance suggesting collaborative leadership
Shoulders naturally positioned - confident but humble
Camera height: Eye level for equal, peer-to-peer connection
Vertical/portrait orientation optimized for modern tech platforms and social media
Composition feels genuine and unforced - documentary authenticity with professional quality
Framing suggests innovation, authenticity, and tech industry cultural fit
Expression & Creative Intelligence
Direct, genuine eye contact with camera - authentic and intellectually engaged
Relaxed, approachable expression with natural confidence - tech industry authenticity
Subtle, genuine smile or thoughtful, creative expression - intelligent and approachable
Expression projecting: creative intelligence, accessibility, innovative thinking, authentic leadership
Eyes showing curiosity, problem-solving intelligence, technical depth, and genuine engagement
Facial expression that suggests someone who builds things and solves complex problems
Approachable intelligence - someone who codes, creates, and collaborates
Natural, unguarded expression suggesting authenticity and realness
Slight animation reflecting passion for technology and innovation
Expression that feels like catching someone discussing their latest project or breakthrough
Energy of someone who thinks deeply about technology and its human impact
Clear, natural catchlights in both eyes at 10-11 o'clock position
Posture & Tech Industry Authenticity
Casual positioning with slight natural lean suggesting engagement and accessibility
Relaxed, authentic posture with natural energy
Slight forward engagement suggesting genuine interest and passion
Body language communicating: "Let me show you what I'm building"
Authentic presence - someone comfortable in their own skin
Natural positioning suggesting approachability and collaborative spirit
Overall stance: product demo-ready, team-accessible, genuinely passionate
Energy of someone who builds technology that improves lives
Posture suggesting both technical depth and human connection
Wardrobe - Tech Industry Contemporary
Primary Option: Modern henley shirt in heather gray with rolled sleeves

Heather Gray: #8E8E93 to #A0A0A5 (contemporary, tech-friendly)
High-quality cotton blend with contemporary fit
Sleeves naturally rolled to forearms (casual, hands-on aesthetic)
Clean, minimal design - no logos or graphics
Perfect fit - relaxed but well-fitted
Suggests approachable technical leadership
Alternative Option: Clean minimal button-down with open collar

Colors: White #FFFFFF, Light Blue #E8F2F7, Soft Gray #E0E0E3
Top button casually unbuttoned - relaxed tech industry standard
Premium cotton with excellent drape
Contemporary fit - not tight, not baggy
Clean, minimal styling
Could be Oxford cloth, chambray, or quality poplin
Style characteristics:

High-quality fabric with natural texture
Contemporary, relaxed fit
Minimal branding or graphics
Colors that work well with tech aesthetics
Professional enough for investor meetings
Casual enough for engineering team leadership
Silicon Valley/Seattle tech industry appropriate
Overall aesthetic:

CTO, VP Engineering, Tech Founder, Product Leader
Google, Apple, Microsoft, startup leadership standard
Technical depth with leadership accessibility
Builder mentality - someone who actually codes/creates
Contemporary tech professional - thinks in systems and user experience
Quality without ostentation - focused on substance and impact
Avoid:

Loud logos or tech company branded clothing
Overly formal business attire
Flashy or expensive accessories
Anything that suggests style over substance
Background
Solid, perfectly uniform studio background in #141414 (deep charcoal)
Alternative tech-friendly tones: #151517 to #1F1F21 (contemporary neutrals)
Clean, distraction-free backdrop suitable for tech applications
Completely seamless with no patterns or textures
Professional subject-background separation for natural depth
Background works seamlessly with tech company branding and materials
Dark tone allows subject and technical expertise to be the focus
Suitable for integration into tech websites, presentations, and social platforms
Professional Lighting Setup - Bright & Natural Tech
Lighting philosophy: Bright, airy, naturally diffused lighting that feels contemporary and accessible, suggesting innovation and open collaboration

Key light: Large, soft diffusion source (large octabox or scrim) at 25-35° angle

Loop or modified butterfly lighting pattern
Bright, clean, naturally diffused illumination
Open, airy lighting quality suggesting transparency and accessibility
Soft, wraparound light - nothing harsh or dramatic
Contemporary studio aesthetic - clean and naturally bright
Fill light: Generous, soft fill creating minimal shadow contrast (1.5:1 to 2:1 ratio)

Bright, open lighting approach
Natural, airy feel suggesting innovation and openness
Face evenly illuminated with contemporary polish
Minimal shadows for fresh, accessible look
Light suggesting natural daylight or modern office environment
Rim/hair light: Subtle separation for natural polish

Clean edge definition without artificial drama
Natural application maintaining bright, airy aesthetic
Adds professional quality and dimension
Eye light: Natural, bright catchlights

Lower fill or large reflector for engaging eyes
Eyes bright and intellectually engaged
Natural light interaction suggesting authenticity
Overall lighting characteristics:

Bright, airy, naturally diffused studio approach
Contemporary and accessible illumination
Clean, fresh lighting with modern polish
Warm-neutral color temperature (5200-5500K)
Bright, optimistic aesthetic suggesting innovation and collaboration
Face naturally illuminated with intellectual engagement
Lighting conveys accessibility, intelligence, and authentic leadership
Natural studio aesthetic - contemporary and genuine
Technical Camera Specifications
Lens: 85mm prime focal length simulation (natural tech portrait standard)
Aperture: f/1.8-f/2.0 for beautiful subject isolation with maintained facial sharpness
Focus point: Exquisite precision focus on nearest eye (critical for engagement and intelligence)
Depth of field: Shallow with optimal facial clarity
Both eyes in exquisite sharp focus
Face comfortably within sharp focus plane
Beautiful, soft falloff to background
Smooth, natural bokeh characteristics - elegant and unobtrusive
Perspective: Natural compression with contemporary proportions
Image quality: Contemporary digital sensor simulation with exceptional dynamic range and color depth
Image Quality & Tech Industry Standards
Eyes: Exquisitely sharp, intellectually engaging

Visible iris detail with natural color depth and variation
Individual eyelashes clearly defined
Bright, natural catchlights suggesting engagement
Eyes projecting technical intelligence and creative problem-solving
Skin: Natural, authentic texture showing real person

Realistic skin texture preservation
Contemporary retouching maintaining genuine appearance
Modern approach - polished but authentically human
Healthy, energetic skin tone suggesting vitality
Fabric texture: Natural clothing detail and quality

Henley: Visible cotton knit texture and natural drape
Button-down: Clean cotton weave and contemporary fit
Natural fabric characteristics and quality indicators
Rolled sleeves showing natural fabric behavior
Hair: Individual strands with natural texture and movement

Contemporary styling and grooming
Natural hair texture and light interaction
Modern, professional but not overly styled appearance
Overall sharpness: Exceptional clarity with natural quality

Optical sharpness without artificial enhancement
Clean, precise detail throughout focus plane
Natural image quality suggesting authenticity
Color Grading & Post-Processing - Contemporary Tech
Color philosophy: Clean, contemporary color science with balanced warmth and modern finish appropriate for tech industry applications

Temperature: Balanced with contemporary warmth (5200-5600K)

Natural, contemporary color balance
Slight warmth suggesting accessibility and human connection
Modern, tech-friendly aesthetic
Balanced approach - neither cool nor overly warm
Skin tones: Natural, healthy, contemporary

Warm-neutral and vibrant
Natural, authentic appearance
Contemporary color with realistic enhancement
Skin tone suggesting intelligence, health, and engagement
Contrast: Contemporary, clean, accessible

Slightly lifted blacks for modern, open feel
Controlled highlights with natural detail preservation
Contemporary contrast curve - bright and naturally engaging
Fresh, accessible aesthetic
Clean, digitally optimized contrast
Saturation: Natural with contemporary vibrancy

Clean, modern color palette
Slightly enhanced for digital platform optimization
Natural color richness and depth
Contemporary, tech-friendly color approach
Overall: fresh, natural, digitally optimized
Contemporary retouching - Tech industry standard:

Minimal retouching maintaining complete authenticity
Remove only temporary blemishes or distractions
Preserve all natural character, texture, and genuine appearance
Natural skin texture and individual characteristics maintained
Modern approach prioritizing authenticity over perfection
Brighten eyes naturally for intellectual engagement
Clean up any minor wardrobe issues
Philosophy: Real person, genuine leader - enhanced but completely authentic
Final refinements:

Very subtle vignette (barely detectable)
Natural sharpening approach maintaining authenticity
Optimized for tech platforms, social media, and digital applications
Contemporary color grading suitable for technology sector communications
Color Palette - Tech Industry Contemporary
Henley options:

Heather Gray: #8E8E93 to #A0A0A5
Soft Charcoal: #5A5A5D to #6A6A6D
Warm Gray: #8A8A8D to #9A9A9D
Button-down options:

White: #FFFFFF to #F8F8F8
Light Blue: #E8F2F7 to #DDE9F0
Soft Gray: #E0E0E3 to #EBEBEE
Background: #141414 or contemporary tech-friendly neutral

Skin tones: Natural, warm-neutral, healthy, contemporary

Overall palette: Fresh, modern, natural, tech-friendly, accessible

Overall Aesthetic & Mood
Tech Industry Leader / Technical Innovator: CTO, VP of Engineering, Tech Founder, Product Leader, Senior Software Architect. Someone who builds technology products, leads engineering teams, solves complex technical problems, and bridges the gap between technology and human needs.

Visual references:

Silicon Valley executive profiles (Google, Apple, Microsoft, Meta)
TechCrunch feature interviews and profiles
GitHub leadership pages and developer community
Stack Overflow and developer platform profiles
Y Combinator technical founder photography
Tech conference keynote speaker materials
Engineering leadership blog profiles
Open source project maintainer photos
Tech industry contexts:

Engineering leadership and technical team management
Product development and technical strategy
Open source community leadership and contribution
Technical conference speaking and thought leadership
Developer relations and community building
Technical recruiting and team building
Investor relations for technical founders
Customer-facing technical leadership and product evangelism
Emotional tone:

Authentic technical intelligence with human accessibility
Genuine passion for building things that matter
Collaborative leadership that attracts top engineering talent
Problem-solving mindset with user-centric thinking
Innovative thinking grounded in technical reality
Approachable expertise that builds trust with technical and non-technical stakeholders
Forward-thinking vision with practical execution capability
Key characteristics:

Authentic over polished - real technical leader, not corporate executive
Accessible over intimidating - builds teams and collaborative relationships
Technical depth over superficial knowledge - genuine expertise and hands-on experience
Human-centered over technology-centered - builds for people, not just systems
Collaborative over authoritative - leads through influence and shared vision
Innovation-focused over status-focused - cares about impact and solutions
Contemporary over traditional - understands modern tech industry culture
Genuine over manufactured - authentic leadership and technical passion
Tech Industry Applications
This portrait must excel in:

Company websites and engineering leadership pages
Technical conference speaker profiles and presentations
LinkedIn profiles and professional tech networking
GitHub profiles and open source community presence
Technical blog authoring and thought leadership
Investor presentations and technical founder materials
Team recruitment and engineering culture communications
Customer-facing technical leadership and product evangelism
Developer relations and community engagement
Technical awards and industry recognition
Press coverage in tech publications and industry media
Podcast appearances and technical interviews
Digital Platform Optimization
Optimized for modern tech platforms and developer communities
Professional quality for technical conference presentations
Clear and engaging across various digital applications
Works effectively in GitHub, LinkedIn, and technical social platforms
Contemporary aesthetic appealing to engineers, investors, and customers
Suitable for technical webinars, demos, and virtual conferences
Scales appropriately for both thumbnail and large-format applications
Technical Leadership Context
Projects technical competence and innovative thinking
Suggests hands-on experience and deep technical knowledge
Conveys ability to lead engineering teams and complex projects
Balances technical depth with business and user understanding
Inspires confidence in technical decision-making and architecture
Suggests collaborative leadership style that attracts top talent
Projects authenticity and genuine passion for technology and innovation
Strictly Avoid
❌ Formal business suits or traditional corporate attire
❌ Overly serious, intimidating, or unapproachable expressions
❌ Artificial, overly retouched, or "corporate headshot" appearance
❌ Cool, sterile, or lifeless lighting and color grading
❌ Dramatic or artistic lighting effects
❌ Loud logos, tech company branded clothing, or flashy accessories
❌ Stiff, formal, or overly posed positioning
❌ Expressions that appear arrogant or condescending
❌ Poor grooming or unprofessional casual appearance
❌ Distracting backgrounds or busy elements
❌ Technical imperfections or soft focus issues
❌ Colors that clash with tech industry aesthetics
❌ Overly trendy styling that will quickly date
❌ Sales-focused or marketing-heavy energy
❌ Traditional formal photography approaches inappropriate for tech culture

Quality Benchmarks
Industry standards: Silicon Valley tech companies (Google, Apple, Microsoft, Meta, Netflix), leading startups, major tech conferences (Google I/O, Apple WWDC, Microsoft Build, AWS re:Invent)

Photography references: Tech industry portrait specialists, Silicon Valley executive photographers, developer community documentation, modern tech conference photography

Publications: TechCrunch, Wired, Fast Company, IEEE Computer Society, ACM Communications, Stack Overflow Blog, GitHub Blog, tech company engineering blogs

Platform standards: LinkedIn tech executive profiles, GitHub maintainer photos, tech conference speaker directories, engineering leadership websites

Final result: An authentic, contemporary tech entrepreneur portrait that immediately communicates technical intelligence, innovative thinking, and approachable leadership. Quality and presentation worthy of major tech conferences, engineering leadership communications, and press coverage in leading technology publications. Natural, genuine aesthetic that resonates with tech industry culture while maintaining professional polish for investor and customer communications. The portrait should project the technical depth and authentic leadership that attracts top engineering talent, builds trust with technical stakeholders, and inspires confidence in the ability to build innovative technology solutions.

The ultimate test: This portrait should work effectively on a technical conference speaker page, inspire confidence when recruiting senior engineers, look natural in TechCrunch or Wired coverage, and convey the authentic technical leadership that CTOs and technical founders need to build successful technology companies. It should project the right balance of technical expertise, innovative thinking, and human accessibility that characterizes successful tech leaders who build products that improve lives and advance technology
Prompt 11: The Product Manager or Team Lead
Edit this image to create a premium product manager/team lead professional headshot with the following specifications:

Core Requirements
Preserve identity: Maintain exact facial structure, bone architecture, eye shape and color, nose proportions, mouth characteristics, distinctive features, and all identifying elements of the original subject
Resolution: Minimum 2400x2400px, 300 DPI, professional quality for corporate applications, team pages, and professional networking
Output format: Professional corporate-ready file optimized for company websites, LinkedIn profiles, project presentations, and team communications
Primary objective: Project collaborative leadership, reliable competence, and organized professionalism that builds trust with cross-functional teams, stakeholders, and management
Composition & Framing
Professional team lead headshot framing: mid-chest through crown with clean, organized proportions
Subject positioned using rule of thirds with eyes in upper-middle third
Clean headroom and comfortable negative space above head (12-16% of frame)
Body positioning: Straight-forward, confident positioning suggesting reliability and focus
Squared shoulders or subtle angle (5-15° rotation) for approachable professionalism
Confident, organized posture suggesting competence and reliability
Open, collaborative stance indicating team leadership and accessibility
Professional bearing appropriate for cross-functional team leadership
Camera height: Eye level for peer-to-peer, collaborative connection
Vertical/portrait orientation optimized for professional platforms and corporate communications
Composition suggests organization, reliability, and professional competence
Framing appropriate for team pages, project presentations, and stakeholder communications
Expression & Collaborative Leadership
Direct, steady eye contact with camera - engaged and professionally focused
Focused, collaborative expression with thoughtful confidence - reliable team leadership energy
Genuine professional smile or composed, thoughtful expression - approachable but competent
Expression projecting: reliability, collaborative leadership, organized thinking, professional competence
Eyes showing intelligence, focus, strategic thinking, and team-oriented mindset
Facial expression that builds confidence in project delivery and team coordination
Thoughtful leadership - someone who listens, organizes, and delivers results
Professional warmth suggesting excellent team collaboration and stakeholder management
Composed confidence suggesting ability to handle complex projects and competing priorities
Expression that suggests someone you'd trust to manage important initiatives
Energy of someone who bridges technical and business requirements effectively
Clear, professional catchlights in both eyes at 10-11 o'clock position
Posture & Professional Team Leadership
Confident, organized posture with professional bearing
Reliable, competent presence suggesting consistent delivery
Straight, engaged positioning suggesting focus and attention to detail
Body language communicating: "I deliver results and coordinate teams effectively"
Professional presence that inspires confidence from both technical and business stakeholders
Natural positioning suggesting accessibility and collaborative approach
Overall stance: cross-functional team-ready, stakeholder-accessible, project-focused
Energy of someone who manages complexity and delivers outcomes
Posture suggesting both technical understanding and business acumen
Wardrobe - Smart Business Casual Professional
Blazer: Clean, well-fitted business casual blazer - professional team leadership appropriate

Colors: Navy #2B3D52, Charcoal #3A3A3E, Medium Gray #4A4A4E, or Professional Earth tones
Smart business casual cut - professional but not executive formal
Modern, structured fit suggesting competence and attention to detail
Could be: contemporary blazer, structured cardigan, or professional sport coat
Quality fabric indicating professional standards and reliability
Clean, professional styling appropriate for stakeholder meetings
Shirt/Underlayer: Simple, well-fitted shirt - organized professional aesthetic

Options:
Clean button-down shirt (white, light blue, subtle pattern)
High-quality polo shirt in professional colors
Fine-knit crew-neck or v-neck sweater
Professional henley or mock turtleneck
Key characteristics:
Excellent fit - professional but comfortable
Clean, minimal design - no loud patterns or graphics
Professional colors that work in corporate environments
Quality fabric suggesting attention to professional standards
Overall aesthetic:

Product Manager, Scrum Master, Team Lead, Project Manager
Cross-functional team leadership - tech meets business
Professional enough for stakeholder presentations
Approachable enough for daily team collaboration
Organized competence and reliable delivery
Smart business casual - more professional than startup casual, less formal than executive
Quality standards:

Excellent fit and professional styling
Clean, well-maintained appearance
Professional colors appropriate for corporate environments
Suggests organized approach and attention to detail
Background
Solid, perfectly uniform studio background in #141414 (deep charcoal)
Alternative professional tones: #131315 to #1D1D1F (corporate-friendly neutrals)
Clean, professional backdrop suitable for corporate applications
Completely seamless with no patterns, textures, or distractions
Professional subject-background separation for clean presentation
Background works well with corporate branding and team materials
Neutral tone allows professional competence to be the focus
Suitable for integration into company websites, presentations, and team communications
Professional Lighting Setup - Even & Clear Professional
Lighting philosophy: Even, bright, professional studio lighting that creates clear, organized impression suggesting reliability and competence

Key light: Large softbox or octabox at 30-40° angle

Loop or modified butterfly lighting pattern
Even, professional illumination with clear detail
Bright, organized lighting quality suggesting competence and reliability
Professional studio quality with consistent, dependable results
Clean, corporate-appropriate lighting aesthetic
Fill light: Balanced fill creating controlled shadow ratio (2:1 to 2.5:1)

Professional lighting balance
Clear, organized illumination
Face evenly lit with professional dimension
Controlled shadows for professional polish
Lighting suggesting transparency and reliable communication
Rim light: Clean separation for professional polish

Professional edge definition and quality
Subtle application maintaining clean, organized aesthetic
Adds professional quality and corporate polish
Eye light: Clear, professional catchlights

Eyes bright and professionally engaged
Clear light interaction suggesting focus and competence
Overall lighting characteristics:

Even, bright, professionally controlled studio lighting
Clear and organized illumination
Professional studio quality with corporate polish
Neutral color temperature (5400-5700K)
Bright, clear aesthetic suggesting professional competence
Face professionally illuminated with organized clarity
Lighting conveys reliability, competence, and professional organization
Clean studio aesthetic - professional and dependable
Technical Camera Specifications
Lens: 85mm prime focal length simulation (professional portrait standard)
Aperture: f/1.8-f/2.2 for professional subject isolation with maintained clarity
Focus point: Sharp precision focus on nearest eye (critical for professional engagement)
Depth of field: Professional shallow depth with complete facial sharpness
Both eyes in sharp focus plane
Face entirely within acceptable sharpness
Clean, professional falloff to background
Unobtrusive, professional bokeh characteristics
Perspective: Natural compression with professional proportions
Image quality: Professional digital sensor quality with excellent dynamic range
Image Quality & Professional Standards
Eyes: Sharp, professionally focused, and engaged

Visible iris detail with natural clarity
Individual eyelashes clearly defined
Clear, professional catchlights
Eyes projecting competence, focus, and collaborative intelligence
Skin: Natural, professional skin texture

Realistic texture preservation showing authentic professional
Professional retouching maintaining natural appearance
Balanced approach - polished but genuine
Healthy, professional skin tone suggesting competence
Fabric detail: Clean clothing and professional styling detail

Blazer: Visible quality fabric texture and professional construction
Shirt: Clean fabric weave and professional fit
Professional presentation suggesting attention to detail
Quality indicators suggesting reliable professional standards
Hair: Professional grooming with natural texture

Clean, professional styling appropriate for corporate environment
Individual strands with natural texture and professional polish
Well-maintained appearance suggesting organized approach
Overall sharpness: Professional clarity with clean detail

Clean, precise sharpness without artificial enhancement
Professional quality throughout focus plane
Clear, organized detail rendition
Color Grading & Post-Processing - Professional Corporate
Color philosophy: Clean, professional color science with neutral, polished tones appropriate for corporate environments

Temperature: Neutral to slightly cool (5400-5800K)

Professional, clean color balance
Corporate-appropriate color temperature
Clean, organized aesthetic
Professional color standards
Skin tones: Natural, professional, healthy

Neutral and professionally balanced
Clean, professional appearance
Natural color with professional polish
Skin tone suggesting competence and reliability
Contrast: Professional, clean, organized

Controlled shadows and highlights
Professional tonal separation
Clean contrast appropriate for corporate applications
Organized, clear aesthetic
Professional contrast standards
Saturation: Natural with professional polish

Clean, professional color palette
Slightly refined for corporate presentation
Professional color depth and clarity
Corporate-appropriate color approach
Overall: clean, professional, organized
Professional retouching - Corporate standard:

Professional retouching maintaining authenticity
Remove temporary blemishes and minor distractions
Preserve natural professional appearance
Professional skin smoothing without artificiality
Clean up any wardrobe imperfections
Enhance professional presentation details
Approach: Professional, competent, reliable - enhanced but authentic
Corporate refinements:

Subtle professional vignette
Professional sharpening approach
Optimized for corporate platforms and professional communications
Clean color grading suitable for business environments
Color Palette - Professional Corporate
Blazer options:

Navy: #2B3D52 to #3A4A5F
Charcoal: #3A3A3E to #4A4A4E
Medium Gray: #4A4A4E to #5A5A5E
Professional Earth: #4A453F to #5A554F
Shirt options:

White: #FFFFFF to #F8F8F8
Light Blue: #E8F2F7 to #DDE9F0
Light Gray: #E8E8EA to #EEEEEE
Professional colors appropriate for corporate settings
Background: #141414 or professional neutral tone

Skin tones: Natural, neutral, professional, healthy

Overall palette: Clean, professional, neutral, corporate-appropriate, reliable

Overall Aesthetic & Mood
Professional Team Leader / Cross-Functional Coordinator: Product Manager, Scrum Master, Team Lead, Project Manager, Program Manager. Someone who coordinates cross-functional teams, manages complex projects, bridges technical and business requirements, and delivers consistent results.

Visual references:

Corporate team pages and organizational charts
Professional LinkedIn profiles for mid-level managers
Project management and agile methodology training materials
Corporate website "Meet the Team" sections
Professional conference attendee photography
Business school case study materials
Corporate training and development programs
Professional certification program materials
Corporate contexts:

Cross-functional team leadership and project coordination
Stakeholder management and business communication
Product development and project delivery
Agile methodology and process improvement
Professional development and team building
Corporate presentations and status reporting
Client-facing project management and coordination
Professional networking and industry engagement
Emotional tone:

Reliable competence that builds stakeholder confidence
Collaborative leadership that coordinates diverse teams effectively
Organized professionalism that manages complexity successfully
Thoughtful intelligence that bridges technical and business requirements
Consistent delivery that meets deadlines and expectations
Professional accessibility that facilitates effective communication
Dependable expertise that handles competing priorities efficiently
Key characteristics:

Reliable over innovative - consistent delivery and dependable results
Collaborative over authoritative - builds consensus and facilitates teamwork
Organized over creative - manages complexity and delivers structure
Professional over casual - corporate-appropriate presentation
Balanced over specialized - bridges technical and business requirements
Consistent over disruptive - steady performance and reliable outcomes
Team-focused over individual - cross-functional coordination and collaboration
Process-oriented over ad-hoc - systematic approach to complex projects
Corporate Applications
This portrait must excel in:

Company websites and team organization pages
Professional LinkedIn profiles and corporate networking
Project presentations and stakeholder communications
Corporate training materials and professional development
Team communications and organizational announcements
Professional conferences and industry networking
Client-facing materials and project documentation
Internal communications and company newsletters
Professional certifications and credential documentation
Performance reviews and career development materials
Cross-functional team coordination and collaboration tools
Corporate social media and professional representation
Professional Platform Optimization
Professional quality appropriate for corporate environments
Clean presentation for stakeholder and management communications
Works effectively across various corporate platforms and applications
Professional aesthetic appropriate for client-facing materials
Corporate-friendly appearance suitable for team coordination and leadership
Suitable for professional presentations, project documentation, and team communications
Scales appropriately for both digital applications and print materials
Team Leadership Context
Projects competence in cross-functional team coordination
Suggests ability to manage complex projects and competing priorities
Conveys reliable delivery and consistent professional performance
Balances technical understanding with business acumen
Inspires confidence in project management and team leadership capabilities
Suggests collaborative approach that facilitates effective teamwork
Projects professional organization and systematic approach to complexity
Strictly Avoid
❌ Overly casual or startup-style informal appearance
❌ Executive-level formal attire inappropriate for mid-level position
❌ Overly artistic or creative styling
❌ Dramatic lighting or mood-heavy presentation
❌ Expressions that appear overly serious or unapproachable
❌ Colors or styling that clash with corporate environments
❌ Poor grooming or unprofessional presentation
❌ Overly retouched or artificial appearance
❌ Loud patterns, logos, or distracting elements
❌ Posture suggesting arrogance or superiority
❌ Technical imperfections or poor image quality
❌ Expressions that appear unfocused or disorganized
❌ Styling that suggests inexperience or lack of professional competence
❌ Backgrounds that distract from professional presentation
❌ Lighting that creates unflattering shadows or unclear presentation

Quality Benchmarks
Industry standards: Fortune 500 corporate team pages, professional services firms, technology companies with established corporate structure, project management organizations

Photography references: Corporate headshot specialists, professional services photography, business school materials, professional certification programs

Publications: Harvard Business Review team features, Project Management Institute materials, Agile Alliance conference documentation, corporate case study photography

Platform standards: LinkedIn professional profiles for team leads and project managers, corporate website team sections, professional development materials

Final result: A polished, professional team leadership portrait that immediately communicates competence, reliability, and collaborative leadership capability. Quality and presentation worthy of corporate team pages, stakeholder presentations, and professional networking platforms. Clean, organized aesthetic that projects the dependable professionalism required for cross-functional team leadership and complex project management. The portrait should inspire confidence in the ability to coordinate diverse teams, manage competing priorities, and deliver consistent results while maintaining professional relationships across technical and business stakeholders.

The ultimate test: This portrait should work effectively on a corporate team page, inspire confidence in stakeholder presentations, look professional in client-facing materials, and convey the reliable competence that managers seek when assigning complex cross-functional projects. It should project the right balance of technical understanding, business acumen, and collaborative leadership that characterizes successful product managers and team leads who consistently deliver results in complex organizational environments
Prompt 12: The Developer or Engineer Profile
Edit this image to create a premium software developer/engineer professional headshot with the following specifications:

Core Requirements
Preserve identity: Maintain exact facial structure, bone architecture, eye shape and color, nose proportions, mouth characteristics, distinctive features, and all identifying elements of the original subject
Resolution: Minimum 2400x2400px, 300 DPI, optimized for digital platforms, portfolio sites, and technical profiles
Output format: Developer ecosystem-ready file optimized for GitHub, Stack Overflow, LinkedIn technical profiles, portfolio websites, technical conference materials, and engineering team pages
Primary objective: Project technical expertise, analytical intelligence, and focused competence that builds credibility in software engineering contexts
Composition & Framing
Technical professional headshot framing: mid-chest through crown with clean, minimal proportions
Subject positioned using rule of thirds with eyes in upper-middle third
Relaxed, natural headroom (12-15% of frame) - uncontrived, thoughtful spacing
Body positioning: Straight-forward or subtle angle (0-10° rotation)
Square, focused stance suggesting technical precision
Calm, centered posture reflecting logical thinking
Clean, distraction-free positioning appropriate for technical contexts
Shoulders relaxed but purposeful - not stiff, not slouched
Camera height: Eye level for direct, honest technical connection
Vertical/portrait orientation optimized for developer platforms and profiles
Composition suggests clarity, focus, and technical precision
Clean, minimal framing appropriate for technical contexts and developer communities
Avoids overly creative or artistic composition - respects technical function
Expression & Technical Intelligence
Direct, clear eye contact with camera - engaged and intellectually present
Calm, intelligent expression with quiet confidence - technical competence energy
Composed, thoughtful expression - neither smiling broadly nor completely serious
Expression projecting: analytical thinking, problem-solving ability, technical depth, focused intelligence
Eyes showing logical thinking, attention to detail, and deep technical understanding
Facial expression that suggests someone who solves complex technical problems
Quiet confidence - competence without arrogance or showmanship
Authentic, unmanufactured expression suggesting genuine technical ability
Slight hint of curiosity or analytical consideration - the look of someone evaluating a problem
Expression that feels natural in technical environments and developer communities
Energy of someone who writes clean code and builds solid systems
Clear, natural catchlights in both eyes at 10-11 o'clock position
Posture & Technical Focus
Calm, centered posture with natural technical presence
Focused, intentional bearing suggesting attention to detail
Clean, minimal positioning - nothing distracting or extraneous
Body language communicating: "I write code that works"
Quiet technical confidence without performative elements
Natural positioning suggesting authentic technical competence
Overall stance: repository-ready, technically credible, engineering appropriate
Energy of someone who focuses deeply on technical challenges
Posture suggesting both concentration and calm competence
Wardrobe - Technical Professional
Primary Option: Clean, minimal crew-neck sweater in neutral color

Colors: Charcoal #3A3A3E, Navy #2B3A4F, Heather Gray #8E8E93, Slate Blue #4E5D6C
High-quality fabric with clean, minimal texture
Simple, functional design - no logos, graphics or patterns
Perfect fit - not tight, not loose
Suggests focus on function over form
Alternative Option: Simple button-down shirt in minimal style

Colors: Oxford Blue #BDCAD6, Light Gray #E0E0E3, White #FFFFFF
Clean, minimal styling - no patterns or loud elements
Top button open, collar relaxed - not formal
Could be Oxford cloth or quality cotton
Contemporary fit without flashiness
Style characteristics:

High-quality but not showy
Function-first aesthetic
Clean lines and minimal design
Technical rather than fashionable
Practical colors that work in technical environments
Avoids anything loud, flashy, or attention-seeking
Professional enough for technical leadership
Appropriate for focused development work
Overall aesthetic:

Senior Developer, Software Engineer, Systems Architect
Technical professional who focuses on substance over style
Quality engineering rather than corporate image
Deep technical competence over surface presentation
Function-focused professionalism - pragmatic and clear
Background
Solid, perfectly uniform studio background in #141414 (deep charcoal)
Alternative technical tones: #0F0F11 to #1A1A1C (deep neutral blacks)
Clean, distraction-free backdrop appropriate for technical profiles
Completely seamless with no patterns or textures
Natural subject-background separation for clean presentation
Background supports technical focus without competing elements
Dark tone allows technical competence to be the focus
Suitable for technical applications across various platforms
Appearance reminiscent of code editor dark themes (VS Code, JetBrains)
Professional Lighting Setup - Clean & Technical
Lighting philosophy: Soft, even, distraction-free lighting that creates a clean, focused impression suggesting technical clarity and analytical thinking

Key light: Large softbox or scrim at 30-45° angle

Loop or butterfly lighting pattern
Clean, even illumination with minimal drama
Soft but precise lighting quality suggesting technical accuracy
Natural falloff without harsh transitions
Lighting that supports focus rather than calls attention to itself
Fill light: Clean, even fill creating balanced shadow ratio (2:1 to 3:1 ratio)

Controlled shadow for dimension without distraction
Face clearly illuminated with subtle modeling
Technical precision in lighting approach
Balanced, thoughtful illumination
Rim light: Subtle, clean separation

Minimal edge definition - functional not dramatic
Technical application maintaining clean aesthetic
Adds separation without drawing attention
Eye light: Natural, clean catchlights

Eyes clear and intellectually engaged
Lighting suggesting analytical focus
Overall lighting characteristics:

Soft, even, technically precise lighting
Clean and distraction-free illumination
Controlled, intentional light quality
Cool-neutral color temperature (5500-5800K)
Clear, focused aesthetic supporting technical credibility
Face illuminated with calm clarity
Lighting conveys precision, accuracy, and technical focus
Clean studio aesthetic - functional and unobtrusive
Technical Camera Specifications
Lens: 85mm prime focal length simulation (technical portrait standard)
Aperture: f/1.8-f/2.0 for clean subject isolation
Focus point: Sharp precise focus on nearest eye (critical for technical credibility)
Depth of field: Technical shallow depth with complete facial clarity
Both eyes in critically sharp focus
Face entirely within sharp focus plane
Clean, precise falloff to background
Smooth, unobtrusive bokeh characteristics
Perspective: Natural compression with technical proportions
Image quality: Clean digital sensor quality with excellent technical precision
Image Quality & Technical Standards
Eyes: Sharp precise focus with clear detail

Visible iris texture and natural color depth
Individual eyelashes clearly defined
Clean, natural catchlights
Eyes projecting analytical intelligence and focus
Skin: Natural, authentic texture

Realistic skin texture preservation
Natural appearance without excessive retouching
Clean approach maintaining technical authenticity
Healthy, natural skin tone
Fabric texture: Clean, functional material detail

Visible quality fabric texture
Natural material characteristics
Clean construction and minimal design elements
Hair: Natural texture with clean definition

Individual strands with natural texture
Well-maintained but not overly styled
Technical professional grooming standard
Overall sharpness: Technical precision with clean detail

Sharp, clear focus throughout intended plane
Technical quality supporting credibility
Clean, precise detail rendition
Color Grading & Post-Processing - Technical Professional
Color philosophy: Clean, cool-neutral, balanced color science with technical precision and clarity

Temperature: Cool-neutral (5600-5900K)

Technical, clean color balance
Slightly cool temperature suggesting analytical thinking
Modern, digital-native aesthetic
Technical precision in color calibration
Skin tones: Natural, neutral, technically accurate

Cool-neutral and balanced
Natural appearance without enhancement
Technically accurate color rendition
Skin tone suggesting focus and clarity
Contrast: Clean, precise, controlled

Technical contrast with clarity
Deep but controlled shadows
Clean highlights with detail preservation
Technical precision in tonal separation
Modern contrast approach supporting technical aesthetic
Saturation: Slightly desaturated for technical focus

Clean, minimal color palette
Slightly reduced for technical clarity
Focus on structure over color
Technical color approach
Overall: clean, precise, focused
Technical retouching:

Minimal retouching maintaining complete authenticity
Remove only distracting temporary elements
Preserve natural character and texture
Technical approach prioritizing accuracy over enhancement
Clean up any minor technical imperfections
Approach: Accurate, precise, authentic - minimal intervention
Technical refinements:

Subtle technical vignette (barely detectable)
Precise sharpening on key elements
Optimized for digital platforms and technical profiles
Clean, technical color grading suitable for developer communities
Color Palette - Technical Professional
Sweater options:

Charcoal: #3A3A3E to #4A4A4E
Navy: #2B3A4F to #3A4A5F
Heather Gray: #8E8E93 to #A0A0A5
Slate Blue: #4E5D6C to #5E6D7C
Button-down options:

Oxford Blue: #BDCAD6 to #AEC2D6
Light Gray: #E0E0E3 to #EBEBEE
White: #FFFFFF to #F8F8F8
Background: #141414 or technical neutral tone

Skin tones: Natural, neutral, technically accurate

Overall palette: Clean, cool-neutral, technical, functional, precise

Overall Aesthetic & Mood
Technical Professional / Software Developer: Senior Software Engineer, Backend Developer, Systems Architect, Database Administrator, DevOps Engineer. Someone who writes code, builds systems, solves technical problems, and focuses on functional excellence over appearance.

Visual references:

GitHub profile images of respected open source contributors
Stack Overflow high-reputation user profiles
Technical conference speaker headshots
Engineering team pages from respected tech companies
Developer community profile photos
Technical blog author images
Engineering documentation contributor photos
Technical contexts:

GitHub profiles and open source contributions
Stack Overflow and technical community participation
Developer portfolios and personal websites
Engineering team pages and technical blogs
Technical conference speaker materials
Developer documentation and technical publications
Code repository contributions and technical projects
Engineering job applications and technical resumes
Emotional tone:

Calm technical competence that builds trust in code quality
Focused intelligence suggesting attention to detail and logical thinking
Quiet confidence in technical ability without unnecessary showmanship
Analytical mindset suggesting problem-solving capability
Thoughtful precision appropriate for complex technical work
Function-over-form mentality that prioritizes results
Technical depth that respects complexity and seeks elegant solutions
Key characteristics:

Substance over style - technical excellence over superficial polish
Function over form - prioritizes what works over what impresses
Precision over drama - calm accuracy over flashy presentation
Depth over breadth - focused expertise over generalized knowledge
Logical over emotional - analytical thinking over personality projection
Technical over social - competence over charisma
Clean over complex - elegant simplicity over unnecessary elaboration
Authentic over manufactured - genuine expertise over cultivated image
Technical Applications
This portrait must excel in:

GitHub profiles and open source project contributions
Developer portfolios and personal technical websites
Stack Overflow and technical Q&A communities
LinkedIn technical profiles and engineering networks
Technical blog authorship and documentation
Engineering team pages and company websites
Technical conference speaker materials and submissions
Developer community participation and forums
Technical project repositories and documentation
Engineering job applications and professional development
Technical Slack/Discord profiles and developer communities
Engineering education and teaching materials
Technical Platform Optimization
Optimized for developer platforms and technical communities
Clear and effective across various technical applications
Works well on dark and light interfaces (GitHub dark/light modes)
Professional quality appropriate for senior technical roles
Clean presentation that maintains credibility across contexts
Technically appropriate aesthetic that resonates with engineering peers
Scales appropriately for various technical profile requirements
Technical Credibility Context
Projects technical competence and problem-solving capability
Suggests depth of knowledge and focused expertise
Conveys logical thinking and analytical approach
Balances technical focus with professional presentation
Inspires confidence in code quality and system design
Suggests attention to detail and precision in work
Projects authentic technical knowledge without unnecessary embellishment
Strictly Avoid
❌ Corporate formal business attire
❌ Overly enthusiastic or sales-oriented expressions
❌ Artificially enhanced or overly retouched appearance
❌ Dramatic or artistic lighting effects
❌ Busy patterns, loud colors, or distracting elements
❌ Stiff, formal, or overly posed positioning
❌ Expressions that appear arrogant or unapproachable
❌ Poor grooming or unprofessional appearance
❌ Distracting backgrounds or environmental elements
❌ Technical imperfections or focus issues
❌ Corporate branding or company logos
❌ Overly warm or emotionally-focused color grading
❌ Marketing-style polish inappropriate for technical contexts
❌ Trendy styling that sacrifices technical credibility
❌ Anything that suggests style over substance

Quality Benchmarks
Industry standards: GitHub verified contributors, Stack Overflow high-reputation users, technical conference speakers, respected open source maintainers

Photography references: Developer community documentation, engineering team photography, technical conference speaker materials, technical blog author profiles

Technical platforms: GitHub, Stack Overflow, LinkedIn technical profiles, developer portfolios, engineering documentation

Engineering contexts: Open source projects, technical teams, developer communities, systems architecture, software engineering leadership

Final result: A clean, focused technical professional portrait that immediately communicates software development expertise, analytical thinking, and focused competence. Quality and presentation appropriate for developer communities, open source contributions, and technical professional contexts. Clean, precise aesthetic that builds credibility among technical peers and supports professional engineering reputation. The portrait should project the technical depth and calm competence that characterizes respected developers who write quality code, build reliable systems, and solve complex technical problems with logical precision.

The ultimate test: This portrait should look natural on a GitHub profile of a major open source contributor, build credibility on a technical blog explaining complex systems architecture, feel appropriate on an engineering team page for a respected tech company, and convey the right balance of technical expertise and professional focus that senior engineering hiring managers look for when evaluating candidates for technical leadership positions
Healthcare, Education, and Service Professionals (4 Prompts)
These prompts use profession-specific attire and mood language that builds the trust and approachability these fields depend on. The healthcare prompt includes profession-specific wardrobe details that signal immediate professional recognition. The professional portrait AI results here prioritize warmth alongside competence.
Prompt 13: The Healthcare Professional
Edit this image to create a premium medical professional headshot with the following specifications:

Core Requirements
Preserve identity: Maintain exact facial structure, bone architecture, eye shape and color, nose proportions, mouth characteristics, distinctive features, and all identifying elements of the original subject
Resolution: Minimum 2500x2500px, 300 DPI, medical-grade quality for healthcare marketing, practice websites, and professional directories
Output format: Healthcare-optimized file for medical websites, physician directories, hospital credentials, patient communications, and health system marketing
Primary objective: Project clinical expertise, trustworthy competence, and genuine compassionate care that builds patient confidence and professional credibility
Composition & Framing
Professional medical headshot framing: mid-chest through crown with clean, professional proportions
Subject positioned using rule of thirds with eyes in upper-middle third
Professional headroom and clean upper space (12-15% breathing room) - organized, trustworthy
Body positioning: Direct, forward-facing (0-5° rotation maximum)
Squared shoulders suggesting medical confidence and reliability
Open, accessible stance conveying patient-centered approach
Direct, engaged positioning appropriate for physician/patient trust
Professional bearing communicating clinical expertise
Camera height: Eye level for equal, trustworthy connection with patients
Vertical/portrait orientation with clear, medical professional proportions
Composition suggests reliability, expertise, and healthcare credibility
Framing appropriate for medical websites, hospital credentialing, and physician directories
Expression & Medical Compassion
Direct, engaged eye contact with camera - trustworthy and present
Trustworthy, compassionate expression - balanced clinical professionalism with genuine warmth
Subtle, genuine smile conveying confidence and care - approachable yet authoritative
Expression projecting: medical expertise, trustworthy competence, compassionate understanding, clinical confidence
Eyes showing intelligence, attentiveness, and genuine care for patients
Facial expression that builds confidence in medical judgment while conveying human empathy
Professional warmth - someone patients trust with their health concerns
Balance of clinical authority and approachable humanity
Expression conveying both "I know what I'm doing" and "I care about you as a person"
Looks like someone who listens carefully to patients while providing expert care
Energy of a practitioner who combines technical expertise with genuine compassion
Clear, gentle catchlights in both eyes at 10-11 o'clock position enhancing trustworthiness
Posture & Medical Authority
Excellent, confident posture with professional bearing
Straight, aligned spine suggesting medical precision and professionalism
Shoulders squared and open - confident but not intimidating
Chest naturally forward suggesting engagement and confidence
Neck aligned with subtle chin positioning - authoritative without arrogance
Body language communicating: "You are in good hands" and "I am fully present"
Professional presence that inspires patient confidence and peer respect
Overall stance: clinically competent, ethically grounded, patient-focused
Energy of someone who takes healthcare responsibilities seriously
Posture suggesting both medical expertise and compassionate attention
Wardrobe - Clinical Professional
Medical Coat: Crisp white laboratory or physician coat - symbol of medical expertise

White: #FFFFFF to #FAFAFA (pure clinical white)
Professional-grade medical coat with proper fit and length
Clean, pressed appearance with professional structure
Visible lapels in proper position
Coat fits well across shoulders - not too tight, not too loose
Sleeves at proper length showing professional attention to detail
High-quality medical coat fabric with subtle texture
Could include subtle embroidery of credentials (MD, DO, NP, etc.) if appropriate
No stains, wrinkles or imperfections - impeccably maintained
Professional pocket placement and structure
Underlayer: Clean light blue or white collared shirt

Light Blue: #D0E0F0 to #E0F0FF (medical professional blue)
White: #FFFFFF to #F8F8F8 (crisp clinical white)
Professional collar visible above coat
Clean, pressed appearance - impeccably maintained
Conservative, professional styling
Possible subtle tie for male physicians (burgundy, blue, or muted pattern)
Open collar without tie acceptable for approachable aesthetic
Overall clinical aesthetic:

Board-certified physician, established medical practitioner
Clinical excellence with human compassion
Professional healthcare standard - hospital credentialing ready
Trustworthy medical authority with patient-centered approach
Quality healthcare professional - someone patients can trust
Appropriate for all healthcare contexts from private practice to major medical centers
Medical professional principles:

Cleanliness and precision above all
Professional presentation reflecting clinical standards
Traditional elements that patients recognize and trust
Details that reflect attention to medical precision
Nothing flashy or attention-seeking - focus on patient care
Background
Solid, perfectly uniform studio background in #141414 (deep charcoal)
Alternative medical tones: #0F0F11 to #1A1A1C (deep neutral blacks)
Clean, distraction-free backdrop appropriate for medical contexts
Completely seamless with no patterns or textures
Professional subject-background separation for clean clinical presentation
Background allows focus on medical professional and clinical credentials
Dark tone provides contrast with white coat while maintaining professional feel
Suitable for medical marketing, healthcare directories, and hospital credentialing
Professional Lighting Setup - Medical Professional
Lighting philosophy: Clean, bright soft studio lighting that is warm and approachable while remaining clinically precise - suggests both expertise and care

Key light: Large softbox or scrim at 30-45° angle

Loop or butterfly lighting pattern for clinical clarity
Clean, bright illumination with professional polish
Soft but precise lighting quality suggesting medical expertise
Bright enough for clarity while remaining flattering
Professional lighting supporting medical credibility
Fill light: Gentle fill creating balanced shadow ratio (2:1 to 2.5:1 ratio)

Controlled shadow for dimension without severity
Face clearly illuminated with subtle modeling
Professional precision in lighting approach
Warm fill suggesting approachability and care
Rim light: Subtle separation for clinical definition

Clean edge light defining medical professional from background
Precise application enhancing professional appearance
Adds separation without excessive drama
Professional polish appropriate for healthcare context
Eye light: Gentle catchlights enhancing engagement

Eyes bright and compassionately engaged
Lighting suggesting attentiveness and care
Overall lighting characteristics:

Clean, bright, professionally controlled lighting
Warm approachability with clinical precision
Professional quality appropriate for medical marketing
Warm-neutral color temperature (5200-5500K)
Clean, professional aesthetic with human warmth
Face illuminated with clarity and compassion
Lighting conveys expertise, attention, and medical trustworthiness
Professional studio aesthetic - polished but human
Technical Camera Specifications
Lens: 85mm prime focal length simulation (medical portrait standard)
Aperture: f/1.8-f/2.2 for professional subject isolation
Focus point: Sharp precision focus on nearest eye (critical for medical trustworthiness)
Depth of field: Professional shallow depth with complete facial clarity
Both eyes in critically sharp focus
Face entirely within sharp focus plane
Clean, professional falloff to shoulders and background
Unobtrusive, professional bokeh characteristics
Perspective: Natural compression with professional proportions
Image quality: Clean digital sensor quality with excellent color accuracy and detail
Image Quality & Medical Professional Standards
Eyes: Sharp, clear focus with professional detail

Visible iris detail with natural color accuracy
Individual eyelashes clearly defined
Clean, gentle catchlights suggesting engagement and care
Eyes projecting medical intelligence and compassionate attention
Skin: Natural, healthy texture with professional polish

Realistic skin texture preservation
Professional retouching maintaining natural appearance
Clean approach preserving authenticity
Healthy, vibrant skin tone suggesting medical well-being
Blemishes removed without artificial smoothing
Medical coat: Clean, professional fabric detail

Visible quality fabric texture and professional construction
Crisp, white color with subtle texture detail
Professional tailoring and structural elements
Clean lapels and professional styling
Hair: Professional grooming with natural definition

Clean, professional styling appropriate for medical practice
Individual strands with natural texture
Well-maintained appearance suggesting attention to detail
Conservative, trustworthy styling
Overall sharpness: Professional clarity with clean detail

Sharp, clear focus throughout intended plane
Professional quality supporting medical credibility
Clean, precise detail rendition
Color Grading & Post-Processing - Healthcare Professional
Color philosophy: Clean, warm-neutral color science with professional polish appropriate for healthcare contexts

Temperature: Warm-neutral (5200-5500K)

Professional color balance with subtle warmth
Clean, clinical base with human warmth
Medical-appropriate color temperature
Balance of clinical precision and human care
Skin tones: Natural, healthy, vibrant

Warm-neutral and professionally balanced
Natural appearance with healthy glow
Accurately rendered with subtle enhancement
Skin tone suggesting health and vitality
Whites: Clean, bright medical whites

Coat rendered pure white without blowing out
Clean, clinical appearance of medical garments
Professional handling of bright whites
Medical-grade white balance and rendering
Contrast: Clean, professional, dimensional

Controlled with medical precision
Bright without harsh contrasts
Professional polish without artificial enhancement
Contrast suggesting clarity and transparency
Saturation: Natural with subtle professional enhancement

Clean, medical color palette
Slightly enhanced for professional polish
Natural color with subtle vibrancy
Professional health-oriented color approach
Overall: clean, professional, trustworthy
Medical professional retouching:

Clean, natural approach maintaining authenticity
Remove temporary blemishes and distractions
Preserve natural features and character
Professional polish without artificial appearance
Subtle under-eye refinement maintaining natural look
Even skin tone with natural variation preserved
Clean up any minor wardrobe imperfections
Philosophy: Healthy, natural, professional - enhanced but authentic
Medical refinements:

Subtle professional vignette drawing focus to practitioner
Clean sharpening enhancing critical details
Optimized for medical websites and healthcare directories
Professional color grading suitable for healthcare marketing
Color Palette - Healthcare Professional
Medical coat: Pure White #FFFFFF to #FAFAFA

Shirt options:

Light Blue: #D0E0F0 to #E0F0FF
White: #FFFFFF to #F8F8F8
Background: #141414 or professional medical neutral

Skin tones: Natural, warm-neutral, healthy, vibrant

Overall palette: Clean, warm-neutral, professional, healthy, medical

Overall Aesthetic & Mood
Healthcare Professional / Medical Practitioner: Physician, Nurse Practitioner, Physician Assistant, Medical Specialist. Someone who combines clinical expertise with compassionate care, providing trustworthy medical guidance with human understanding.

Visual references:

Major hospital system physician directories
Academic medical center faculty profiles
Medical board certification photography
Healthcare provider marketing materials
Medical practice websites and patient portals
Hospital credentialing documentation
Medical insurance network provider directories
Pharmaceutical speaker bureau professionals
Medical journal contributor photography
Healthcare contexts:

Medical practice websites and marketing
Physician directories and provider networks
Hospital credentialing and staff pages
Patient portals and provider information
Health system marketing and communications
Medical society membership and leadership
Healthcare conference presentations and speaking
Medical publication authorship and research
Insurance network provider directories
Medical education and training materials
Emotional tone:

Trustworthy expertise that builds patient confidence
Compassionate understanding balanced with clinical authority
Professional competence with genuine human warmth
Patient-centered focus with medical precision
Approachable authority that puts patients at ease
Clinical excellence with ethical integrity
Balanced intelligence - knowledgeable but relatable
Healthcare leadership that inspires confidence and trust
Key characteristics:

Competence with compassion - expertise with human understanding
Authority with approachability - confident but not intimidating
Clinical precision with human warmth - technical skill with empathy
Professional with personal - formal credentials with human connection
Traditional with current - established medical protocols with contemporary approach
Serious without severity - appropriate gravity without intimidation
Confident without arrogance - expertise without superiority
Caring without emotionality - compassion with professional boundaries
Healthcare Applications
This portrait must excel in:

Medical practice websites and marketing materials
Physician directories and provider listings
Hospital staff and department pages
Healthcare system provider networks
Patient portal provider information
Medical society membership directories
Professional credentials and board certifications
Medical publications and research papers
Healthcare conference presentations and materials
Medical education and teaching credentials
Insurance networks and provider listings
Professional networking in medical contexts
Patient-Centered Optimization
Professional quality inspiring patient confidence
Approachable warmth encouraging patient engagement
Clean presentation appropriate for healthcare marketing
Professional appearance meeting hospital credentialing standards
Balanced authority and accessibility for diverse patient populations
Trustworthy presence supporting patient decision-making
Medical professionalism appropriate for all healthcare contexts
Strictly Avoid
❌ Overly casual or unprofessional appearance
❌ Cold, clinical lighting without human warmth
❌ Dramatic lighting or artistic effects
❌ Expressions that appear aloof or detached
❌ Wrinkled, stained, or improperly fitted medical coat
❌ Poor grooming or unprofessional presentation
❌ Overly retouched or artificial appearance
❌ Backgrounds that distract from medical professional
❌ Technical imperfections or focus issues
❌ Colors inappropriate for healthcare contexts
❌ Posture suggesting disengagement or inattention
❌ Extreme retouching removing natural character
❌ Styling inappropriate for medical credibility
❌ Expressions appearing insincere or forced
❌ Lighting creating unflattering shadows or color casts
❌ Attire without clear medical identification (white coat)

Quality Benchmarks
Industry standards: Leading academic medical centers (Mayo Clinic, Cleveland Clinic, Johns Hopkins), major hospital systems, respected medical journals, healthcare provider marketing best practices

Healthcare applications: Medical practice websites, physician directories, hospital staff pages, health system provider networks, medical society directories

Photography references: Medical board certification photography, healthcare provider portraits, academic medical faculty profiles, hospital marketing materials

Patient-centered considerations: Inspires confidence, communicates expertise, conveys compassion, builds trust, reduces anxiety, suggests accessibility

Final result: A polished, professional medical practitioner portrait that immediately communicates clinical expertise, trustworthy competence, and genuine compassionate care. Quality and presentation worthy of major medical centers, respected healthcare directories, and patient-centered medical marketing. The portrait should project both the technical expertise and human compassion that patients seek when selecting a healthcare provider - someone they can trust with their medical concerns who will provide both excellent clinical care and compassionate human understanding.

The ultimate test: When a potential patient views this portrait while searching for a healthcare provider, it should inspire confidence in the practitioner's medical expertise while also suggesting someone who will listen carefully to concerns, explain clearly, and provide care with both technical skill and genuine compassion
Prompt 14: The Teacher, Professor, or Academic
Edit this image to create a premium university faculty/academic professional headshot with the following specifications:

Core Requirements
Preserve identity: Maintain exact facial structure, bone architecture, eye shape and color, nose proportions, mouth characteristics, distinctive features, and all identifying elements of the original subject
Resolution: Minimum 2500x2500px, 300 DPI, publication-quality for academic journals, university websites, and scholarly applications
Output format: Academic-ready file optimized for university faculty pages, scholarly publications, conference materials, research profiles, and educational platforms
Primary objective: Project intellectual authority, educational warmth, and scholarly expertise that builds credibility with students, peers, and academic communities
Composition & Framing
Scholarly professional headshot framing: mid-chest through crown with intellectual proportions
Subject positioned using rule of thirds with eyes in upper-middle third
Relaxed, intellectual headroom (12-18% of frame) - thoughtful, contemplative spacing
Body positioning: Relaxed yet dignified angle (5-15° rotation)
Shoulders positioned with scholarly bearing - authoritative but accessible
Slight forward presence suggesting intellectual engagement
Open stance indicating educational approachability
Professional posture with academic thoughtfulness
Camera height: Eye level for equal, intellectual peer connection
Vertical/portrait orientation optimized for academic applications
Composition suggests thoughtfulness, intellectual presence, and educational gravitas
Framing appropriate for university directories, academic publications, and educational contexts
Expression & Academic Engagement
Direct, thoughtful eye contact with camera - intellectually present and engaged
Thoughtful, engaged expression - balanced intellectual authority with educational warmth
Genuine, subtle smile or contemplative expression - approachably intelligent
Expression projecting: intellectual curiosity, scholarly expertise, educational warmth, academic authority
Eyes showing wisdom, critical thinking, intellectual engagement, and genuine interest in ideas
Facial expression that encourages intellectual discussion while maintaining scholarly credibility
Academic warmth - someone who challenges students while supporting their growth
Balance of intellectual authority and educational accessibility
Expression suggesting both "I know my field deeply" and "I'm interested in your thoughts"
Looks like someone who listens to students while guiding their intellectual development
Energy of an educator who combines scholarly excellence with genuine teaching passion
Clear, warm catchlights in both eyes at 10-11 o'clock position enhancing intellectual engagement
Posture & Scholarly Presence
Dignified yet relaxed posture with academic bearing
Upright without stiffness - scholarly without pretension
Shoulders comfortably back suggesting intellectual confidence
Chest naturally open conveying approachability and engagement
Neck relaxed with natural head position - thoughtful without affectation
Body language communicating: "I have expertise to share" and "I value intellectual exchange"
Professional presence that inspires academic respect and student trust
Overall stance: intellectually authoritative, educationally approachable, scholarly grounded
Energy of someone who values rigorous thinking and meaningful discourse
Posture suggesting both academic accomplishment and teaching dedication
Wardrobe - Academic Professional
Primary Option: Classic blazer over quality dress shirt/blouse - timeless academic professionalism

Blazer colors: Navy #1F2C47, Burgundy #662A35, Forest Green #214A35, Charcoal #3A3A3E
Professional cut with scholarly styling - academic without excessive formality
Quality fabric with natural texture and drape
Traditional tailoring suggesting academic credibility
Could be structured blazer, semiformal academic jacket, or quality suit jacket
Alternative Option: Traditional tweed sport coat - classic scholarly aesthetic

Tweed patterns: Herringbone, subtle check, or classic elbow-patched professor style
Colors: Earth tones #5A4B3E, Olive #4A5440, Brown Tones #62503C, Heathered Gray #5A5A5E
Traditional academic styling with natural texture
Quality wool with visible texture and scholarly character
Classic professor aesthetic with contemporary fit
Shirt/Blouse:

Options for all genders:
Quality dress shirt in White #FFFFFF, Light Blue #E0EAF5, Soft Cream #F5F1E6
Professional blouse in complementary tones
Fine turtleneck or quality sweater for more casual academic settings
Clean, professional collar visible above jacket
Quality fabric suggesting attention to detail without ostentation
Could include subtle tie for more formal academic contexts
Open collar acceptable for more approachable scholarly aesthetic
Overall academic aesthetic:

Tenured professor, department chair, scholarly author
Academic excellence with educational accessibility
Professional standard appropriate across university settings
Intellectual authority with teaching approachability
Quality academic professional - someone students respect and colleagues trust
Appropriate for contexts from university lectures to academic conferences
Academic professional principles:

Intellectual substance over flashy presentation
Traditional elements that convey academic credibility
Quality suggesting scholarly attention to detail
Balance of formality and approachability appropriate for educational settings
Disciplinary-appropriate styling (more traditional for humanities, slightly more contemporary for sciences)
Background
Solid, perfectly uniform studio background in #141414 (deep charcoal)
Alternative academic tones: #0F0F11 to #1A1A1C (deep neutral blacks) or #192535 (deep academic blue)
Clean, distraction-free backdrop appropriate for scholarly contexts
Completely seamless with no patterns or textures
Professional subject-background separation for clean intellectual presentation
Background allows focus on academic professional and scholarly presence
Dark tone provides depth while maintaining professional academic feel
Suitable for university websites, faculty directories, and scholarly publications
Professional Lighting Setup - Academic Warmth
Lighting philosophy: Warm, soft studio lighting that flatters and creates an atmosphere of intellectual approachability - suggests both wisdom and accessibility

Key light: Large softbox or scrim at 30-45° angle

Loop or butterfly lighting pattern for intellectual clarity
Warm, soft illumination with scholarly polish
Gentle but defined lighting quality suggesting academic depth
Flattering without artifice - truthful yet complementary
Professional lighting supporting intellectual credibility
Fill light: Gentle, warm fill creating balanced shadow ratio (2:1 to 3:1 ratio)

Controlled shadow for dimension and character
Face clearly illuminated with thoughtful modeling
Academic precision in lighting approach
Warm fill suggesting educational approachability
Rim light: Subtle separation for scholarly definition

Clean edge light defining academic professional from background
Precise application enhancing scholarly appearance
Adds separation without excessive drama
Professional polish appropriate for academic context
Eye light: Warm catchlights enhancing intellectual engagement

Eyes bright and intellectually engaged
Lighting suggesting wisdom and curiosity
Overall lighting characteristics:

Warm, soft, professionally controlled lighting
Intellectual depth with educational warmth
Professional quality appropriate for academic applications
Warm color temperature (4800-5400K)
Clean, scholarly aesthetic with human warmth
Face illuminated with clarity and thoughtfulness
Lighting conveys wisdom, approachability, and academic credibility
Professional studio aesthetic - polished but genuine
Technical Camera Specifications
Lens: 85mm prime focal length simulation (academic portrait standard)
Aperture: f/1.8-f/2.2 for professional subject isolation with scholarly depth
Focus point: Sharp precision focus on nearest eye (critical for intellectual credibility)
Depth of field: Professional shallow depth with complete facial clarity
Both eyes in critically sharp focus
Face entirely within sharp focus plane
Clean, professional falloff to shoulders and background
Smooth, natural bokeh characteristics - unobtrusive and elegant
Perspective: Natural compression with balanced proportions
Image quality: Clean digital sensor quality with excellent color accuracy and natural detail
Image Quality & Academic Professional Standards
Eyes: Sharp, clear focus with intellectual depth

Visible iris detail with natural color accuracy
Individual eyelashes clearly defined
Clean, warm catchlights suggesting engagement and wisdom
Eyes projecting intellectual curiosity and scholarly depth
Skin: Natural, truthful texture with professional polish

Realistic skin texture preservation showing authentic character
Professional retouching maintaining natural appearance
Truthful approach preserving academic authenticity
Healthy, natural skin tone suggesting vitality and engagement
Character lines preserved - suggesting wisdom and experience
Academic attire: Clean, professional fabric detail

Visible quality fabric texture and scholarly construction
Natural drape and structure of academic attire
Professional tailoring and quality materials
Texture details enhancing academic credibility
Hair: Professional grooming with natural definition

Natural styling appropriate for academic settings
Individual strands with authentic texture
Age-appropriate styling suggesting scholarly authenticity
Well-maintained appearance without excessive styling
Overall sharpness: Professional clarity with thoughtful detail

Sharp, clear focus throughout intended plane
Professional quality supporting academic credibility
Clean, precise detail rendition with natural character
Color Grading & Post-Processing - Academic Professional
Color philosophy: Warm, inviting color science with scholarly polish appropriate for educational contexts

Temperature: Warm (4800-5400K)

Intellectual color balance with intentional warmth
Scholarly base with educational approachability
Academic-appropriate color temperature
Balance of intellectual depth and human connection
Skin tones: Natural, warm, authentic

Naturally warm and truthfully balanced
Authentic appearance with healthy vitality
Accurately rendered with subtle enhancement
Skin tone suggesting engagement and presence
Contrast: Clean, scholarly, dimensional

Controlled with intellectual precision
Professional without harsh extremes
Academic polish without artificial enhancement
Contrast suggesting depth and dimension
Saturation: Natural with subtle scholarly enhancement

Clean, academic color palette
Slightly enhanced for professional polish
Natural color with subtle richness
Professional education-oriented color approach
Overall: warm, intellectual, truthful
Academic professional retouching:

Clean, natural approach maintaining authenticity
Remove temporary blemishes and distractions
Preserve character lines and natural features
Professional polish without artificial appearance
Subtle refinement maintaining scholarly authenticity
Even skin tone with natural variation preserved
Clean up any minor wardrobe imperfections
Philosophy: Authentic, scholarly, truthful - enhanced but genuine
Academic refinements:

Subtle professional vignette drawing focus to educator
Clean sharpening enhancing critical details
Optimized for university websites and academic directories
Warm color grading suitable for educational contexts
Color Palette - Academic Professional
Blazer options:

Navy: #1F2C47 to #2A3A58
Burgundy: #662A35 to #7A3541
Forest Green: #214A35 to #2A5A42
Charcoal: #3A3A3E to #4A4A4E
Tweed options:

Earth tones: #5A4B3E to #6A5A4B
Olive: #4A5440 to #5A6450
Brown Tones: #62503C to #72604A
Heathered Gray: #5A5A5E to #6A6A6E
Shirt/Blouse options:

White: #FFFFFF to #F8F8F8
Light Blue: #E0EAF5 to #D0E0F0
Soft Cream: #F5F1E6 to #EFE9DD
Background: #141414 or scholarly neutral tone

Skin tones: Natural, warm, truthful, vibrant

Overall palette: Warm, scholarly, natural, intellectual, educational

Overall Aesthetic & Mood
Academic Professional / University Educator: Professor, Associate Professor, Department Chair, Scholar-Teacher, Academic Researcher. Someone who combines scholarly expertise with educational dedication, providing intellectual leadership with genuine interest in teaching and mentoring.

Visual references:

University faculty directories of prestigious institutions
Academic journal editorial board profiles
University press author photographs
Academic conference keynote speaker profiles
Department chair and tenured faculty photography
Educational leadership portraits
Research institute scholarly profiles
University marketing materials featuring distinguished faculty
Academic book jacket author photographs
Educational contexts:

University faculty directories and department pages
Academic publications and research profiles
Scholarly journals and editorial boards
Educational conference presentations and materials
University marketing to prospective students
Research grant applications and academic CV
Academic book author profiles and jacket photos
Educational leadership roles and committee work
Professional academic societies and organizations
Teaching award recognition and academic honors
Emotional tone:

Intellectual authority balanced with educational accessibility
Scholarly expertise with genuine teaching passion
Academic rigor with approachable mentorship
Professional competence with intellectual warmth
Thoughtful intelligence that encourages student growth
Critical thinking with supportive guidance
Disciplinary depth with interdisciplinary openness
Academic accomplishment with teaching dedication
Key characteristics:

Expertise with approachability - scholarly depth with educational warmth
Authority with accessibility - intellectual leadership with student engagement
Academic with human - professional scholarly with personal connection
Challenging with supportive - intellectual rigor with educational scaffolding
Traditional with progressive - scholarly traditions with contemporary approaches
Serious without severity - intellectual depth without intimidation
Accomplished without arrogance - scholarly achievement with humility
Intellectual without pretension - genuine scholarly without affectation
Academic Applications
This portrait must excel in:

University faculty directories and department websites
Academic CV and professional profiles
Scholarly publications and journal editorial boards
Conference presentations and speaking engagements
Research grant applications and academic credentials
University marketing and student recruitment materials
Academic book publications and author profiles
Educational leadership roles and committee work
Teaching award nominations and academic recognition
Professional societies and academic organizations
Alumni publications and university news features
Educational technology platforms and online courses
Educational Context Optimization
Professional quality appropriate for scholarly publication
Intellectual warmth encouraging student engagement
Balanced authority and approachability for diverse educational settings
Academic credibility supporting research and scholarly work
Disciplinary-appropriate presentation across academic fields
Traditional enough for established institutions, contemporary enough for innovative programs
Suitable for both print publications and digital platforms
Strictly Avoid
❌ Overly casual or unprofessional appearance
❌ Corporate or business formal styling inappropriate for academia
❌ Cold, distant, or intimidating expressions
❌ Dramatic lighting or artistic effects inappropriate for scholarly contexts
❌ Expressions that appear condescending or arrogant
❌ Poor quality or inappropriate academic attire
❌ Overly retouched or artificial appearance
❌ Backgrounds that distract from academic professional
❌ Technical imperfections or focus issues
❌ Colors inappropriate for educational contexts
❌ Posture suggesting disengagement or academic aloofness
❌ Extreme retouching removing scholarly character
❌ Styling inappropriate for academic credibility
❌ Expressions appearing insincere or forced
❌ Ultra-contemporary or trendy styling that will date quickly
❌ Overly formal or stuffy academic stereotypes

Quality Benchmarks
Industry standards: Leading research universities (Oxford, Harvard, Stanford), respected academic journals, university press publications, scholarly societies and organizations

Academic applications: University faculty pages, scholarly publications, academic conference materials, university press materials, research profiles

Photography references: Academic professional portraiture, university faculty photography, scholarly publication standards, educational leadership portraits

Educational considerations: Builds credibility with students and peers, communicates expertise, conveys approachability, inspires intellectual trust, encourages academic engagement, suggests scholarly depth

Final result: A polished, scholarly academic professional portrait that immediately communicates intellectual authority, educational warmth, and scholarly expertise. Quality and presentation worthy of prestigious universities, respected academic publications, and educational leadership contexts. The portrait should project both the intellectual depth and educational dedication that defines excellent faculty - someone students respect for their expertise and appreciate for their genuine commitment to teaching and mentoring.

The ultimate test: When students view this portrait on a university faculty page, it should inspire confidence in the professor's expertise while suggesting someone approachable for office hours; when academic peers view it in a scholarly publication, it should convey intellectual credibility and academic professionalism
Prompt 15: The Therapist or Counselor
Edit this image to create a premium counseling/therapy professional headshot with the following specifications:

Core Requirements
Preserve identity: Maintain exact facial structure, bone architecture, eye shape and color, nose proportions, mouth characteristics, distinctive features, and all identifying elements of the original subject
Resolution: Minimum 2500x2500px, 300 DPI, therapeutic-grade quality for counseling websites, psychology directories, and mental health platforms
Output format: Mental health professional-ready file optimized for therapy practice websites, counseling directories, telehealth platforms, and psychology networking
Primary objective: Project emotional safety, therapeutic warmth, and authentic empathy that builds immediate trust with potential clients seeking support
Composition & Framing
Therapeutic professional headshot framing: mid-chest through crown with gentle, open proportions
Subject positioned using rule of thirds with eyes in upper-middle third
Gentle, open headroom (12-18% of frame) - creating psychological space and openness
Body positioning: Slightly angled (10-20° rotation) with open shoulders
Shoulders relaxed and gently open toward camera suggesting accessibility
Slight forward presence suggesting attentiveness and engagement
Open, welcoming stance indicating emotional availability
Nothing rigid or closed - completely non-threatening posture
Camera height: Eye level for equal, non-hierarchical connection
Vertical/portrait orientation optimized for therapy platforms and directories
Composition suggests safety, approachability, and psychological holding space
Framing that feels contained and secure while remaining open and inviting
Expression & Therapeutic Presence
Direct, gentle eye contact with camera - present and emotionally attuned
Calm, empathetic expression - authentic emotional presence without forced cheerfulness
Subtle, genuine smile or warm neutral expression - approachable but not inappropriately cheerful
Expression projecting: emotional safety, non-judgmental acceptance, empathic understanding, grounded presence
Eyes showing warmth, attentive listening, emotional intelligence, and compassionate awareness
Facial expression that invites sharing of difficult emotions while conveying ability to hold space
Therapeutic warmth - someone clients would feel safe being vulnerable with
Balance of professional competence and genuine human warmth
Expression suggesting both "I understand how difficult this is" and "I'm here with you in this process"
Looks like someone who truly listens without judgment or agenda
Energy of a practitioner who balances professional boundaries with authentic care
Clear, gentle catchlights in both eyes at 10-11 o'clock position enhancing connection and presence
Posture & Therapeutic Bearing
Open, welcoming posture with grounded presence
Relaxed shoulders suggesting emotional accessibility
Gentle forward presence indicating attentiveness without intrusion
Neck relaxed with natural head position - attentive without strain
Body language communicating: "I am fully present" and "You are emotionally safe here"
Professional presence that balances boundaries with accessibility
Overall stance: emotionally attuned, psychologically safe, therapeutically grounded
Energy of someone who can hold space for difficult emotions without becoming overwhelmed
Posture suggesting both professional training and human compassion
Wardrobe - Therapeutic Professional
Professional business casual in calm, soothing tones - therapeutic without clinical coldness

Colors:

Sage Green: #8AA891 to #9BB9A1 (grounding, natural healing)
Soft Lavender: #C6C1DB to #D6D1EB (gentle, supportive)
Calming Blue: #A0BCD0 to #B0CCE0 (tranquil, trustworthy)
Warm Gray: #9A9A95 to #AAA9A4 (neutral, stabilizing)
Soft Cream: #EDE5D4 to #F5EFE5 (warm, comforting)
Style options:

Soft cardigan or relaxed blazer over simple shell
Quality knit top with gentle drape
Simple blouse or button-down with soft collar
Cowl neck or subtle v-neck sweater
Therapeutic wrap or structured but soft jacket
Key characteristics:

Natural, breathable fabrics with gentle texture
Soft draping that suggests approachability
Nothing rigid, sharp, or overly structured
Clean lines but not corporate or clinical
Professional without creating distance
Quality suggesting care and attention to detail
No distracting patterns, logos, or embellishments
Neckline that frames face without distraction
Overall therapeutic aesthetic:

Licensed therapist, psychologist, counselor, social worker
Empathic professional with clinical training
Balancing professional boundaries with emotional accessibility
Trustworthy presence that invites therapeutic alliance
Authentic professional who creates safety for vulnerability
Accessories (minimal and intentional):

Simple, meaningful necklace or subtle earrings acceptable
Nothing flashy, distracting, or status-oriented
Possibly meaningful symbol connected to healing or growth
Clean, minimal approach prioritizing client comfort
Background
Solid, perfectly uniform studio background in #141414 (deep charcoal)
Alternative therapeutic tones: #151517 to #1A1A1C (soft, grounding dark neutrals)
Clean, distraction-free backdrop supporting psychological safety
Completely seamless with no patterns or texture variations
Professional subject-background separation for clean therapeutic presentation
Background provides psychological containment without feeling claustrophobic
Dark tone creates safe emotional container while maintaining welcoming feel
Suitable for therapy websites, psychology directories, and mental health platforms
Professional Lighting Setup - Therapeutic Warmth
Lighting philosophy: Soft, warm studio lighting that creates a comforting, peaceful impression - suggests emotional safety and gentle holding

Key light: Large softbox or scrim at 30-45° angle

Loop or butterfly lighting pattern for gentle clarity
Soft, diffused illumination with minimal shadow
Warm, nurturing light quality suggesting safety and comfort
No harsh edges or dramatic shadows - completely non-threatening
Professional lighting supporting therapeutic connection
Fill light: Generous, warm fill creating minimal shadow contrast (1.5:1 to 2:1 ratio)

Open, accessible lighting approach
Face gently and fully illuminated with minimal shadowing
Balanced lighting suggesting emotional equilibrium
Warm fill suggesting therapeutic containment
Rim light: Subtle separation for gentle definition

Very soft edge light defining therapeutic professional from background
Gentle application enhancing dimensional presence
Adds subtle separation without drama or harshness
Professional polish appropriate for mental health context
Eye light: Gentle catchlights enhancing connection

Eyes warm and empathically engaged
Lighting suggesting presence and attunement
Overall lighting characteristics:

Soft, warm, professionally controlled lighting
Emotionally safe with therapeutic containment
Professional quality appropriate for mental health applications
Warm color temperature (4600-5200K)
Gentle, nurturing aesthetic with professional boundaries
Face illuminated with clarity and compassion
Lighting conveys safety, warmth, and therapeutic presence
Professional studio aesthetic - polished but genuinely human
Technical Camera Specifications
Lens: 85mm prime focal length simulation (therapeutic portrait standard)
Aperture: f/1.8-f/2.2 for gentle subject isolation
Focus point: Warm, precise focus on nearest eye (critical for therapeutic connection)
Depth of field: Professional shallow depth with complete facial clarity
Both eyes in warm, clear focus
Face entirely within focus plane
Gentle, soothing falloff to shoulders and background
Smooth, unobtrusive bokeh characteristics
Perspective: Natural compression with gentle proportions
Image quality: Clean digital sensor quality with natural warmth and detail
Image Quality & Therapeutic Professional Standards
Eyes: Clear, warm focus with emotional depth

Visible iris detail with natural color warmth
Individual eyelashes softly defined
Gentle, natural catchlights suggesting presence and attunement
Eyes projecting empathic understanding and emotional intelligence
Skin: Natural, authentic texture with gentle polish

Realistic skin texture preservation showing authentic human
Professional retouching maintaining natural appearance
Gentle approach preserving authenticity
Healthy, warm skin tone suggesting vitality and presence
Temporary blemishes removed while preserving character
Fabric texture: Soft, professional detail

Visible quality fabric texture and gentle drape
Natural material characteristics suggesting comfort
Professional quality without corporate rigidity
Texture supporting therapeutic aesthetic
Hair: Natural styling with authentic texture

Clean, professional styling appropriate for therapeutic context
Individual strands with natural movement and texture
Well-maintained appearance suggesting care without perfectionism
Authentic, approachable styling
Overall sharpness: Clean clarity with gentle detail

Clear focus throughout intended plane
Professional quality supporting therapeutic credibility
Clean detail rendition with nurturing softness
Color Grading & Post-Processing - Therapeutic Professional
Color philosophy: Warm, soothing color science with gentle polish appropriate for mental health contexts

Temperature: Warm (4600-5200K)

Therapeutic color balance with intentional warmth
Psychologically safe base with emotional accessibility
Mental health appropriate color temperature
Balance of professional boundaries and human connection
Skin tones: Natural, warm, authentic

Gently warm and professionally balanced
Authentic appearance with healthy vitality
Naturally rendered with subtle enhancement
Skin tone suggesting presence and attunement
Contrast: Gentle, therapeutic, dimensional

Controlled with psychological safety
Professional without harsh extremes
Therapeutic polish without artificial enhancement
Contrast suggesting depth without intensity
Saturation: Natural with subtle therapeutic enhancement

Clean, therapeutic color palette
Slightly enhanced for professional polish
Natural color with subtle warmth
Professional healing-oriented color approach
Overall: warm, safe, nurturing, genuine
Therapeutic professional retouching:

Gentle, natural approach maintaining authenticity
Remove temporary blemishes and distractions
Preserve character lines and natural features
Professional polish without artificial appearance
Subtle refinement maintaining human authenticity
Even skin tone with natural variation preserved
Clean up any minor wardrobe imperfections
Philosophy: Authentic, warm, present - gently enhanced but genuinely human
Therapeutic refinements:

Very subtle vignette creating psychological containment
Gentle sharpening enhancing connection points
Optimized for mental health websites and therapeutic directories
Warm color grading suitable for psychological safety
Color Palette - Therapeutic Professional
Clothing options:

Sage Green: #8AA891 to #9BB9A1
Soft Lavender: #C6C1DB to #D6D1EB
Calming Blue: #A0BCD0 to #B0CCE0
Warm Gray: #9A9A95 to #AAA9A4
Soft Cream: #EDE5D4 to #F5EFE5
Background: #141414 or therapeutic neutral tone

Skin tones: Natural, warm, authentic, present

Overall palette: Warm, soothing, genuine, therapeutic, containing

Overall Aesthetic & Mood
Therapeutic Professional / Mental Health Practitioner: Psychotherapist, Counselor, Psychologist, Clinical Social Worker, Marriage and Family Therapist. Someone who creates emotional safety, provides empathic presence, and supports psychological healing through professional therapeutic relationship.

Visual references:

Psychology Today therapist directories (top profiles)
Major therapy platform provider photos
Mental health association professional directories
Counseling practice websites
Psychology clinic team pages
Telehealth mental health provider portals
Therapy books author photos
Mental health conference speaker profiles
Therapeutic continuing education instructors
Therapeutic contexts:

Private practice websites and marketing
Therapy directories and provider listings
Mental health platforms and telehealth profiles
Psychology clinic team pages
Counseling centers and group practices
Mental health publications and resources
Therapy modality training and certification
Professional associations and networking
Continuing education teaching and facilitation
Mental health awareness and advocacy
Emotional tone:

Emotionally safe presence that invites therapeutic vulnerability
Empathic understanding balanced with professional boundaries
Warm authenticity with clinical competence
Non-judgmental acceptance with therapeutic structure
Compassionate presence with appropriate emotional regulation
Grounded stability that can hold difficult emotions
Genuine humanity with professional training
Trustworthy reliability with authentic emotional presence
Key characteristics:

Safe without distance - emotionally accessible while maintaining boundaries
Warm without merging - connected without enmeshment
Professional without coldness - competent but human
Authentic without oversharing - genuine with appropriate boundaries
Compassionate without overwhelm - capacity to hold pain
Present without intrusion - attuned but respectful
Structured without rigidity - containing without constricting
Human without unprofessionalism - relatable but ethical
Therapeutic Applications
This portrait must excel in:

Therapy practice websites and marketing materials
Psychology Today and other counseling directories
Telehealth platforms and virtual therapy
Mental health clinic team and provider pages
Private practice brochures and materials
Professional associations and networking profiles
Continuing education teaching and facilitation
Psychology publications and resources
Mental health podcasts and media
Therapy modality training and certification
Insurance panels and provider networks
Therapeutic supervision and consultation
Client-Centered Optimization
Professional quality inspiring therapeutic trust
Emotional warmth encouraging client engagement
Balanced boundaries creating psychological safety
Authentic presence supporting therapeutic alliance
Approachable energy reducing therapy anxiety
Professional appearance maintaining clinical credibility
Human warmth appropriate for vulnerability and healing work
Strictly Avoid
❌ Corporate or overly formal business attire
❌ Cold, clinical, or sterile presentation
❌ Overly cheerful or inauthentic expressions
❌ Dramatic lighting creating harsh shadows
❌ Expressions that appear detached or disinterested
❌ Colors that create anxiety or excessive stimulation
❌ Rigid, closed, or defensive body language
❌ Overly retouched or artificial appearance
❌ Backgrounds that feel unstable or chaotic
❌ Technical imperfections or focus issues
❌ Overly casual or unprofessional presentation
❌ Expressions that feel forced or insincere
❌ Styling that creates distance or authority barriers
❌ Lighting creating disconnection or emotional distance
❌ Accessories that distract from therapeutic presence
❌ Any elements that might trigger client distress

Quality Benchmarks
Industry standards: Leading therapy directories (Psychology Today verified profiles), major telehealth platforms, respected therapeutic training organizations, psychology associations

Therapeutic applications: Private practice websites, counseling directories, mental health platforms, psychology clinic pages, telehealth profiles

Photography references: Mental health professional portraiture, therapeutic professional standards, counseling association guidelines, trauma-informed visual communication

Client-centered considerations: Creates safety, invites trust, reduces anxiety, supports accessibility, communicates understanding, balances warmth with boundaries, suggests hope for healing

Final result: A warm, professional therapeutic portrait that immediately communicates emotional safety, empathic presence, and professional containment. Quality and presentation worthy of respected therapy directories, private practice websites, and mental health platforms. The portrait should project both the professional training and human warmth that clients seek when selecting a therapist - someone they can trust with their vulnerability, who will provide both competent care and genuine empathic understanding.

The ultimate test: When a potential client viewing this portrait while searching for a therapist should feel: "This is someone I could trust with my story," "I would feel safe being vulnerable with this person," and "This therapist might understand what I'm going through without judgment." The image should reduce anxiety about starting therapy while maintaining professional credibility
Prompt 16: The Real Estate Agent or Local Business Owner
Edit this image to create a premium real estate/local business professional headshot with the following specifications:

Core Requirements
Preserve identity: Maintain exact facial structure, bone architecture, eye shape and color, nose proportions, mouth characteristics, distinctive features, and all identifying elements of the original subject
Resolution: Minimum 2500x2500px, 300 DPI, marketing-quality for real estate listings, property brochures, business cards, and neighborhood marketing
Output format: Local business-ready file optimized for real estate websites, Zillow profiles, local service directories, community marketing, and printed materials
Primary objective: Project warm trustworthiness, local expertise, and approachable success that builds immediate neighborhood credibility and client confidence
Composition & Framing
Professional local business headshot framing: mid-chest through crown with confident, welcoming proportions
Subject positioned using rule of thirds with eyes in upper-middle third
Confident, welcoming headroom (12-15% of frame) - suggests stability and openness
Body positioning: Direct or slight angle (0-15° rotation) suggesting accessibility
Shoulders positioned with confident but approachable posture
Open stance suggesting neighborhood accessibility and client focus
Confident presence without corporate stiffness
Professional bearing with local warmth and authenticity
Camera height: Eye level for equal, neighbor-to-neighbor connection
Vertical/portrait orientation optimized for real estate marketing applications
Composition suggests stability, local presence, and community connection
Framing appropriate for yard signs, business cards, and local marketing materials
Expression & Local Trustworthiness
Direct, engaged eye contact with camera - connected and present
Warm, reassuring smile - genuine and naturally expressed through the entire face
Relaxed eyes with natural open expression - authentic warmth, not forced
Expression projecting: local trustworthiness, neighborhood expertise, genuine interest, approachable success
Eyes showing warmth, confidence, and authentic community connection
Facial expression that makes clients comfortable entrusting important local transactions
Balanced professional confidence with genuine neighborhood warmth
Expression suggesting both "I know this community" and "I'll take care of your needs"
Looks like someone who knows the neighborhood inside and out
Energy of a successful local professional who truly cares about client outcomes
Expression that builds immediate trust in person and in marketing materials
Clear, natural catchlights in both eyes at 10-11 o'clock position enhancing warmth and engagement
Posture & Local Professional Presence
Confident, welcoming posture with neighborhood approachability
Straight, engaged posture suggesting local expertise and reliability
Shoulders relaxed but confident - successful without intimidation
Chest naturally open conveying accessibility and client focus
Neck relaxed with confident head position - authoritative without arrogance
Body language communicating: "I'm established here" and "I'm here for you"
Professional presence that builds community trust and client confidence
Overall stance: locally successful, neighborhood-accessible, client-focused
Energy of someone who knows the community and delivers for clients
Posture suggesting both professional success and genuine local connection
Wardrobe - Local Business Professional
Blazer/Jacket: Sharp business casual blazer in welcoming, approachable color

Colors:
Navy #1F3A5F (trustworthy classic)
Burgundy #7A2639 (warm, established success)
Warm Gray #5A5A58 (approachable neutral)
Forest Green #2A553F (neighborhood connection)
Camel/Tan #A67C52 (approachable success)
Professional cut with contemporary local styling
Quality fabric with natural texture and professional drape
Excellent fit suggesting attention to client details
Clean lapels and professional structure
Could be traditional blazer or contemporary sports coat
Shirt/Blouse:

Clean dress shirt or professional blouse
Colors: White #FFFFFF, Light Blue #D5E5F5, Soft Pink #F5E1E2, Cream #F5F0E1
Crisp, professional collar visible above jacket
Open collar (no tie) for approachable local professional aesthetic
Quality fabric suggesting service excellence without pretension
Professional appearance with neighborhood accessibility
Overall aesthetic:

Successful real estate agent, local business owner, community professional
Established neighborhood expert with genuine local connections
Professional enough for significant transactions
Approachable enough for kitchen table discussions
Quality local professional - someone neighbors trust and recommend
Appropriate for contexts from home showings to community events
Local professional principles:

Successful but connected to community
Professional without corporate coldness
Quality suggesting attention to client needs
Traditional elements that local clients recognize and trust
Contemporary enough to be current but classic enough to be timeless
Nothing too flashy or status-oriented - focus on client service
Clean, well-maintained appearance reflecting property standards
Background
Solid, perfectly uniform studio background in #141414 (deep charcoal)
Alternative local business tones: #1A1A1C to #222224 (rich professional neutrals)
Clean, distraction-free backdrop appropriate for local marketing
Completely seamless with no patterns or textures
Professional subject-background separation for clean local presentation
Background allows focus on local professional and neighborhood expertise
Dark tone provides sophistication while maintaining approachable professionalism
Suitable for real estate marketing, business cards, and local service directories
Professional Lighting Setup - Warm & Successful
Lighting philosophy: Warm, bright studio lighting that creates a successful, trustworthy impression - suggests both achievement and accessibility

Key light: Large softbox or octa at 30-45° angle

Loop or butterfly lighting pattern for warm clarity
Bright, clean illumination with professional polish
Warm, inviting light quality suggesting neighborhood trust
Professional lighting supporting local business credibility
Fill light: Balanced fill creating natural shadow ratio (2:1 to 3:1 ratio)

Clean, professional shadow control
Face clearly illuminated with dimensional modeling
Professional precision with neighborhood warmth
Warm fill suggesting local accessibility
Rim light: Subtle separation for professional definition

Clean edge light defining local professional from background
Professional application enhancing success impression
Adds separation without excessive drama
Polish appropriate for established local business
Eye light: Natural catchlights enhancing connection

Eyes bright and warmly engaged
Lighting suggesting attentiveness to client needs
Overall lighting characteristics:

Warm, bright, professionally controlled lighting
Successful glow with neighborhood accessibility
Professional quality appropriate for marketing applications
Warm color temperature (4800-5400K)
Clean, inviting aesthetic with professional polish
Face illuminated with clarity and warmth
Lighting conveys success, trust, and local approachability
Professional studio aesthetic - polished but genuinely warm
Technical Camera Specifications
Lens: 85mm prime focal length simulation (local professional portrait standard)
Aperture: f/1.8-f/2.0 for professional subject isolation
Focus point: Sharp precision focus on nearest eye (critical for trust building)
Depth of field: Professional shallow depth with complete facial clarity
Both eyes in critically sharp focus
Face entirely within sharp focus plane
Clean, professional falloff to shoulders and background
Smooth, professional bokeh characteristics
Perspective: Natural compression with balanced proportions
Image quality: Clean digital sensor quality with excellent color accuracy and natural detail
Image Quality & Local Professional Standards
Eyes: Sharp, clear focus with warm engagement

Visible iris detail with natural color accuracy
Individual eyelashes clearly defined
Clean, natural catchlights suggesting connection
Eyes projecting trustworthiness and local expertise
Skin: Natural, authentic texture with professional polish

Realistic skin texture preservation showing authentic person
Professional retouching maintaining natural appearance
Clean approach preserving local authenticity
Healthy, vibrant skin tone suggesting success and vitality
Natural features preserved - suggesting approachability
Professional attire: Clean, detailed fabric texture

Visible quality fabric texture and professional construction
Natural drape and structure of business attire
Professional tailoring and quality materials
Clean lines and professional presentation
Hair: Professional grooming with natural definition

Clean, professional styling appropriate for local business
Individual strands with natural texture
Well-maintained appearance suggesting attention to detail
Conservative but contemporary styling
Overall sharpness: Professional clarity with natural detail

Sharp, clear focus throughout intended plane
Professional quality supporting local business credibility
Clean, precise detail rendition with natural character
Color Grading & Post-Processing - Local Professional
Color philosophy: Warm, welcoming color science with professional polish appropriate for local business contexts

Temperature: Warm (4800-5400K)

Success-oriented color balance with intentional warmth
Professional base with neighborhood approachability
Local business appropriate color temperature
Balance of professional success and community connection
Skin tones: Natural, warm, vibrant

Naturally warm and professionally balanced
Authentic appearance with healthy vitality
Accurately rendered with subtle enhancement
Skin tone suggesting success and neighborhood presence
Contrast: Clean, professional, dimensional

Controlled with local expertise
Professional without harsh extremes
Local business polish without artificial enhancement
Contrast suggesting success and dimension
Saturation: Natural with subtle professional enhancement

Clean, local business color palette
Slightly enhanced for professional polish
Natural color with subtle richness
Professional community-oriented color approach
Overall: warm, trustworthy, successful
Local professional retouching:

Clean, natural approach maintaining authenticity
Remove temporary blemishes and distractions
Preserve character lines and natural features
Professional polish without artificial appearance
Subtle refinement maintaining genuine appearance
Even skin tone with natural variation preserved
Clean up any minor wardrobe imperfections
Philosophy: Successful, authentic, local - enhanced but genuine
Local business refinements:

Subtle professional vignette drawing focus to local expert
Clean sharpening enhancing critical details
Optimized for real estate marketing and local directories
Warm color grading suitable for neighborhood marketing
Color Palette - Local Business Professional
Blazer options:

Navy: #1F3A5F to #2A4A70
Burgundy: #7A2639 to #8A3649
Warm Gray: #5A5A58 to #6A6A68
Forest Green: #2A553F to #3A654F
Camel/Tan: #A67C52 to #B68C62
Shirt/Blouse options:

White: #FFFFFF to #F8F8F8
Light Blue: #D5E5F5 to #E5F0FA
Soft Pink: #F5E1E2 to #F8EAEB
Cream: #F5F0E1 to #FAF5E6
Background: #141414 or local professional neutral tone

Skin tones: Natural, warm, vibrant, healthy

Overall palette: Warm, welcoming, trustworthy, successful, local

Overall Aesthetic & Mood
Local Business Professional / Real Estate Expert: Real Estate Agent, Mortgage Broker, Insurance Agent, Financial Advisor, Community Business Owner. Someone who combines professional success with local connection, providing trustworthy expertise with genuine community understanding.

Visual references:

Top-producing real estate agent profiles on Zillow/Redfin
Local insurance agent marketing materials
Neighborhood mortgage broker websites
Community financial advisor profiles
Chamber of Commerce leadership pages
Local business success stories
Neighborhood service provider directories
Community bank local branch management
Successful real estate team websites
Local business contexts:

Real estate listings and property marketing
Local business directories and community guides
Neighborhood marketing materials and direct mail
Zillow/Trulia/Redfin agent profiles and reviews
Business cards and personal marketing
Community event sponsorships and materials
Local service websites and customer portals
Chamber of Commerce and business networking
Social proof testimonials and client success stories
Yard signs and local advertising
Neighborhood sponsorships and community involvement
Emotional tone:

Trustworthy local expertise with proven success
Approachable professionalism with genuine community connection
Neighborhood knowledge with broad market understanding
Confident competence with client-focused service
Established success without detachment from community
Local reliability with professional excellence
Relationship-based business with professional results
Client-centered focus with proven track record
Key characteristics:

Local over corporate - neighborhood connection with professional standards
Trustworthy over impressive - genuine reliability over status symbols
Approachable success - accomplished without intimidation
Client-focused over self-promoting - service orientation with proven results
Community-connected over distant - genuine local presence
Warm professional over cold corporate - human connection with business excellence
Relationship-based over transactional - long-term community reputation
Established without detachment - successful but still connected to clients
Local Business Applications
This portrait must excel in:

Real estate yard signs and property marketing
Business cards and personal marketing materials
Local service websites and client portals
Community directories and neighborhood guides
Social media profiles focused on local business
Direct mail campaigns and neighborhood marketing
Vehicle signage and mobile advertising
Local newspaper and community publication ads
Client testimonial materials and success stories
Community event sponsorships and materials
Local digital advertising and targeted marketing
Neighborhood office signage and location marketing
Community-Centered Optimization
Professional quality inspiring local business confidence
Warm approachability encouraging neighborhood connection
Balanced success and accessibility for diverse community applications
Local authenticity supporting word-of-mouth marketing
Trustworthy presence building community reputation
Professional appearance meeting industry standards while maintaining local connection
Visual consistency across multiple marketing channels and community touchpoints
Strictly Avoid
❌ Corporate executive or overly formal styling
❌ Cold, distant, or aloof expressions
❌ Overly casual or unprofessional appearance
❌ Flashy, expensive, or ostentatious styling
❌ Expressions that appear forced or insincere
❌ Poor quality or ill-fitting professional attire
❌ Overly retouched or artificial appearance
❌ Backgrounds that distract from local professional
❌ Technical imperfections or focus issues
❌ Colors inappropriate for community marketing
❌ Posture suggesting detachment or superiority
❌ Extreme retouching removing relatability
❌ Styling that creates distance from local community
❌ Status symbols or luxury indicators that create distance
❌ Trendy styling that will quickly date marketing materials
❌ Generic corporate look without local character

Quality Benchmarks
Industry standards: Top-producing real estate teams, successful local financial services, established neighborhood businesses, community-focused professional services

Marketing applications: Real estate listings, local business websites, community directories, neighborhood marketing, printed business cards, direct mail campaigns

Photography references: Local business portraiture, real estate professional standards, community service provider marketing, neighborhood expertise positioning

Community considerations: Builds trust with neighbors, communicates local expertise, conveys approachability, inspires confidence, suggests community connection, establishes professional reliability within a local context

Final result: A warm, professional local business portrait that immediately communicates trustworthiness, neighborhood expertise, and approachable success. Quality and presentation worthy of successful real estate marketing, trusted local service providers, and community business leaders. The portrait should project both the professional competence and genuine local connection that clients seek when selecting neighborhood professionals - someone they can trust with important local transactions who will provide both excellent service and authentic community understanding.

The ultimate test: When a potential client views this portrait on a yard sign, business card or local website, it should inspire confidence in the professional's expertise while also suggesting someone who genuinely knows and cares about the community - the kind of local professional neighbors recommend to friends and family with complete confidence
Creative, Media, and Personal Brand Prompts (4 Prompts)
Creative professionals need headshots that show personality alongside professionalism. These prompts allow for slightly more expressive attire and mood while keeping the same technical quality. Personal branding photo AI results work best when the prompt reflects who you actually are rather than who you think you should look like.
Prompt 17: The Creative Professional Portfolio Shot
Edit this image to create a premium creative professional headshot with the following specifications:

Core Requirements
Preserve identity: Maintain exact facial structure, bone architecture, eye shape and color, nose proportions, mouth characteristics, distinctive features, and all identifying elements of the original subject
Resolution: Minimum 2800x2800px, 300 DPI, gallery-quality for creative portfolios, design websites, artistic publications, and exhibition materials
Output format: Creative industry-ready file optimized for design portfolios, agency websites, artistic platforms, creative directories, and high-end print applications
Primary objective: Project creative intelligence, artistic sophistication, and innovative vision that establishes credibility in creative industries and attracts discerning clients
Composition & Framing
Artistic professional headshot framing: mid-chest through crown with intentional negative space
Subject positioned slightly off-center using rule of thirds with eyes on upper intersection
Artistic, natural headroom (15-20% of frame) - creating visual breathing room for creative context
Body positioning: Dynamic asymmetrical pose with one shoulder slightly forward
One shoulder naturally positioned forward (10-15°) creating dimensional depth
Slight angle to torso creating natural asymmetry and visual interest
Relaxed yet intentional stance suggesting artistic confidence
Balanced between composed and dynamic - nothing rigid or forced
Camera height: Eye level or slightly below for artistic perspective
Vertical/portrait orientation with subtle dynamism in framing
Composition suggesting artistic intentionality and creative consideration
Framing that feels deliberately composed yet organic and natural
Expression & Creative Intelligence
Direct, contemplative eye contact with camera - engaged and intellectually present
Thoughtful, inspired expression - balancing artistic vision with approachable sophistication
Subtle, contemplative expression - neither smiling broadly nor overly serious
Expression projecting: creative intelligence, artistic vision, conceptual thinking, refined aesthetic sensibility
Eyes showing depth, thoughtfulness, visual perception, and creative insight
Facial expression that suggests someone who sees and thinks differently
Artistic confidence - self-assured without arrogance or pretension
Balance of creative intensity and professional accessibility
Slight hint of curiosity or contemplation - the look of someone visualizing possibilities
Expression appropriate for creative direction, artistic collaboration, and client presentation
Energy of someone who bridges artistic vision with practical execution
Clear, natural catchlights in both eyes at 10-11 o'clock position enhancing depth and perception
Posture & Creative Presence
Natural, dynamic posture with artistic intention
One shoulder slightly forward creating dimensional interest
Subtle asymmetry suggesting creative perspective and vision
Neck relaxed with slight tilt suggesting contemplation
Body language communicating: "I see possibilities others miss"
Professional presence that balances artistic vision with execution capability
Overall stance: gallery-ready, client-presentable, creatively authentic
Energy of someone who balances creative innovation with professional delivery
Posture suggesting both artistic vision and practical capability
Wardrobe - Creative Professional
Primary Option: Well-fitted black turtleneck - timeless creative professional standard

Black: #000000 to #0A0A0A (rich, deep black)
Fine-gauge premium fabric with subtle texture and excellent drape
Perfect fit - neither too tight nor too loose
Clean lines creating a minimal, artistic silhouette
Collar sitting naturally without tension
Evokes creative icons while remaining contemporary
Alternative Option: Minimalist top with contemporary texture

Colors: Black #000000, Charcoal #2A2A2A, Deep Navy #1A2535, Slate #3A4A59
Clean, architectural lines with subtle textural interest
Minimal design elements - no logos, patterns, or distractions
Premium fabric with visible quality and texture
Contemporary neckline with intentional design
Could be: architectural cowl neck, minimal crew neck, well-designed boatneck
Style characteristics:

Timeless yet contemporary
Minimalist with intentional design
Quality fabric with visible texture
Clean lines and considered silhouette
Monochromatic palette focusing attention on face
Artistic without being affected or costume-like
Professional enough for client meetings
Creative enough for artistic credibility
Overall aesthetic:

Creative Director, Designer, Architect, Photographer, Artist
Cultural creative with professional execution capability
Artistic vision with practical application
Refined taste level and aesthetic discernment
Quality over quantity - fewer elements, better quality
Focus on essential elements - nothing superfluous
Contemporary classic rather than trendy
Background
Solid, perfectly uniform studio background in #141414 (deep charcoal)
Alternative creative tones: #0A0A0A (near black) to #1A1A1A (rich charcoal)
Absolutely seamless with zero texture or gradient variation
Professional subject-background separation for crisp artistic presentation
Background recedes completely, focusing attention on creative professional
Dark tone creates sophisticated gallery-like setting
Suitable for creative portfolios, design websites, and artistic applications
Clean slate allowing creative identity to be the focal point
Professional Lighting Setup - Creative Sophistication
Lighting philosophy: Bright and airy soft studio lighting with subtle artistic quality - sophisticated illumination that flatters while revealing character

Key light: Large softbox or octabox at 30-45° angle

Loop or butterfly lighting pattern creating dimensional form
Bright, clean illumination with artistic sensibility
Soft light with defined transitions - not flat, not harsh
Professional quality with creative character
Light that reveals rather than conceals or flattens
Fill light: Precise fill creating intentional shadow ratio (3:1 to 4:1 ratio)

Controlled shadow for artistic dimension
Face illuminated with sculptural modeling
Shadows present but controlled - adding depth without harshness
Artistically considered light to shadow transition
Rim/hair light: Refined separation for artistic definition

Clean, precise edge light defining subject from background
Subtle artistic application enhancing dimensional form
Separation that feels intentional rather than formulaic
Professional polish appropriate for creative context
Eye light: Natural catchlights enhancing depth and perception

Eyes bright and intellectually engaged
Lighting suggesting perception and vision
Overall lighting characteristics:

Bright, airy, artistically controlled lighting
Creative sophistication with professional polish
Dimensional quality appropriate for artistic portfolio
Natural color temperature (5200-5500K)
Clean, contemporary aesthetic with artistic dimension
Face illuminated with clarity and depth
Lighting conveys creative perception, artistic vision, and professional execution
Studio aesthetic that feels intentional but not overproduced
Technical Camera Specifications
Lens: 85mm prime focal length simulation (creative portrait standard)
Aperture: f/1.8-f/2.0 for artistic subject isolation
Focus point: Sharp precise focus on nearest eye (critical for creative perception)
Depth of field: Artistic shallow depth with complete facial clarity
Both eyes in critically sharp focus
Face entirely within sharp focus plane
Beautiful, natural falloff to shoulders and background
Smooth, aesthetic bokeh characteristics - elegant and artistic
Perspective: Natural compression with artistic proportions
Image quality: Premium digital capture with exceptional detail and tonal range
Image Quality & Creative Professional Standards
Eyes: Sharp, precise focus with depth and intelligence

Visible iris texture and detail with natural color depth
Individual eyelashes clearly defined
Natural catchlights suggesting perception and vision
Eyes projecting creative thinking and artistic perspective
Skin: Natural, authentic texture with artistic refinement

Realistic skin texture preservation showing character and authenticity
Professional retouching maintaining natural appearance
Artistic approach preserving individual character
Healthy, vibrant skin tone with natural dimension
Character lines and natural features maintained - suggesting experience and perception
Fabric texture: Refined material detail with artistic quality

Visible premium fabric texture and construction
Natural drape and structure of garment
Subtle textural detail adding dimensional interest
Quality material suggesting refined taste level
Hair: Natural styling with artistic definition

Individual strands with natural texture and movement
Intentional but not overproduced styling
Well-maintained appearance with artistic sensibility
Contemporary approach appropriate for creative professional
Overall sharpness: Precise clarity with artistic intention

Sharp, clear focus throughout intended plane
Artistic quality supporting creative credibility
Clean, precise detail rendition with aesthetic sensitivity
Color Grading & Post-Processing - Creative Sophistication
Color philosophy: Clean cinematic color science with subtle warmth and polished contemporary feel

Temperature: Neutral to slightly warm (5200-5400K)

Balanced color with subtle artistic warmth
Contemporary base with refined aesthetic
Creative industry appropriate color temperature
Balance of artistic expression and professional polish
Skin tones: Natural, dimensional, refined

Subtly warm and artistically balanced
Authentic appearance with natural vibrancy
Dimensional rendering with subtle enhancement
Skin tone suggesting creative vitality and perception
Blacks: Rich, deep, dimensional

Wardrobe rendered with subtle textural detail
Deep black without becoming flat or crushed
Subtle variation revealing fabric quality
Artistic rendering of monochromatic elements
Contrast: Refined, intentional, dimensional

Controlled with artistic sophistication
Professional without harsh extremes
Creative polish without artificial enhancement
Contrast suggesting depth and creative perception
Saturation: Restrained with artistic intention

Refined, contemporary color palette
Slightly desaturated for artistic sophistication
Intentional color with subtle richness
Professional creative color approach
Overall: refined, contemporary, sophisticated
Creative professional retouching:

Refined approach maintaining authentic character
Remove temporary imperfections while preserving unique features
Preserve character lines and natural elements
Professional polish without artificial appearance
Subtle refinement maintaining artistic authenticity
Even skin tone while preserving natural variation
Clean up any minor wardrobe imperfections
Philosophy: Authentic, refined, artistic - enhanced with sophistication
Creative refinements:

Subtle artistic vignette enhancing dimensional focus
Refined sharpening with artistic intention
Optimized for both digital portfolios and print applications
Clean color grading suitable for creative industry applications
Color Palette - Creative Professional
Wardrobe options:

Black: #000000 to #0A0A0A
Charcoal: #2A2A2A to #3A3A3A
Deep Navy: #1A2535 to #2A3545
Slate: #3A4A59 to #4A5A69
Background: #141414 or artistic neutral tone

Skin tones: Natural, dimensional, refined, authentic

Overall palette: Clean, sophisticated, intentional, contemporary, artistic

Overall Aesthetic & Mood
Creative Professional / Artistic Visionary: Creative Director, Designer, Architect, Photographer, Artist, Art Director. Someone who combines artistic vision with professional execution, providing creative insight with sophisticated taste and practical application.

Visual references:

Design agency creative director portraits
Architectural firm principal photography
Contemporary artist portraits in gallery catalogs
Photography studio owner profiles
Design publication featured creatives
Acclaimed designer portfolio headshots
Creative industry leadership profiles
Museum curator and artistic director portraits
Creative industry contexts:

Design portfolios and creative websites
Agency team pages and creative leadership
Artistic publications and design annuals
Exhibition materials and gallery presentations
Creative directories and professional platforms
Client presentations and new business pitches
Speaking engagements at design conferences
Design awards and recognition materials
Creative publications and industry features
Artistic collaborations and project documentation
Emotional tone:

Creative intelligence with practical execution capability
Artistic vision balanced with professional delivery
Refined aesthetic sensibility with client-focused application
Thoughtful perception with innovative perspective
Contemporary sophistication with timeless principles
Conceptual thinking with practical problem-solving
Visual acuity with strategic understanding
Artistic confidence with collaborative spirit
Key characteristics:

Vision with execution - creative ideas with practical application
Artistic with professional - creative sensibility with client service
Sophisticated without pretension - refined without affectation
Contemporary with timeless - current without trendy
Innovative with proven - fresh thinking with established capability
Conceptual with practical - abstract thinking with real-world solutions
Individual vision with collaborative skill - unique perspective with teamwork
Depth with accessibility - profound thinking with clear communication
Creative Industry Applications
This portrait must excel in:

Design portfolios and creative websites
Agency team pages and creative leadership
Design annuals and creative publications
Client presentations and new business pitches
Creative directories and professional platforms
Exhibition materials and gallery catalogs
Speaking engagements and conference materials
Design awards and industry recognition
Artistic collaborations and project documentation
Press features and creative industry publications
Professional networking in creative communities
Teaching and mentoring in design education
Creative Field Optimization
Professional quality appropriate for artistic presentation
Sophisticated aesthetic building creative credibility
Balanced artistic vision and professional execution
Creative authenticity supporting design leadership
Refined presence appropriate for client presentation
Contemporary appearance with timeless principles
Visual consistency across portfolio applications
Strictly Avoid
❌ Corporate business attire or conventional styling
❌ Overly casual or unprofessional appearance
❌ Forced, inauthentic, or overly cheerful expressions
❌ Dramatic or excessive artistic lighting effects
❌ Expressions that appear affected or pretentious
❌ Trendy fashion choices that will quickly date
❌ Overly retouched or artificial appearance
❌ Distracting backgrounds or environmental elements
❌ Technical imperfections or focus issues
❌ Clichéd "artistic" poses or stereotypical creative tropes
❌ Colors inappropriate for creative applications
❌ Status symbols or flashy accessories
❌ Styling that feels like a costume rather than authentic expression
❌ Overly serious or intimidating expressions
❌ Generic or stock photography aesthetic
❌ Anything that undermines creative credibility

Quality Benchmarks
Industry standards: Leading design agencies (Pentagram, IDEO, Sagmeister & Walsh), architectural publications (Architectural Digest, Dezeen), photography annuals (PDN, Communication Arts), contemporary art catalogs

Creative applications: Design portfolios, agency websites, creative directories, design publications, exhibition materials, speaking engagements

Photography references: Creative professional portraiture, design agency leadership portraits, artistic director photography, gallery catalog standards

Creative considerations: Builds design credibility, communicates artistic vision, conveys sophisticated taste level, inspires creative confidence, suggests innovative thinking, establishes professional artistic identity

Final result: A refined, sophisticated creative professional portrait that immediately communicates artistic vision, creative intelligence, and professional execution capability. Quality and presentation worthy of leading design agencies, prestigious creative publications, and high-end client presentations. The portrait should project both the artistic sensibility and practical execution ability that clients seek when selecting creative professionals - someone who can provide both innovative thinking and reliable delivery of sophisticated creative solutions.

The ultimate test: When a potential client views this portrait in a creative portfolio or agency website, it should inspire confidence in the creative professional's artistic vision while also suggesting someone who can translate creative concepts into practical solutions - the kind of creative leader who balances innovative thinking with professional execution
Prompt 18: The Speaker, Podcast Guest, or Thought Leader
Edit this image to create a premium broadcast-quality professional headshot with the following specifications:

Core Requirements
Preserve identity: Maintain exact facial structure, bone architecture, eye shape and color, nose proportions, mouth characteristics, distinctive features, and all identifying elements of the original subject
Resolution: Minimum 3000x3000px, 300 DPI, broadcast-quality for high-definition media platforms, speaking event marketing, and professional press kits
Output format: Media-optimized file for podcast artwork, speaking engagement promotion, broadcast appearances, publication features, and digital thought leadership platforms
Primary objective: Project authoritative expertise, articulate communication capability, and authentic thought leadership that builds credibility across diverse media platforms
Composition & Framing
Broadcast-professional headshot framing: mid-chest through crown with optimal media proportions
Subject positioned using rule of thirds with eyes in upper-middle third
Confident, broadcast-ready headroom (15-18% of frame) - professional media standard
Body positioning: Direct or slight angle (0-15° rotation) suggesting engagement
Shoulders squared or slightly angled for authoritative presence
Poised, upright posture with media-trained bearing
Open, engaged stance suggesting conversational authority
Professional posture appropriate for broadcast contexts
Slight forward lean suggesting engagement without intrusiveness
Camera height: Eye level for direct audience connection
Vertical/portrait orientation with 4:5 aspect ratio optimization for media platforms
Composition suggests authority, expertise, and media professionalism
Framing adaptable for podcast thumbnails, speaking banners, and publication features
Clean, professional composition that crops effectively at multiple ratios (16:9, 1:1, 4:5)
Expression & Thought Leadership Presence
Direct, engaged eye contact with camera - connected and authoritative
Knowledgeable, articulate expression - balancing expertise with approachability
Confident, thoughtful expression - suggesting substance and intellectual depth
Expression projecting: subject matter expertise, communication skill, thought leadership, authentic authority
Eyes showing intelligence, engagement, and confident expertise
Facial expression that makes audiences trust the subject's insights and perspective
Balanced professional authority with conversational accessibility
Expression suggesting both "I know my subject deeply" and "I can communicate it clearly"
Looks like someone you'd want to listen to on a podcast or conference stage
Energy of a professional communicator who delivers valuable insights
Expression that translates well across media contexts from video to still images
Clear, defined catchlights in both eyes at 10-11 o'clock position enhancing engagement and authority
Posture & Media Authority
Engaged, media-ready posture with professional confidence
Straight, poised posture suggesting broadcast training and platform presence
Shoulders comfortably squared - authoritative without stiffness
Chest naturally open conveying confidence and engagement
Neck relaxed with confident head position - authoritative without tension
Body language communicating: "I have insights worth sharing" and "I communicate with clarity"
Professional presence that translates across broadcast platforms
Overall stance: stage-ready, camera-friendly, audience-engaging
Energy of someone comfortable in broadcast settings and speaking roles
Posture suggesting both thought leadership expertise and communication skill
Wardrobe - Media Professional
Blazer/Jacket: Sharp, well-fitted blazer - broadcast-appropriate professional attire

Colors:
Navy #1F3550 to #2A4565 (authoritative, trustworthy)
Charcoal #3A3A3E to #4A4A4E (professional, substantial)
Deep Burgundy #6B2836 to #7A3846 (distinguished, memorable)
Forest Green #294A38 to #395A48 (thoughtful, established)
Professional cut with media-appropriate styling
Excellent fit across shoulders and chest for broadcast appearance
Clean lapels with proper proportions for video framing
Quality fabric with subtle texture that reads well on camera
Structure without stiffness - professional but natural
Shirt/Blouse:

Clean dress shirt or professional blouse
Colors: White #FFFFFF, Light Blue #D5E5F5, Soft Pink #F5E1E2, Light Gray #E8E8EA
Crisp, clean collar visible above jacket
Professional neckline appropriate for broadcast settings
Possibility of subtle tie for traditional media contexts (solid or minimal pattern)
Open collar acceptable for contemporary thought leadership aesthetic
Quality fabric with excellent on-camera appearance
Overall aesthetic:

Professional speaker, podcast guest, media commentator
Thought leader with broadcast presence and platform credibility
Professional enough for traditional media appearances
Contemporary enough for podcast and digital platforms
Polished media professional - someone audiences trust and engage with
Appropriate for contexts from conference keynotes to television appearances
Media professional principles:

Camera-friendly colors that don't distract from face and message
Clean, defined edges and shapes that read well in thumbnails
Quality suggesting attention to presentation without vanity
Traditional elements that translate across diverse platforms
Contemporary enough to be relevant across platforms
Nothing that would distract viewers/listeners from content
Consistent with subject matter expertise and professional domain
Background
Solid, perfectly uniform studio background in #141414 (deep charcoal)
Alternative media tones: #121216 to #1A1A1E (broadcast-friendly neutrals)
Clean, distraction-free backdrop appropriate for media contexts
Completely seamless with no patterns or textures
Professional subject-background separation for clean media presentation
Background allows focus on thought leader and communication
Dark tone provides sophisticated contrast while maintaining professional media standards
Suitable for chroma keying in broadcast applications if needed
Adapts well across diverse media platforms and application requirements
Professional Lighting Setup - Broadcast Quality
Lighting philosophy: Broadcast-quality soft diffused studio lighting creating clean professional illumination - industry standard for media appearances

Key light: Large softbox or scrim at 30-45° angle

Loop or butterfly lighting pattern for professional clarity
Clean, even illumination with professional definition
Soft but precisely controlled lighting appropriate for broadcast
Flattering without being artificial - authentic professional quality
Lighting that supports media credibility and authority
Fill light: Balanced fill creating ideal broadcast ratio (2:1 to 3:1 ratio)

Clean, professional shadow control
Face clearly illuminated with dimensional modeling
Professional precision with broadcast standards
Controlled fill for video-ready appearance
Hair/rim light: Clean separation for broadcast definition

Professional edge light defining subject from background
Precise application enhancing three-dimensionality
Adds separation without excessive drama
Standard broadcast practice for subject definition
Eye light: Professional catchlights enhancing engagement

Eyes bright and clearly engaged
Broadcast-standard catchlight position and shape
Professional lighting enhancing connection with audience
Overall lighting characteristics:

Clean, professional broadcast-standard lighting
Even illumination with dimensional quality
Professional quality appropriate for all media platforms
Neutral color temperature (5400-5600K) - broadcast standard
Clean, professional aesthetic with natural authenticity
Face illuminated with clarity and dimension
Lighting conveys authority, expertise, and media professionalism
Studio lighting that translates perfectly across platforms
Technical Camera Specifications
Lens: 85mm prime focal length simulation (broadcast portrait standard)
Aperture: f/1.8-f/2.0 for professional subject isolation
Focus point: Precise, critical focus on nearest eye (essential for media credibility)
Depth of field: Professional shallow depth with complete facial clarity
Both eyes in critically sharp focus
Face entirely within sharp focus plane
Clean, professional falloff to shoulders and background
Refined bokeh characteristics appropriate for thought leadership
Perspective: Natural compression with broadcast-optimized proportions
Image quality: Professional digital capture with broadcast-ready color and detail
Aspect ratio flexibility: Composition allows for different crops across media platforms
Image Quality & Media Professional Standards
Eyes: Sharp, clear focus with engaged presence

Visible iris detail with natural color accuracy
Individual eyelashes clearly defined
Clear, professional catchlights enhancing connection
Eyes projecting expertise, engagement, and communication skill
Skin: Natural, authentic texture with professional polish

Realistic skin texture preservation showing authenticity
Professional retouching maintaining natural appearance
Broadcast-appropriate finish balancing realism and polish
Healthy, vibrant skin tone suggesting expertise and vitality
Natural features preserved - suggesting authentic authority
Professional attire: Sharp, detailed fabric texture

Visible quality fabric texture and professional construction
Clean lines and broadcast-ready presentation
Professional tailoring and quality materials
Texture that reads well across digital platforms
Hair: Professional grooming with natural definition

Clean, professional styling appropriate for broadcast
Individual strands with natural texture
Well-maintained appearance suggesting media readiness
Styling that works across platforms and contexts
Overall sharpness: Broadcast-quality clarity with natural detail

Sharp, clear focus throughout intended plane
Professional quality supporting media credibility
Clean, precise detail rendition with natural character
Technical excellence appropriate for high-definition platforms
Color Grading & Post-Processing - Media Professional
Color philosophy: Clean, balanced color science with professional polish appropriate for broadcast applications

Temperature: Neutral to slightly warm (5400-5600K)

Broadcast-standard color balance
Professional neutrality with subtle warmth
Media-appropriate color temperature
Balanced for cross-platform compatibility
Skin tones: Natural, accurate, professional

Neutrally balanced and professionally rendered
Authentic appearance with healthy vitality
Accurately rendered with broadcast standards
Skin tone calibrated for video and still applications
Contrast: Clean, professional, dimensional

Controlled with broadcast precision
Professional without excessive stylization
Media-standard contrast ratios
Optimized for cross-platform appearance
Saturation: Natural with professional calibration

Clean, media-professional color palette
Calibrated for broadcast standards
Natural color with professional accuracy
Balanced for consistent appearance across platforms
Overall: clean, professional, authoritative
Media professional retouching:

Clean, natural approach maintaining authenticity
Remove temporary blemishes and distractions
Preserve character lines and natural features
Professional polish without artificial appearance
Broadcast-appropriate skin refinement
Even skin tone with natural variation preserved
Clean up any minor wardrobe imperfections
Philosophy: Professional, authentic, media-ready - enhanced but genuine
Media refinements:

Subtle professional vignette enhancing focus
Clean sharpening enhancing critical details
Optimized for diverse media platforms and applications
Professional color grading suitable for cross-platform consistency
Color Palette - Media Professional
Blazer options:

Navy: #1F3550 to #2A4565
Charcoal: #3A3A3E to #4A4A4E
Deep Burgundy: #6B2836 to #7A3846
Forest Green: #294A38 to #395A48
Shirt/Blouse options:

White: #FFFFFF to #F8F8F8
Light Blue: #D5E5F5 to #E5F0FA
Soft Pink: #F5E1E2 to #F8EAEB
Light Gray: #E8E8EA to #F0F0F2
Background: #141414 or broadcast-neutral tone

Skin tones: Natural, balanced, broadcast-calibrated

Overall palette: Clean, professional, authoritative, consistent

Overall Aesthetic & Mood
Media Professional / Thought Leader: Professional Speaker, Podcast Host/Guest, Conference Presenter, Subject Matter Expert, Media Commentator. Someone who combines deep expertise with excellent communication skills, providing valuable insights with clarity, authority, and engagement.

Visual references:

TED Talk speaker portraits
Major podcast host/guest photography
Conference keynote speaker headshots
Published author media kits
Television expert commentator profiles
Industry thought leadership platforms
Professional speaking bureau materials
Media training professional standards
Expert commentary profile images
Media contexts:

Speaking engagement marketing and programs
Podcast appearances and episode artwork
Webinar and virtual event promotion
Conference keynote materials and directories
Media interview bookings and press kits
Publication bylines and expert commentary
Television appearances and broadcast media
Online course instructor profiles
Professional speaking bureau listings
Book jacket author photography
Industry event promotional materials
Expert panel participant listings
Emotional tone:

Authoritative expertise with communication accessibility
Professional credibility with engaging presence
Thought leadership with platform-ready polish
Substantive knowledge with articulate expression
Confident authority with audience connection
Media-trained presence with authentic expertise
Balanced intelligence - knowledgeable but relatable
Professional communication with genuine insight
Key characteristics:

Expertise with accessibility - knowledge with communication skill
Authority without arrogance - confident but approachable
Substance with presence - depth of knowledge with engaging delivery
Professional with authentic - polished but genuine
Traditional with contemporary - established credibility with current relevance
Confident without intimidating - approachable authority
Articulate without verbose - clear, precise communication
Polished without artificial - professional but authentic
Media Platform Applications
This portrait must excel in:

Podcast artwork and episode promotion
Speaking engagement marketing materials
Conference programs and presenter listings
Media kit and press materials
Publication bylines and expert columns
Webinar and virtual event promotion
Professional speaking bureau listings
Book jacket and author marketing
Website "About" sections and professional bios
Television appearance bookings and graphics
Industry expert directories and platforms
Social media professional profiles
Cross-Platform Optimization
Professional quality appropriate for broadcast standards
Composition allowing for multiple crop ratios (16:9, 4:5, 1:1)
Color calibration ensuring consistency across digital platforms
Resolution supporting both web and print applications
Professional appearance meeting diverse platform standards
Clear subject definition at small thumbnail sizes
Appropriate framing for lower-third graphics in video applications
Background providing clean slate for text overlay and graphics
Portrait that maintains integrity across digital compression
Strictly Avoid
❌ Overly casual or unprofessional appearance
❌ Corporate stiffness or excessive formality
❌ Artificial, forced, or inauthentic expressions
❌ Unflattering lighting or harsh shadows
❌ Expressions that appear arrogant or unapproachable
❌ Poor quality or inappropriate professional attire
❌ Overly retouched or artificial appearance
❌ Distracting backgrounds or busy elements
❌ Technical imperfections or focus issues
❌ Colors that appear unprofessional on camera
❌ Posture suggesting disengagement or stiffness
❌ Extreme retouching removing authenticity
❌ Styling that creates distance from audience
❌ Expressions appearing insincere or rehearsed
❌ Trendy styling that will quickly date
❌ Anything that undermines expertise or credibility

Quality Benchmarks
Industry standards: TED Conference speakers, major podcast hosts/guests, broadcast media commentators, professional speaking bureaus, published thought leaders

Media applications: Podcast platforms, speaking event marketing, conference programs, broadcast media, online learning platforms, industry publications

Photography references: Professional media portraiture, speaker bureau standards, broadcast professional headshots, publishing industry author standards

Platform considerations: Works across diverse media contexts, communicates expertise, conveys communication skill, builds credibility, suggests engagement, establishes professional authority while maintaining accessibility

Final result: A polished, professional media-ready portrait that immediately communicates thought leadership, communication expertise, and engaging authority. Quality and presentation worthy of major speaking platforms, respected podcasts, and professional media appearances. The portrait should project both the subject matter expertise and communication skill that audiences and bookers seek - someone who delivers valuable insights with clarity, authority, and engagement across diverse media platforms.

The ultimate test: When a conference organizer, podcast booker, or media producer views this portrait while considering potential speakers or guests, it should inspire confidence in the subject's expertise while also suggesting someone who communicates clearly and engagingly - the kind of thought leader who delivers valuable content while maintaining audience engagement across any platform
Prompt 19: The Content Creator and Personal Brand Profile
Edit this image to create a premium personal brand professional headshot with the following specifications:

Core Requirements
Preserve identity: Maintain exact facial structure, bone architecture, eye shape and color, nose proportions, mouth characteristics, distinctive features, and all identifying elements of the original subject
Resolution: Minimum 3000x3000px, 300 DPI, social-optimized quality for cross-platform usage, high-engagement feeds, sponsorship decks, and brand partnership materials
Output format: Personal brand-ready file with versatile composition allowing for multiple crop ratios (1:1, 4:5, 9:16) for Instagram, TikTok, LinkedIn, and sponsorship materials
Primary objective: Project authentic personal energy, contemporary brand aesthetic, and engaging approachability that builds connection with audiences and attracts brand partnerships
Composition & Framing
Dynamic personal brand headshot framing: mid-chest through crown with engaging negative space
Subject positioned slightly off-center using rule of thirds with eyes on upper intersection point
Dynamic, engaging headroom (10-15% of frame) - creating visual interest and crop flexibility
Body positioning: Energetic yet natural pose with subtle dynamism
Body at slight angle (15-25° rotation) creating dimension and movement
Shoulders relaxed but defined - suggesting confidence without stiffness
Subtle forward presence suggesting engagement and accessibility
Natural, unforced posture that feels spontaneous rather than posed
Position that creates natural lines and visual interest without appearing contrived
Camera height: Eye level or very slightly above for flattering, engagement-optimized angle
Vertical/portrait orientation with composition allowing for multiple platform-specific crops
Framing that creates visual interest while maintaining personal connection
Composition that feels contemporary and scrollstopping without being overly trendy
Expression & Authentic Engagement
Direct, connected eye contact with camera - genuinely engaged and present
Natural, energetic expression - authentic enthusiasm without appearing forced
Genuine smile or expression that reflects personal brand energy - natural, not manufactured
Expression projecting: approachable authenticity, natural confidence, personal connection, and brand-aligned energy
Eyes showing genuine spark, personal warmth, and real engagement with viewer
Facial expression that feels like capturing a spontaneous moment of authentic connection
Natural confidence - self-assured without appearing staged or contrived
Expression suggesting both personal approachability and professional capability
Looks like someone viewers would trust, engage with, and want to follow
Energy that translates into high engagement rates and strong brand perception
Expression that remains engaging when scaled down to thumbnail/avatar size
Clear, bright catchlights in both eyes positioned to enhance connection and liveliness
Posture & Personal Brand Energy
Natural, dynamic posture with contemporary energy
Relaxed confidence suggesting authentic personal presence
Subtle movement or energy suggesting active engagement
Body language communicating openness and accessibility
Shoulders and neck relaxed but intentionally positioned for visual impact
Position suggesting real person rather than overly posed model
Overall stance: social-media ready, brand partnership-worthy, audience-engaging
Energy that feels genuine rather than manufactured or artificially enhanced
Posture that creates visual interest while maintaining authentic presentation
Wardrobe - Personal Brand Style
Contemporary outfit that aligns with personal brand aesthetic:

Option 1: Stylish fitted blazer in statement color

Colors: Emerald Green #1A6D50, Royal Blue #1A4B8C, Vibrant Coral #E85D46, Deep Burgundy #8C2841
Modern cut with contemporary proportions
Clean lines creating visual impact without distraction
Could be paired with simple white/neutral underlayer for contrast
Texture or subtle pattern acceptable if aligned with personal brand
Option 2: Modern crew-neck/top with clean accessories

Base colors: Clean White #FFFFFF, Soft Black #2A2A2A, Brand-specific color
Contemporary fit with intentional styling
Minimal but impactful design elements
Possible addition of simple, strategic accessories:
Minimalist quality jewelry (subtle necklace, earrings)
Contemporary timepiece or bracelet
Brand-aligned accessories that add personality without distraction
Style characteristics:

Visual impact that scales well in feeds and thumbnails
Clean lines and intentional design elements
Quality fabric and construction suggesting attention to detail
Contemporary without being overly trendy
Personal style that reflects authentic brand identity
Balance of approachability and aspiration
Colors that pop on screen without overwhelming
Strategic use of color psychology aligned with brand values
Overall aesthetic:

Polished content creator, brand ambassador, influence professional
Contemporary digital presence with cross-platform versatility
Authentic personal style rather than generic professional
Quality presentation suggesting brand partnership value
Individual expression balanced with professional polish
Strategic personal branding rather than random styling
Wardrobe that clearly differentiates from corporate headshots
Background
Solid, perfectly uniform studio background in #141414 (deep charcoal)
Alternative personal brand options: #0F0F12 to #1D1D21 (rich neutral darks)
Absolutely seamless with zero texture variations or distractions
Professional subject-background separation with clean edge definition
Background that provides perfect contrast for subject without competing
Dark tone creating sophisticated frame for personal brand presentation
Suitable for graphics overlay, text addition, and brand element integration
Clean slate allowing personal brand to be the exclusive focal point
Versatile neutral that works with any personal brand color palette
Professional Lighting Setup - Personal Brand Optimization
Lighting philosophy: Social media-optimized bright, soft studio lighting that creates flattering, even illumination - contemporary, clean, and scroll-stopping

Key light: Large softbox or beauty dish at 30-45° angle

Butterfly or loop lighting pattern creating dimensional form with minimal shadows
Bright, clean illumination with contemporary energy
Soft, flattering light that enhances features without harsh shadows
Perfect balance of definition and softness
Light that reveals rather than conceals authenticity
Fill light: Generous, even fill creating minimal shadow contrast (1.5:1 to 2:1 ratio)

Open, bright, feed-friendly lighting approach
Even illumination minimizing under-eye shadows
Social-optimized light ratio that works at small scales
Contemporary brightness that captures attention in feeds
Hair/rim light: Clean separation for scroll-stopping definition

Precise edge light defining subject from background
Subtle application enhancing three-dimensionality
Contemporary separation that feels intentional but natural
Definition that creates visual interest in crowded feeds
Eye light: Natural, bright catchlights enhancing engagement

Eyes bright and genuinely engaged
Strategic catchlight positioning for maximum connection
Light that creates the "spark" crucial for engagement
Overall lighting characteristics:

Bright, clean, contemporary lighting
Social feed-optimized illumination
Even but dimensional quality appropriate for personal branding
Slightly warm color temperature (5000-5400K)
Clean, contemporary aesthetic with authentic dimension
Face illuminated with clarity and energy
Lighting conveys authenticity, engagement, and contemporary polish
Studio aesthetic that feels fresh, current, and personally branded
Technical Camera Specifications
Lens: 85mm prime focal length simulation (personal brand portrait standard)
Aperture: f/1.8-f/2.0 for aesthetic subject isolation
Focus point: Tack-sharp focus on nearest eye (critical for engagement)
Depth of field: Contemporary shallow depth with complete facial clarity
Both eyes in critically sharp focus
Face entirely within sharp focus plane
Smooth, aesthetic falloff to shoulders and background
Contemporary bokeh characteristics - clean and aesthetic
Perspective: Natural compression with flattering proportions
Image quality: Premium digital capture with excellent detail and color fidelity
Frame optimization: Composition allowing versatile cropping for various platforms
Image Quality & Personal Brand Standards
Eyes: Sharp, vibrant focus with genuine engagement

Visible iris detail with enhanced color clarity
Individual eyelashes clearly defined
Bright, engaging catchlights positioned for maximum connection
Eyes projecting authentic personality and brand energy
Skin: Natural, authentic texture with contemporary refinement

Realistic skin texture preservation showing genuine character
Professional retouching maintaining natural appearance
Contemporary approach preserving authenticity
Healthy, vibrant skin tone with natural dimension
Complexion that appears authentic yet optimized
Wardrobe detail: Clean, defined fabric texture with brand alignment

Visible quality and thoughtful styling
Contemporary fit and intentional design elements
Colors that reproduce accurately across devices
Textures and details that add visual interest
Hair: Contemporary styling with natural definition

Individual strands with natural texture and movement
Well-defined yet natural-looking styling
Intentional but not overly produced appearance
Style that enhances personal brand identity
Overall sharpness: Precise clarity with contemporary polish

Sharp, clear focus throughout intended plane
Clean, precise detail rendition with modern aesthetic
Crisp edges and textures creating visual interest
Professional quality supporting brand positioning
Color Grading & Post-Processing - Personal Brand Aesthetic
Color philosophy: Clean cinematic color science with vibrant yet balanced tones - contemporary, feed-optimized, and brand-aligned

Temperature: Slightly warm to neutral (5000-5400K)

Contemporary color with subtle warmth
Feed-optimized color balance
Personal brand-appropriate color temperature
Cross-platform compatible color rendering
Skin tones: Natural, vibrant, contemporary

Slightly warm and social media-optimized
Authentic appearance with subtle enhancement
Dimensional rendering with natural vibrancy
Skin tone suggesting energy and presence
Brand colors: Strategic enhancement of wardrobe colors

Clean, vibrant rendering of key brand colors
Strategic color emphasis aligned with personal brand palette
Controlled saturation for impact without oversaturation
Color separation creating visual hierarchy and interest
Contrast: Contemporary, clean, dimensional

Controlled with social media optimization
Professional without harsh extremes
Feed-friendly contrast levels
Black point optimized for cross-platform display
Contrast suggesting dimension and contemporary polish
Saturation: Strategic with brand-aligned emphasis

Clean, contemporary color palette
Slightly enhanced for feed visibility
Strategic emphasis on brand-aligned colors
Professional control preventing oversaturation
Overall: vibrant, contemporary, strategically enhanced
Personal brand retouching:

Authentic approach maintaining genuine character
Remove temporary blemishes while preserving unique features
Preserve natural elements that contribute to authentic brand
Contemporary polish without artificial appearance
Subtle refinement maintaining genuine presence
Even skin tone while preserving natural dimension
Clean up any minor wardrobe imperfections
Philosophy: Authentic, optimized, genuine - enhanced for impact but real
Social media refinements:

Strategic sharpening for feed visibility
Clean color grading optimized for mobile displays
Contrast and brightness calibrated for cross-platform consistency
Attention to how image will appear at various sizes and crops
Color Palette - Personal Brand
Wardrobe statement colors:

Emerald Green: #1A6D50 to #2A7D60
Royal Blue: #1A4B8C to #2A5B9C
Vibrant Coral: #E85D46 to #F86D56
Deep Burgundy: #8C2841 to #9C3851
Base/neutral options:

Clean White: #FFFFFF to #F8F8F8
Soft Black: #2A2A2A to #3A3A3A
Contemporary Gray: #6A6A6A to #7A7A7A
Background: #141414 or contemporary personal brand neutral

Skin tones: Natural, vibrant, dimensional, authentic

Overall palette: Clean, contemporary, vibrant, intentional, branded

Overall Aesthetic & Mood
Personal Brand Professional / Content Creator: Influencer, Brand Ambassador, Content Creator, Social Media Professional. Someone who builds authentic connections with audiences while maintaining professional brand partnerships, providing engaging content with personal style and strategic positioning.

Visual references:

Top-tier creator media kits
Successful Instagram profile portraits
Brand partnership announcement imagery
Sponsored content creator headshots
TikTok creator marketplace profiles
LinkedIn influencer/thought leader imagery
YouTube thumbnails of successful creators
Brand ambassador press materials
Social media bio/avatar imagery with high engagement
Platform-specific contexts:

Instagram profile pictures and feed posts
TikTok creator profiles and partnership content
LinkedIn personal branding for creator economy
YouTube channel thumbnails and about pages
Sponsored content disclosure materials
Brand partnership announcements and decks
Speaker/appearance promotion materials
Media kit and collaboration proposals
Social media bio/avatar across all platforms
Personal website and about page imagery
Press features and media coverage
Podcast appearance promotion materials
Emotional tone:

Authentic engagement with strategic positioning
Personal warmth with professional polish
Genuine connection with brand alignment
Contemporary relevance with timeless appeal
Approachable aspiration - relatable yet elevated
Individual personality with universal appeal
Natural confidence with strategic presentation
Engaging energy that invites interaction and follows
Key characteristics:

Authentic with strategic - genuine but purposeful
Personal with professional - individual style with business credibility
Contemporary with timeless - current without trend dependency
Aspirational with approachable - elevated but relatable
Branded with genuine - strategic without appearing manufactured
Energetic with intentional - dynamic but controlled
Polished without perfect - enhanced but realistic
Individual with universal - unique yet broadly appealing
Platform-Specific Optimizations
Instagram Optimization
Perfect for 1:1 profile picture and 4:5 feed posts
Color saturation calibrated for Instagram's processing
Composition allowing for critical face visibility in circular crop
Energy and expression that drives engagement metrics
Contemporary aesthetic aligned with platform visual trends
TikTok Optimization
Composition adaptable to vertical 9:16 format with subject centered
Energetic presence appropriate for dynamic platform
Slightly higher contrast for visibility on video-focused platform
Expression that translates well to creator marketplace profiles
Modern, youth-focused aesthetic without trying too hard
LinkedIn Optimization
Professional polish appropriate for business context
Balanced energy that suggests both creativity and reliability
Composition that works in smaller circular profile format
Clean presentation that builds creator economy credibility
Personal brand positioning for professional context
Cross-Platform Considerations
Color consistency across different platform color processing
Flexible composition allowing for diverse crop requirements
Balanced energy appropriate for both personal and professional platforms
Lighting and contrast that maintain integrity across compression algorithms
Expression that remains engaging at various display sizes
Personal Brand Applications
This portrait must excel in:

Social media profiles across multiple platforms
Brand partnership proposals and decks
Media kits and collaboration materials
Sponsored content disclosures and announcements
Speaking engagement and appearance promotion
Press features and media coverage
Personal website and about page presence
Creator marketplace profiles and applications
Product launch collaborations and promotions
Bio/avatar imagery for consolidated personal brand
Engagement-driving posts and promotional materials
Personal brand monetization materials
Strictly Avoid
❌ Overly posed or unnatural expressions
❌ Corporate or traditional business headshot styling
❌ Dated or overly trendy aesthetics that will quickly age
❌ Harsh or unflattering lighting that creates shadows
❌ Expressions that appear forced, fake, or inauthentic
❌ Generic styling lacking personal brand differentiation
❌ Overly retouched or artificial appearance
❌ Distracting backgrounds or busy elements
❌ Technical imperfections or focus issues
❌ Colors that don't translate well across platforms
❌ Posture that appears stiff, uncomfortable, or contrived
❌ Extreme editing that undermines authenticity
❌ Styling that feels like a costume rather than personal brand
❌ Positioning that won't crop well across platforms
❌ Poor quality wardrobe or accessories that undermine brand value
❌ Generic "influencer" tropes without authentic personality

Quality Benchmarks
Industry standards: Top-tier content creators, successful brand ambassadors, professional influencers with brand partnerships, social media professionals with verified status

Platform applications: Instagram, TikTok, LinkedIn, YouTube, Twitter/X profiles that drive high engagement and partnership opportunities

Photography references: Contemporary personal branding portraiture, social media optimization techniques, content creator media kits, brand partnership materials

Engagement considerations: Creates immediate connection, drives higher engagement rates, supports monetization efforts, builds consistent cross-platform recognition, enhances perceived partnership value

Final result: A contemporary, engaging personal brand portrait that immediately communicates authentic personality, strategic positioning, and partnership value. Quality and presentation worthy of successful content creators, brand ambassadors, and social media professionals. The portrait should project both the genuine personality and strategic brand positioning that drives audience engagement and attracts partnership opportunities - the foundation of successful personal brand monetization across platforms.

The ultimate test: When potential followers encounter this image, it should inspire immediate connection and follow action; when brands view it in partnership proposals, it should communicate professionalism and alignment potential; when used as a profile image, it should create instant recognition and brand consistency across all platforms
Prompt 20: The Author, Coach, or Online Course Creator
Edit this image to create a premium author/coach headshot with the following specifications:

Core Requirements
Preserve identity: Maintain exact facial structure, bone architecture, eye shape and color, nose proportions, mouth characteristics, distinctive features, and all identifying elements of the original subject
Resolution: Minimum 2800x2800px, 300 DPI, publication-quality for book covers, course platforms, coaching websites, and marketing materials
Output format: Author/coach-ready file optimized for publishing platforms, speaker one-sheets, course thumbnails, and coaching materials
Primary objective: Project earned wisdom, approachable expertise, and genuine desire to help others that builds immediate trust with potential readers, students, and clients
Composition & Framing
Warm professional headshot framing: mid-chest through crown with inviting proportions
Subject positioned using rule of thirds with eyes in upper-middle third
Warm, inviting headroom (12-18% of frame) - creating psychological openness and breathing room
Body positioning: Slight angle (10-20° rotation) suggesting engagement
Shoulders relaxed and gently angled suggesting approachability
Subtle forward presence suggesting genuine interest in connecting
Open, inviting stance indicating warmth and accessibility
Poised but natural posture - comfortable in their expertise
Camera height: Eye level or very slightly above for warm, connected perspective
Vertical/portrait orientation optimized for book jackets and course platforms
Composition suggests wisdom, openness, and genuine human connection
Framing appropriate for book covers, course platforms, and coaching websites
Expression & Warm Expertise
Direct, connected eye contact with camera - present and genuinely engaged
Warm, encouraging expression - authentic smile that reaches the eyes (Duchenne smile)
Inviting, approachable expression - suggesting both wisdom and accessibility
Expression projecting: earned credibility, genuine desire to help, approachable expertise, trustworthy guidance
Eyes showing warmth, understanding, and authentic desire to connect
Facial expression that makes readers/students feel "this person understands my challenges"
Balanced professional credibility with genuine human warmth
Expression suggesting both "I have valuable insights to share" and "I genuinely care about your success"
Looks like someone who listens as much as they teach
Energy of a trusted mentor who inspires while remaining relatable
Expression that builds immediate trust and connection
Clear, warm catchlights in both eyes at 10-11 o'clock position enhancing connection and credibility
Posture & Mentorship Presence
Open, inviting posture with natural confidence
Relaxed shoulders suggesting approachability and authenticity
Gentle forward presence indicating genuine interest in others' success
Neck relaxed with natural head position - confident without arrogance
Body language communicating: "I'm here to help" and "I understand your journey"
Professional presence that balances expertise with accessibility
Overall stance: book-cover ready, course-platform appropriate, coaching-website perfect
Energy of someone who has walked the path and now guides others
Posture suggesting both credible expertise and genuine human connection
Wardrobe - Approachable Expert
Quality blazer over clean shirt/blouse - successful but approachable professional attire

Blazer colors:
Warm Navy #28466B (trustworthy yet approachable)
Soft Burgundy #8E3A4A (warm, confident expertise)
Earth Tone #6D5A4C (grounded, authentic wisdom)
Warm Gray #5E5E5C (balanced, approachable authority)
Well-fitted but not overly structured or stiff
Quality fabric with natural texture and inviting appearance
Clean lines suggesting competence without corporate formality
Could be traditional blazer or more relaxed unstructured jacket
Shirt/Blouse:

Clean, warm-toned underlayer that frames the face
Colors: Warm White #F5F5F0, Soft Cream #F0E9D9, Light Blue #DAE5F2, Gentle Pink #F2E2E1
Open collar (no tie) for approachable expertise aesthetic
Quality fabric suggesting successful expertise without intimidation
Simple neckline that doesn't distract from face and expression
Overall aesthetic:

Published author, trusted coach, course creator
Successful expert with genuine desire to help others
Professional enough to establish credibility
Approachable enough to build immediate connection
Authentic mentor - someone readers/students trust and relate to
Appropriate for contexts from book jackets to online courses
Approachable expert principles:

Warm professionalism over corporate formality
Quality suggesting expertise without intimidation
Colors that evoke trust, warmth, and credibility
Style that works across teaching and coaching contexts
Nothing flashy or attention-seeking - focus on the message
Balanced look that appeals to diverse audience demographics
Background
Solid, perfectly uniform studio background in #141414 (deep charcoal)
Alternative warm neutral options: #151515 to #1C1C1C (rich, warm-leaning neutrals)
Clean, distraction-free backdrop supporting focus on expertise and connection
Completely seamless with no patterns or textures
Professional subject-background separation for clean expert presentation
Background provides sophisticated frame without competing with subject
Dark tone creates contrast while maintaining warm, inviting feel
Suitable for book covers, course platforms, and coaching materials
Professional Lighting Setup - Warm & Inviting
Lighting philosophy: Warm, bright soft studio lighting that creates a welcoming, trustworthy impression - suggests both credibility and genuine connection

Key light: Large softbox or octa at 30-45° angle

Loop or butterfly lighting pattern for warm clarity
Bright, clean illumination with inviting softness
Warm, flattering light quality suggesting trustworthiness
Soft but defined - nothing harsh or dramatic
Professional lighting supporting credibility without intimidation
Fill light: Generous fill creating open, inviting shadow ratio (1.5:1 to 2.5:1 ratio)

Warm, open lighting approach
Face clearly illuminated with gentle modeling
Minimal shadows suggesting transparency and accessibility
Lighting that invites connection and trust
Hair/rim light: Subtle separation for professional definition

Clean edge light defining subject from background
Gentle application enhancing dimensional presence
Adds separation without creating artificial drama
Professional polish appropriate for author/coach context
Eye light: Warm catchlights enhancing connection

Eyes bright and genuinely engaged
Lighting suggesting warmth and attentiveness
Overall lighting characteristics:

Warm, bright, professionally controlled lighting
Inviting illumination with professional polish
Clean, bright aesthetic with human warmth
Warm color temperature (4800-5300K)
Open, trustworthy lighting approach
Face illuminated with clarity and warmth
Lighting conveys credibility, trustworthiness, and genuine connection
Studio aesthetic - polished but humanly warm
Technical Camera Specifications
Lens: 85mm prime focal length simulation (author portrait standard)
Aperture: f/1.8-f/2.0 for warm subject isolation
Focus point: Warm precise focus on nearest eye (critical for connection and trust)
Depth of field: Professional shallow depth with complete facial clarity
Both eyes in warm, sharp focus
Face entirely within sharp focus plane
Natural, gentle falloff to shoulders and background
Smooth, unobtrusive bokeh characteristics
Perspective: Natural compression with inviting proportions
Image quality: Clean digital sensor quality with excellent color depth and natural detail
Image Quality & Author/Coach Standards
Eyes: Warm, precise focus with genuine connection

Visible iris detail with natural warmth and depth
Individual eyelashes naturally defined
Clear, warm catchlights suggesting presence and engagement
Eyes projecting wisdom, understanding, and genuine desire to help
Skin: Natural, authentic texture with warm polish

Realistic skin texture preservation showing authentic person
Professional retouching maintaining natural appearance
Warm approach preserving genuine character
Healthy, vibrant skin tone suggesting vitality and presence
Character lines preserved - suggesting experience and wisdom
Professional attire: Clean, inviting fabric texture

Visible quality fabric texture and professional construction
Natural drape and structure of attire
Professional presentation suggesting credible expertise
Warm, inviting colors that convey trustworthiness
Hair: Natural styling with warm definition

Clean, professional styling appropriate for author/coach
Individual strands with natural texture
Well-maintained appearance suggesting attention to detail
Age-appropriate styling suggesting authentic credibility
Overall sharpness: Warm, natural clarity with inviting detail

Sharp, clear focus throughout intended plane
Professional quality supporting credibility
Clean, precise detail rendition with warm character
Color Grading & Post-Processing - Warm Expertise
Color philosophy: Warm cinematic color science with inviting, balanced tones appropriate for teaching and mentorship contexts

Temperature: Warm (4800-5300K)

Inviting color balance with intentional warmth
Trustworthy base with genuine approachability
Author/coach appropriate color temperature
Balance of credibility and human connection
Skin tones: Natural, warm, inviting

Genuinely warm and professionally balanced
Authentic appearance with healthy vitality
Dimensional rendering with subtle enhancement
Skin tone suggesting credibility and approachability
Contrast: Clean, inviting, dimensional

Controlled with warm expertise
Professional without harsh extremes
Author/coach polish without artificial enhancement
Contrast suggesting depth and dimension without severity
Saturation: Natural with subtle warm enhancement

Clean, inviting color palette
Slightly enhanced for warmth and approachability
Natural color with subtle richness
Professional expertise-oriented color approach
Overall: warm, trustworthy, inviting
Author/coach retouching:

Clean, natural approach maintaining authenticity
Remove temporary blemishes while preserving character
Preserve natural features and experience indicators
Professional polish without artificial appearance
Subtle refinement maintaining genuine wisdom
Even skin tone while preserving natural variation
Clean up any minor wardrobe imperfections
Philosophy: Authentic, warm, credible - enhanced but genuinely human
Expertise refinements:

Subtle professional vignette enhancing focus on subject
Clean sharpening enhancing connection points
Optimized for book covers, course platforms, and coaching websites
Warm color grading suitable for teaching and mentorship contexts
Color Palette - Author/Coach
Blazer options:

Warm Navy: #28466B to #385679
Soft Burgundy: #8E3A4A to #9E4A5A
Earth Tone: #6D5A4C to #7D6A5C
Warm Gray: #5E5E5C to #6E6E6C
Shirt/Blouse options:

Warm White: #F5F5F0 to #FAFAF5
Soft Cream: #F0E9D9 to #F5EEE0
Light Blue: #DAE5F2 to #E5EFF9
Gentle Pink: #F2E2E1 to #F7E9E8
Background: #141414 or warm neutral tone

Skin tones: Natural, warm, dimensional, authentic

Overall palette: Warm, inviting, trustworthy, credible, genuine

Overall Aesthetic & Mood
Author/Coach Professional / Trusted Expert: Published Author, Course Creator, Professional Coach, Speaker, Trusted Expert. Someone who combines earned wisdom with genuine desire to help others, providing valuable guidance with warmth, clarity, and authentic connection.

Visual references:

Bestselling nonfiction author photos
Major course platform instructor profiles
Successful coaching website imagery
TED speaker portraits (approachable experts)
Professional development book covers
Self-help and business book jacket photos
Online learning platform featured instructors
Respected thought leader portraits
Professional coach directory headshots
Expert contexts:

Book covers and author marketing materials
Online course platforms and learning management systems
Coaching websites and client acquisition materials
Speaker one-sheets and event promotion
Workshop materials and teaching platforms
Self-help publications and personal development guides
Business leadership books and materials
Membership sites and subscription programs
Client testimonial materials and success stories
Media interviews and podcast appearances
Professional directories and expert listings
Email marketing and newsletter branding
Emotional tone:

Earned wisdom with genuine desire to share
Credible expertise with approachable warmth
Professional authority with authentic accessibility
Trustworthy guidance with human connection
Successful experience with relatable presence
Genuine understanding of audience challenges
Balanced confidence - knowledgeable but relatable
Inspiring presence that motivates without intimidating
Key characteristics:

Credible without intimidating - expertise with accessibility
Warm without overfamiliarity - professional but genuinely caring
Successful without distance - accomplished but relatable
Polished without perfection - professional but authentically human
Inspiring without pressure - motivating but understanding
Authoritative without arrogance - knowledgeable without superiority
Genuine without oversharing - authentic but appropriate
Experienced with empathy - wisdom with understanding
Expert Applications
This portrait must excel in:

Book covers - front and back jacket photos
Course platform profiles and thumbnails
Coaching websites and service pages
Speaker one-sheets and promotional materials
Workshop and seminar marketing
Online learning platform profiles
Professional directories and expert listings
Email signatures and newsletter branding
Media kit and press materials
Publication bylines and author bios
Social proof sections featuring the expert
Sales pages and conversion-focused materials
Platform-Specific Optimizations
Book covers: Composition allowing for text overlay and jacket design
Course platforms: Friendly, approachable energy that drives enrollment
Coaching websites: Trust-building presence encouraging client inquiries
Promotional materials: Professional credibility supporting premium positioning
Digital applications: Clarity and warmth that maintains across screen sizes
Print materials: Color calibration and detail supporting high-quality reproduction
Strictly Avoid
❌ Corporate or overly formal business presentation
❌ Cold, distant, or aloof expressions
❌ Harsh or intimidating lighting
❌ Expressions that appear forced or inauthentic
❌ Overly casual or unprofessional appearance
❌ Overly retouched or artificial appearance
❌ Backgrounds that distract from expert presence
❌ Technical imperfections or focus issues
❌ Colors that feel cold or corporate
❌ Posture suggesting distance or superiority
❌ Extreme retouching removing relatability
❌ Styling that creates distance from audience
❌ Expressions appearing insincere or scripted
❌ Intimidating or unapproachable energy
❌ Trendy styling that will quickly date
❌ Gimmicky or inauthentic elements that undermine credibility

Quality Benchmarks
Industry standards: Bestselling nonfiction authors, top-rated course creators on major platforms (MasterClass, Udemy, LinkedIn Learning), successful coaches with established practices

Platform applications: Book jackets, course platforms, coaching websites, speaker materials, workshop promotions, online learning portals

Photography references: Professional author portraiture, coaching industry standards, course creator platforms, personal development marketing

Connection considerations: Builds immediate trust, communicates expertise, conveys approachability, inspires confidence, suggests understanding of audience challenges, establishes credible authority while maintaining warm accessibility

Final result: A warm, inviting expert portrait that immediately communicates earned wisdom, approachable expertise, and genuine desire to help others. Quality and presentation worthy of bestselling books, successful online courses, and established coaching practices. The portrait should project both the credible expertise and genuine warmth that readers, students, and clients seek when selecting an expert guide - someone they can trust with their personal or professional development who will provide both valuable guidance and authentic understanding.

The ultimate test: When a potential reader sees this portrait on a book cover, they should feel an immediate connection and trust; when a prospective student views it on a course platform, they should feel confident in the instructor's expertise and teaching ability; when a potential client encounters it on a coaching website, they should feel understood and inspired to reach out. The image should create an immediate sense of "This is someone who can help me" across all platforms
Gemini Prompt for Professional Photo for LinkedIn: 5 That Actually Get Noticed
A gemini prompt for professional photo for LinkedIn needs to account for three things that make LinkedIn different from every other professional context: the square crop format, the speed at which profile visitors judge credibility, and the platform’s specific visual conventions around approachability.
LinkedIn crops your profile photo into a circle, which means traditional rectangular headshot compositions often cut off the top of your head or too much of your shoulders. A headshot suitable for linkedin requires more headroom above your head and tighter framing from the chest up than a standard business profile photo.
The second difference is judgment speed. LinkedIn users decide whether to connect with you, message you, or keep scrolling in less than three seconds. Your LinkedIn profile photo prompt needs to prioritize immediate visual signals of trustworthiness and approachability over the authority-focused tone that works in corporate or legal contexts.
The third LinkedIn-specific requirement is body positioning. The person in a LinkedIn headshot should look directly at the camera with their body also directly facing forward rather than angled. This frontal positioning creates the feeling of direct engagement, which matches how LinkedIn connections expect to interact with you: directly, openly, and without corporate barriers.
Here are the five most important optimization tips for any ai prompt for professional linkedin photo:
Face the camera directly. Both your eyes and your body should be square to the camera. Angled poses look great in creative portfolios but feel evasive on LinkedIn. Direct engagement builds connection.
Leave generous headroom. LinkedIn’s circular crop cuts more aggressively than you expect. Specify “ample headroom and negative space above the head, ensuring the top of the head is not cropped” in every LinkedIn profile photo prompt.
Prioritize approachability over authority. Unless you are applying for C-suite executive roles, your LinkedIn photo should feel warm and accessible rather than intimidating. Use phrases like “warm, confident expression” and “approachable professionalism” in your prompt instead of “commanding presence” or “executive authority.”
Keep your smile natural or skip it entirely. Forced smiles read as inauthentic on LinkedIn. A calm, confident expression with warm eyes works better than a big smile that changes your facial structure.
Use the chest-up framing standard. This is the universal LinkedIn framing convention. It shows enough of your attire to signal professionalism without making your face too small in the circular crop.
The prompts in Section 5 under “LinkedIn and Job Application Prompts” already follow all five of these rules. If you are building your own custom LinkedIn prompt, make sure you include direct camera positioning, generous headroom, and an approachability-focused mood description. Those three elements separate a headshot that works everywhere from one optimized specifically for LinkedIn visibility and connection success.
Gemini Prompt for Professional Photo for Women (and Men): The Best Styles
AI image generators treat male and female faces differently, and understanding those tendencies helps you write better prompts. A gemini prompt for professional photo for women needs specific instructions to prevent over-beautification and age regression. A gemini prompt for professional photo men needs wardrobe and expression guidance that balances confidence with approachability.
Gemini Prompt for Professional Photo for Women
The single biggest issue women face with AI-generated professional headshots is over-smoothing. Gemini, like most AI image generators, applies automatic beautification to female faces that removes natural skin texture, softens facial structure, and often makes the subject look significantly younger than they actually are.
One woman shared her experience on Reddit after generating what she thought was a perfect headshot. She showed it to her HR friend for feedback and got this response: “It looks like you 20 years ago, not like the current version of you.” That is the exact problem you need to prevent with the right prompt language.
The fix is simple but critical. Every gemini prompt for professional photo for women must include the phrase “natural, realistic skin texture without beautification or skin smoothing” and “maintain natural age-appropriate appearance.” These two instructions tell Gemini to keep your actual face rather than creating an idealized version.
Here is a complete professional portrait AI prompt optimized for women that includes the anti-beautification instructions:
Edit this image to create a premium business professional headshot with the following specifications:

Core Requirements
Preserve identity: Maintain exact facial structure, bone architecture, eye shape and color, nose proportions, mouth characteristics, distinctive features, and all identifying elements of the original subject
Resolution: Minimum 2500x2500px, 300 DPI, LinkedIn-optimized quality for professional networking, digital display, and print applications
Output format: Professional profile-ready file optimized for LinkedIn, corporate websites, business communications, and professional directories
Primary objective: Project polished professionalism, credible expertise, and approachable confidence that builds trust in business contexts while maintaining authentic presence
Composition & Framing
Professional business headshot framing: mid-chest through crown with ample negative space
Subject positioned using rule of thirds with eyes placed at the upper third intersection
Generous, professional headroom (15-20% of frame above head) ensuring nothing is cropped
Body positioning: Direct or slight angle (0-15° rotation) for professional presence
Shoulders squared or slightly angled - professional but not rigid
Straight, confident posture suggesting competence and reliability
Open stance indicating accessibility and collaboration
Professional bearing appropriate for business contexts
Camera height: Precisely at eye level for equal, professional connection
Vertical/portrait orientation with professional proportions (4:5 aspect ratio optimal for LinkedIn)
Composition suggests stability, competence, and professional polish
Framing appropriate for corporate websites, business profiles, and professional platforms
Expression & Professional Presence
Direct, engaged eye contact with camera - connected and confident
Warm, confident expression - authentic without appearing forced
Natural, approachable smile or composed professional expression - genuine and appropriate
Expression projecting: professional competence, personal warmth, authentic confidence
Eyes showing intelligence, engagement, and genuine approachability
Facial expression that builds immediate trust in professional abilities
Balanced professional authority with human accessibility
Expression suggesting both "I am competent" and "I am easy to work with"
Natural, relaxed facial muscles with slight elevation at corners of eyes/mouth
Jawline defined but relaxed - confident without tension
Expression that remains professional but warm at thumbnail sizes
Clear, subtle catchlights in both eyes at 10-11 o'clock position enhancing engagement
Posture & Professional Bearing
Straight, confident posture with professional poise
Shoulders back but relaxed - confident without stiffness
Chest naturally open conveying confidence and engagement
Neck elongated with natural head position - professional without strain
Body language communicating: "I am competent and reliable"
Professional presence that balances authority with approachability
Overall stance: meeting-ready, client-facing, colleague-friendly
Energy of someone who delivers results while building relationships
Posture suggesting both professional capability and team collaboration
Wardrobe - Business Professional
Smart professional blazer in business-appropriate color

Colors:
Navy #1F3A5F to #2A4A70 (classic, trustworthy)
Charcoal #3A3A3E to #4A4A4E (professional, sophisticated)
Burgundy #7A2639 to #8A3649 (distinctive, confident)
Well-fitted with clean lines and proper shoulder fit
Quality fabric with subtle texture and professional finish
Contemporary cut with traditional professional appeal
Lapel width and styling appropriate for business context
Precise tailoring suggesting attention to detail
Shirt/Blouse:

Clean, professional dress shirt or blouse
Colors: White #FFFFFF, Light Blue #D5E5F5, Soft Pink #F5E1E2, Light Gray #E8E8EA
Crisp, clean collar or professional neckline
Quality fabric with proper fit and professional appearance
Visible above blazer with clean, pressed presentation
Jewelry (subtle and professional):

Dainty gold stud earrings (small pearls, minimal geometric shapes)
Delicate gold necklace (thin chain, subtle pendant if any)
Gold tone: Warm gold #D4AF37 or Rose gold #B76E79
Professional watch or bracelet if appropriate
Wedding/engagement ring if applicable
Quality pieces suggesting attention to detail without distraction
Overall aesthetic:

Business professional with contemporary relevance
Corporate-appropriate with individual polish
Quality suggesting attention to professional standards
Traditional enough for conservative industries
Contemporary enough for modern business contexts
Professional without being rigid or outdated
Appropriate for contexts from corporate meetings to client presentations
Background
Solid, perfectly uniform studio background in #141414 (deep charcoal)
Alternative business tones: #161616 to #1C1C1C (professional neutrals)
Clean, distraction-free backdrop appropriate for business contexts
Completely seamless with no patterns, textures, or gradient
Professional subject-background separation for clean business presentation
Background recedes completely, focusing attention on professional subject
Dark tone providing sophisticated contrast with professional attire
Suitable for corporate websites, LinkedIn, and professional platforms
Professional Lighting Setup - Polished & Approachable
Lighting philosophy: Bright, soft diffused studio lighting that gently illuminates the face - suggesting both competence and approachability

Key light: Large softbox or octabox at 30-45° angle

Loop or butterfly lighting pattern for professional clarity
Bright, clean illumination with soft edge transitions
Gentle, flattering light quality suggesting both capability and warmth
Professional lighting supporting business credibility
Fill light: Balanced fill creating natural shadow ratio (2:1 to 3:1 ratio)

Clean, professional shadow control
Face clearly illuminated with subtle dimensional modeling
Professional precision with approachable softness
Lighting suggesting transparency and openness
Hair/rim light: Subtle separation for professional definition

Clean edge light defining subject from background
Professional application enhancing dimensional presence
Adds separation without excessive drama or artifice
Polish appropriate for business context
Eye light: Subtle catchlights enhancing engagement

Eyes bright and professionally engaged
Lighting suggesting attentiveness and connection
Overall lighting characteristics:

Bright, clean, professionally controlled lighting
Soft illumination with professional polish
Clean aesthetic with balanced dimensionality
Neutral to slightly warm color temperature (5300-5600K)
Professional quality appropriate for business applications
Face illuminated with clarity and warmth
Lighting conveys competence, reliability, and approachability
Studio aesthetic - polished but natural
Technical Camera Specifications
Lens: 85mm prime focal length simulation (professional portrait standard)
Aperture: f/1.8-f/2.0 for professional subject isolation
Focus point: Sharp precision focus on nearest eye (critical for connection)
Depth of field: Professional shallow depth with complete facial clarity
Both eyes in critically sharp focus
Face entirely within sharp focus plane
Clean, professional falloff to shoulders and background
Soft, natural bokeh characteristics in background
Perspective: Natural compression with professional proportions
Image quality: Clean digital sensor quality with excellent color accuracy and detail
Image Quality & Business Professional Standards
Eyes: Sharp, clear focus with professional engagement

Visible iris detail with natural color accuracy
Individual eyelashes clearly defined
Clean, subtle catchlights suggesting connection
Eyes projecting competence, warmth, and professionalism
Skin: Natural, authentic texture without excessive retouching

Realistic skin texture preservation showing authentic person
Professional retouching maintaining natural appearance
No beautification filters or skin smoothing
Temporary blemishes removed while preserving authentic skin texture
Natural age-appropriate appearance fully maintained
Pores, fine lines, and natural skin characteristics preserved
Natural, healthy skin tone with professional presentation
Hair: Natural styling with professional definition

Clean, professional styling appropriate for business
Individual strands with natural texture and definition
Well-maintained appearance suggesting attention to detail
Age-appropriate styling and color preserved
Professional attire: Clean, detailed fabric texture

Visible quality fabric texture and professional construction
Natural drape and structure of business attire
Professional tailoring and quality materials
Clean lines and professional fit
Jewelry: Clean, subtle detail of professional accessories

Fine gold texture and quality appearance
Professional scale and positioning
Subtle presence without distraction
Overall sharpness: Professional clarity with natural detail

Sharp, clear focus throughout intended plane
Professional quality supporting business credibility
Clean, precise detail rendition with natural character
Color Grading & Post-Processing - Professional Warmth
Color philosophy: Clean cinematic color science with subtle warmth and balanced tones appropriate for business contexts

Temperature: Neutral to slightly warm (5300-5600K)

Professional color balance with subtle warmth
Business-appropriate color temperature
Balance of professional polish and human connection
Skin tones: Natural, healthy, professional

Subtly warm and professionally balanced
Authentic appearance with healthy vitality
Accurately rendered with subtle enhancement
Skin tone suggesting professionalism and approachability
Contrast: Clean, professional, dimensional

Controlled with business precision
Professional without harsh extremes
Business polish without artificial enhancement
Contrast suggesting depth and dimension
Saturation: Natural with subtle professional enhancement

Clean, business-appropriate color palette
Slightly enhanced for professional polish
Natural color with subtle richness
Professional business color approach
Overall: clean, natural, professional
Professional retouching:

Clean, natural approach maintaining authenticity
Remove only temporary blemishes and distractions
Preserve all age-appropriate characteristics
Maintain natural skin texture and pores
No artificial smoothing or beautification filters
Professional polish without artificial appearance
Subtle refinement maintaining authentic presentation
Even skin tone while preserving natural variation
Clean up any minor wardrobe imperfections
Philosophy: Professional, authentic, natural - enhanced but genuine
Business refinements:

Subtle professional vignette drawing focus to subject
Clean sharpening enhancing critical details
Optimized for LinkedIn and professional platforms
Balanced color grading suitable for business contexts
Color Palette - Business Professional
Blazer options:

Navy: #1F3A5F to #2A4A70
Charcoal: #3A3A3E to #4A4A4E
Burgundy: #7A2639 to #8A3649
Shirt/Blouse options:

White: #FFFFFF to #F8F8F8
Light Blue: #D5E5F5 to #E5F0FA
Soft Pink: #F5E1E2 to #F8EAEB
Light Gray: #E8E8EA to #F0F0F2
Jewelry:

Warm Gold: #D4AF37 to #E5C04A
Rose Gold: #B76E79 to #C77E89
Background: #141414 or professional neutral tone

Skin tones: Natural, healthy, with age-appropriate authenticity

Overall palette: Clean, professional, approachable, balanced

Overall Aesthetic & Mood
Business Professional / Corporate Approachable: Professional Manager, Executive, Team Leader, Business Specialist. Someone who balances professional competence with genuine approachability, providing reliable expertise with authentic human connection.

Visual references:

LinkedIn top profiles with high engagement rates
Fortune 500 executive team pages (middle management level)
Professional service firms team directories
Corporate annual reports professional profiles
Business publication professional features
Industry conference speaker profiles
Professional networking platform examples
Corporate communications best practices
Business contexts:

LinkedIn profile picture and professional platform presence
Corporate websites and team directories
Business presentations and client-facing materials
Professional networking and industry connections
Corporate communications and internal directories
Industry events and conference materials
Client proposals and business development
Professional credentials and certifications
Business publications and industry features
Company reports and stakeholder communications
Email signatures and digital business communications
Professional introductions and digital first impressions
Emotional tone:

Professional competence with genuine approachability
Business capability with human connection
Reliable expertise with authentic warmth
Corporate appropriateness with individual presence
Confident capability with collaborative spirit
Polished presentation with genuine character
Trustworthy professionalism with personal accessibility
Balanced authority - capable without intimidating
Key characteristics:

Professional with approachable - competent but human
Polished without artificial - refined but genuine
Confident without arrogance - capable but humble
Corporate with individual - business-appropriate with personality
Traditional with contemporary - established standards with current relevance
Capable without intimidating - skilled but accessible
Trustworthy without distance - reliable but connected
Age-appropriate authenticity - natural, not artificially youthful
LinkedIn & Professional Platform Optimization
Perfect square cropping for LinkedIn profile picture (minimum 400x400px)
Composition allowing for circular crop on professional platforms
Clear visibility of face when reduced to thumbnail size
Professional quality supporting career advancement
Balanced expression appropriate across various business contexts
Clean presentation adaptable to different industry standards
Visual consistency supporting professional personal branding
Appropriate for both internal corporate use and external networking
Maintains professional impact when viewed on mobile devices
Optimized color and contrast for diverse display environments
Business Applications
This portrait must excel in:

LinkedIn profile picture and professional networking
Corporate websites and team directories
Professional email signatures and communications
Industry publications and business features
Conference directories and speaking engagements
Business presentations and client materials
Professional credentials and certifications
Corporate communications and internal platforms
Business development and client acquisition
Professional introductions and first impressions
Digital business platforms and professional communities
Strictly Avoid
❌ Excessive retouching or skin smoothing
❌ Age-reducing filters or artificial beautification
❌ Overly casual or unprofessional appearance
❌ Exaggerated or forced expressions
❌ Harsh lighting or unflattering shadows
❌ Distracting backgrounds or busy elements
❌ Inappropriate or overly flashy jewelry/accessories
❌ Technical imperfections or focus issues
❌ Colors inappropriate for business contexts
❌ Extreme contrast or oversaturated colors
❌ Rigid, uncomfortable, or unnatural posing
❌ Styling that appears dated or trendy
❌ Overly formal or intimidating presentation
❌ Expressions that appear insincere or rehearsed
❌ Positioning that won't crop well for platforms

Quality Benchmarks
Industry standards: Major corporations, professional services firms (consulting, finance, law), technology companies, healthcare organizations

Platform applications: LinkedIn, corporate websites, professional directories, business communications, industry publications

Photography references: Professional corporate portraiture, business networking standards, professional service firm team photography

Professional considerations: Projects competence, conveys approachability, builds trust, establishes credibility, creates positive first impressions, supports career advancement, translates well across professional contexts

Final result: A polished, professional business portrait that immediately communicates competence, reliability, and approachable professionalism. Quality and presentation worthy of corporate websites, professional networking platforms, and business communications. The portrait should project both the professional capability and genuine approachability that builds successful business relationships - someone colleagues would trust with projects and clients would feel comfortable working with.

The ultimate test: When viewed by potential employers, clients, or colleagues on LinkedIn or corporate platforms, this portrait should inspire immediate professional confidence while suggesting someone who would be both competent and pleasant to work with - creating a positive first impression that opens professional doors and advances career opportunities
Notice the jewelry detail. One Facebook user who successfully created her professional headshot shared this approach: “I uploaded a good pic of me looking directly at the camera and asked it to give me a white button down and dainty gold jewelry. Keep my arms by my sides.” That level of wardrobe specificity prevents Gemini from defaulting to generic corporate attire.
Three additional tips specific to women’s prompts:
Avoid requesting a smile. AI models struggle to maintain accurate facial features when smile instructions are included. Use “warm, confident expression” or “natural, approachable expression” instead. Your eyes convey warmth more reliably than your mouth.
Specify jewelry if you want it included. Phrases like “dainty gold stud earrings” or “simple pearl necklace” or “minimal professional jewelry” give Gemini clear guidance. Without this, the AI either omits jewelry entirely or adds overly dramatic pieces.
Use wardrobe color names that signal professionalism without being masculine. Navy, charcoal, burgundy, deep teal, and warm gray all work beautifully for women’s professional blazers and create studio quality headshot results without defaulting to the standard black or dark blue corporate uniform.
Here is a second variation for creative professionals:
Edit this image to create a premium creative professional headshot with the following specifications:

Core Requirements
Preserve identity: Maintain exact facial structure, bone architecture, eye shape and color, nose proportions, mouth characteristics, distinctive features, and all identifying elements of the original subject
Resolution: Minimum 2800x2800px, 300 DPI, gallery-quality for creative portfolios, design websites, artistic publications, and exhibition materials
Output format: Creative industry-ready file optimized for design portfolios, agency websites, artistic platforms, creative directories, and print applications
Primary objective: Project creative sophistication, thoughtful confidence, and authentic artistic sensibility that establishes credibility in creative industries and artistic contexts
Composition & Framing
Artistic professional headshot framing: mid-chest through crown with intentional negative space
Subject positioned using rule of thirds with eyes on upper intersection
Natural, balanced headroom (12-18% of frame) - thoughtful, considered spacing
Body positioning: Subtle angle (5-15° rotation) creating dimensional interest
Shoulders positioned with artistic intention - confident but not rigid
Slight asymmetry suggesting creative perspective
Relaxed yet purposeful stance suggesting artistic confidence
Natural posture with subtle sculptural quality
Camera height: Eye level or very slightly below for artistic perspective
Vertical/portrait orientation with subtle dynamism in composition
Framing that feels deliberately composed yet organic
Composition suggesting artistic intentionality and creative confidence
Expression & Creative Confidence
Direct, thoughtful eye contact with camera - present and intellectually engaged
Thoughtful, confident expression - balanced creative authority with authentic presence
Contemplative, subtle expression - neither smiling broadly nor completely serious
Expression projecting: creative intelligence, artistic confidence, thoughtful perspective
Eyes showing depth, perception, and creative insight
Facial expression that suggests someone who sees and thinks differently
Quiet confidence - self-assured without arrogance or pretension
Expression suggesting both artistic vision and practical capability
Slight hint of contemplation or creative consideration in the eyes
Genuine presence without performative elements
Expression appropriate for creative direction, artistic collaboration, and client presentation
Energy of someone who approaches creativity with both vision and substance
Posture & Creative Presence
Natural, poised posture with artistic intention
Shoulders relaxed but purposeful - confident without stiffness
Subtle forward presence suggesting engagement and focus
Neck relaxed with natural head position - thoughtful without affectation
Body language communicating: "I have both creative vision and professional capability"
Professional presence that balances artistic confidence with approachable expertise
Overall stance: gallery-ready, design-worthy, creatively authentic
Energy of someone who balances artistic vision with practical execution
Posture suggesting both creative thinking and professional reliability
Wardrobe - Creative Professional
Primary Option: Well-fitted black turtleneck - timeless creative professional standard

Black: #000000 to #0A0A0A (deep, rich black)
Fine-gauge premium fabric with subtle texture
Perfect fit - not too tight, not too loose
Clean lines creating minimal, artistic silhouette
Collar sitting naturally without tension
Iconic creative professional choice with contemporary relevance
Alternative Option: Modern crew-neck top in sophisticated neutral

Colors: Charcoal #2A2A2A, Deep Navy #1A2535, Warm Gray #5A5A5A, Taupe #6A5A50
Clean, minimal design with architectural lines
Contemporary fit with considered proportions
Quality fabric with visible texture and drape
Modern neckline sitting naturally against collarbone
Accessories (simple, elegant):

Minimal jewelry with artistic intention
Possibly: thin metal necklace, architectural earrings, quality timepiece
Materials: Brushed silver, matte gold, oxidized metal, natural stone
Nothing flashy or attention-seeking - quiet sophistication
Quality suggesting artistic discernment
Scale and proportion showing design sensibility
Style characteristics:

Timeless minimalism with contemporary relevance
Quality materials with visible texture and weight
Intentional simplicity rather than absence of design
Black/neutral palette focusing attention on face and expression
Clean lines and considered silhouettes
Artistic without costume or affectation
Professional enough for client meetings
Creative enough for artistic credibility
Overall aesthetic:

Creative Director, Designer, Architect, Photographer, Artist
Cultural creative with professional execution capability
Artistic vision with practical application
Refined taste level and aesthetic discernment
Focus on essential elements - nothing superfluous or distracting
Contemporary classic rather than trendy
Background
Solid, perfectly uniform studio background in #141414 (deep charcoal)
Alternative creative tones: #0A0A0A (near black) to #1A1A1A (rich charcoal)
Absolutely seamless with zero texture or gradient variation
Professional subject-background separation for crisp artistic presentation
Background recedes completely, focusing attention on creative professional
Dark tone creates sophisticated gallery-like setting
Suitable for creative portfolios, design websites, and artistic applications
Clean slate allowing creative identity to be the focal point
Professional Lighting Setup - Artistic Sophistication
Lighting philosophy: Soft, artistic studio lighting with gentle shadows - sophisticated illumination with intentional dimensionality

Key light: Large softbox or scrim at 35-45° angle

Loop or Rembrandt lighting pattern creating dimensional form
Soft but directional light with intentional shadow play
Artistic quality suggesting depth and dimension
Light that reveals character through subtle shadow interplay
Professional quality with creative character
Fill light: Controlled fill creating intentional shadow ratio (3:1 to 4:1 ratio)

Artistically considered shadows for dimension and character
Face illuminated with sculptural modeling
Shadows present but controlled - adding depth and artistic quality
Shadow transitions that feel painterly rather than technically rigid
Rim/hair light: Refined separation for artistic definition

Subtle edge definition separating subject from background
Artistic application enhancing dimensional form
Separation that feels intentional rather than formulaic
Professional polish appropriate for creative context
Eye light: Natural catchlights enhancing depth and perception

Eyes bright but not overly sparkly
Lighting suggesting perception and creative insight
Single, natural catchlight in each eye positioned at 10-11 o'clock
Overall lighting characteristics:

Soft, artistically controlled lighting with intentional dimensionality
Creative sophistication with professional polish
Dimensional quality appropriate for artistic portfolio
Neutral color temperature (5200-5500K)
Clean, contemporary aesthetic with artistic dimension
Face illuminated with clarity and sculptural depth
Lighting conveys creative perception, artistic confidence, and professional sophistication
Studio aesthetic that feels intentional but not overproduced
Technical Camera Specifications
Lens: 85mm prime focal length simulation (creative portrait standard)
Aperture: f/1.8 for artistic subject isolation
Focus point: Sharp precise focus on nearest eye (critical for connection and perception)
Depth of field: Artistic shallow depth with complete facial clarity
Both eyes in critically sharp focus
Face entirely within sharp focus plane
Beautiful, natural falloff to shoulders and background
Smooth, aesthetic bokeh characteristics - elegant and artistic
Perspective: Natural compression with artistic proportions
Image quality: Premium digital capture with exceptional detail and tonal range
Image Quality & Creative Professional Standards
Eyes: Sharp, precise focus with depth and perception

Visible iris texture and detail with natural color depth
Individual eyelashes clearly defined
Natural catchlights suggesting perception and insight
Eyes projecting creative thinking and artistic confidence
Skin: Natural, authentic texture without manipulation

Realistic skin texture preservation showing character and authenticity
No beautification filters or skin smoothing
Natural age-appropriate appearance fully maintained
Temporary blemishes removed while preserving natural skin texture
Character lines and natural features maintained
Professional but truthful presentation
Healthy, natural skin tone with authentic dimension
Hair: Natural styling with artistic definition

Individual strands with natural texture and movement
Professional styling with artistic sensibility
Well-maintained appearance without overproduction
Age-appropriate styling preserved
Fabric texture: Refined material detail with artistic quality

Visible premium fabric texture and construction
Natural drape and material characteristics
Quality suggesting artistic discernment
Subtle textural detail adding dimensional interest
Accessories: Clean detail with artistic intention

Quality materials and construction
Proportional scale and intentional placement
Subtle presence enhancing rather than distracting
Overall sharpness: Precise clarity with artistic intention

Sharp, clear focus throughout intended plane
Artistic quality supporting creative credibility
Clean, precise detail rendition with aesthetic sensitivity
Color Grading & Post-Processing - Contemporary Creative
Color philosophy: Clean cinematic color science with balanced, contemporary tones appropriate for creative professional contexts

Temperature: Neutral to slightly cool (5200-5600K)

Clean, contemporary color balance
Artistic base with professional polish
Creative industry appropriate color temperature
Balance of artistic expression and professional presentation
Skin tones: Natural, dimensional, authentic

Neutrally balanced and artistically rendered
Authentic appearance with natural vitality
Age-appropriate coloration maintained
Skin tone suggesting creative perception and presence
Blacks: Rich, deep, textural

Wardrobe rendered with subtle detail in shadows
Deep black without crushing or losing texture
Subtle variation revealing fabric quality
Artistic rendering of monochromatic elements
Contrast: Refined, intentional, dimensional

Controlled with artistic sophistication
Professional without harsh extremes
Creative polish without artificial enhancement
Contrast suggesting depth and artistic perception
Saturation: Restrained with artistic intention

Refined, contemporary color palette
Slightly desaturated for creative sophistication
Intentional color with subtle richness
Professional creative color approach
Overall: refined, contemporary, sophisticated
Creative professional retouching:

Refined approach maintaining authentic character
Remove temporary imperfections only
Preserve all age-appropriate characteristics
No artificial smoothing or age manipulation
Professional polish without artificial appearance
Subtle refinement maintaining artistic authenticity
Even skin tone while preserving natural variation
Clean up any minor wardrobe imperfections
Philosophy: Authentic, refined, artistic - truthfully enhanced
Creative refinements:

Subtle vignette enhancing focus on subject
Refined sharpening with artistic intention
Optimized for both digital portfolios and print applications
Clean color grading suitable for creative industry applications
Color Palette - Creative Professional
Wardrobe options:

Black: #000000 to #0A0A0A
Charcoal: #2A2A2A to #3A3A3A
Deep Navy: #1A2535 to #2A3545
Warm Gray: #5A5A5A to #6A6A6A
Taupe: #6A5A50 to #7A6A60
Accessory metals/materials:

Brushed Silver: #C0C0C0 to #D0D0D0
Matte Gold: #BFA968 to #D0BA78
Oxidized Metal: #505055 to #606065
Natural Stone: Colors appropriate to stone type
Background: #141414 or artistic neutral tone

Skin tones: Natural, dimensional, authentic, age-appropriate

Overall palette: Clean, sophisticated, intentional, contemporary, artistic

Overall Aesthetic & Mood
Creative Professional / Artistic Vision: Creative Director, Designer, Architect, Photographer, Artist, Art Director. Someone who combines artistic vision with professional execution, providing creative insight with sophisticated taste and practical application.

Visual references:

Design agency creative director portraits
Architectural monograph author photos
Contemporary artist portraits in gallery catalogs
Photography studio owner profiles
Design publication featured creatives
Museum curator and artistic director portraits
Creative industry leadership profiles
Architectural digest featured designer portraits
Creative industry contexts:

Design portfolios and creative websites
Agency team pages and creative leadership
Artistic publications and design annuals
Exhibition materials and gallery presentations
Creative directories and professional platforms
Client presentations and new business pitches
Speaking engagements at design conferences
Design awards and recognition materials
Creative publications and industry features
Artistic collaborations and project documentation
Professional creative networking platforms
Book jacket author photos for design publications
Emotional tone:

Thoughtful confidence in creative vision
Artistic perception with professional capability
Creative intelligence with practical execution ability
Sophisticated taste with accessible communication
Contemporary relevance with timeless principles
Conceptual thinking with attention to detail
Artistic confidence with collaborative approach
Individual creative vision with client focus
Key characteristics:

Artistic with professional - creative vision with practical execution
Confident without arrogance - assured but approachable
Sophisticated without pretension - refined but genuine
Contemporary with timeless - current without trendy
Thoughtful with decisive - considered but capable
Individual with collaborative - unique perspective with teamwork
Visionary with practical - creative thinking with execution capability
Authentic with intentional - genuine but purposeful
Creative Industry Applications
This portrait must excel in:

Design portfolios and creative websites
Agency team pages and creative leadership
Design annuals and creative publications
Client presentations and new business pitches
Creative directories and professional platforms
Exhibition materials and gallery catalogs
Speaking engagements and conference materials
Design awards and industry recognition
Artistic collaborations and project documentation
Press features and creative industry publications
Professional networking in creative communities
Teaching and mentoring in design education
Platform-Specific Optimizations
Print publications: Composition and detail supporting high-quality reproduction
Digital portfolios: Clean presentation that maintains integrity across devices
Social platforms: Professional quality that stands out in creative communities
Client presentations: Sophisticated aesthetic building creative credibility
Professional applications: Balanced between artistic expression and business credibility
Strictly Avoid
❌ Artificial skin smoothing or beautification filters
❌ Age reduction or manipulation techniques
❌ Corporate business styling or conventional presentation
❌ Forced expressions or performative poses
❌ Harsh lighting or high-contrast effects
❌ Dramatic or tricky lighting techniques
❌ Trendy fashion choices that will quickly date
❌ Overly casual or unprofessional appearance
❌ Distracting backgrounds or environmental elements
❌ Technical imperfections or focus issues
❌ Clichéd "artistic" poses or stereotypical creative tropes
❌ Overly saturated or artificially enhanced colors
❌ Status symbols or flashy accessories
❌ Styling that feels like a costume rather than authentic expression
❌ Overly serious or intimidating expressions
❌ Generic or stock photography aesthetic

Quality Benchmarks
Industry standards: Leading design agencies, architectural publications, photography annuals, contemporary art catalogs, creative industry leaders

Creative applications: Design portfolios, agency websites, creative directories, design publications, exhibition materials, speaking engagements

Photography references: Creative professional portraiture, design agency leadership portraits, artistic director photography, gallery catalog standards

Creative considerations: Builds design credibility, communicates artistic vision, conveys sophisticated taste level, inspires creative confidence, suggests thoughtful approach, establishes professional artistic identity

Final result: A refined, sophisticated creative professional portrait that immediately communicates artistic vision, thoughtful confidence, and professional execution capability. Quality and presentation worthy of leading design agencies, prestigious creative publications, and high-end client presentations. The portrait should project both the artistic sensibility and practical execution ability that clients seek when selecting creative professionals - someone who can provide both innovative thinking and reliable delivery of sophisticated creative solutions.

The ultimate test: When a potential client views this portrait in a creative portfolio or agency website, it should inspire confidence in the creative professional's artistic vision while also suggesting someone who can translate creative concepts into practical solutions - the kind of creative leader who balances innovative thinking with professional execution
Both prompts include the critical realistic skin texture AI instruction that prevents the over-polished look most women want to avoid.
Gemini Prompt for Professional Photo for Men
Men’s prompts tend to produce more consistent face-matching results than women’s prompts because AI applies less automatic beautification by default. The challenge for men is balancing professional authority with approachability, which comes down to wardrobe and expression choices.
One Reddit user described his result this way: “I used the corporate prompt and uploaded a very normal photo of myself. When the result loaded, my jaw hit the floor. The lighting was perfect, the confidence was unreal, and somehow my posture improved digitally.” That reaction is common when the prompt includes specific posture and lighting instructions.
Here is a complete executive portrait prompt optimized for men:
Edit this image to create a premium corporate executive portrait with the following specifications:

Core Requirements
Preserve identity: Maintain exact facial structure, bone architecture, eye shape and color, nose proportions, mouth characteristics, distinctive features, and all identifying elements of the original subject
Resolution: Minimum 3000x3000px, 300 DPI, executive-quality for corporate annual reports, boardroom displays, and executive communications
Output format: Corporate-ready file optimized for annual reports, leadership pages, press materials, and executive directories
Primary objective: Project executive authority, corporate leadership, and professional gravitas that builds stakeholder confidence and establishes organizational leadership credibility
Composition & Framing
Executive portrait framing: mid-chest through crown with formal corporate proportions
Subject positioned precisely using rule of thirds with eyes at upper third intersection
Professional headroom (12-15% of frame) - formal, balanced, and authoritative spacing
Body positioning: Direct, squared to camera (0-10° rotation maximum)
Shoulders perfectly squared to camera plane - formal corporate standard
Symmetrical presentation suggesting stability and authority
Formal stance indicating corporate leadership and executive presence
Shoulders back, chest slightly forward projecting confidence
Camera height: Precisely at eye level for equal authority perspective
Vertical/portrait orientation with classical executive proportions
Composition suggesting stability, authority, and corporate leadership
Framing suitable for C-suite presentations, annual reports, and corporate communications
Expression & Executive Presence
Direct, authoritative eye contact with camera - commanding and confident
Composed, confident expression - executive demeanor without excessive warmth
Subtle, controlled professional expression - neither smiling broadly nor overly serious
Expression projecting: executive authority, corporate leadership, decision-making capability
Eyes showing intelligence, confidence, and strategic vision
Facial expression that inspires stakeholder trust and organizational confidence
Balanced executive authority with appropriate corporate approachability
Expression suggesting both "I lead with vision" and "I deliver results"
Slight elevation of chin suggesting leadership without arrogance
Jawline defined with subtle confidence - commanding without tension
Expression that reads as authoritative at board meeting and investor presentation scales
Clear, precise catchlights in both eyes at 10 o'clock position enhancing executive presence
Posture & Executive Bearing
Excellent upright posture with executive command
Spine perfectly straight with shoulders squared and level
Chest naturally open conveying confidence and authority
Neck elongated with confident head position - authoritative without arrogance
Body language communicating: "I lead with confidence and strategic vision"
Executive presence that projects authority and inspires stakeholder confidence
Overall stance: board-ready, investor-facing, leadership-communicating
Energy of someone who makes significant corporate decisions
Posture suggesting both executive authority and organizational leadership
Wardrobe - Corporate Executive
Sharp business suit in executive-appropriate color

Colors:
Navy #1A2A4A to #203055 (corporate leadership standard)
Charcoal #2A2A30 to #3A3A40 (executive authority classic)
Premium wool fabric with subtle quality indicators (Super 150s appearance)
Impeccable tailoring with perfect shoulder fit and lapel proportion
Modern executive cut with timeless corporate appeal
Sharp lapel edges with proper width for executive presence (2.5-3")
Surgeon cuffs or quality button detailing visible if appropriate
Perfect fit suggesting executive attention to detail
Shirt:

Crisp white dress shirt #FFFFFF to #F8F8F8
Perfect collar with appropriate spread for face shape
French cuffs or quality button cuffs based on industry standard
Immaculate pressing with zero wrinkles
Visible quality fabric with subtle texture (Egyptian cotton appearance)
Collar sitting perfectly with tie
Tie:

Subtle, professional pattern appropriate for executive context
Colors/Patterns:
Burgundy/Red #7A1A2C with minimal pattern
Navy/Blue #1A3A5F with subtle texture
Charcoal/Silver #4A4A50 with restrained pattern
Conservative stripe, small geometric, or subtle texture
Premium silk with perfect dimple and knot (Windsor or half-Windsor)
Appropriate width for lapel proportion (2.75-3.25")
Perfect length (tip touching top of belt buckle)
Quality visible through subtle sheen and texture
Overall aesthetic:

C-suite executive, corporate director, senior leadership
Fortune 500 leadership standard with contemporary relevance
Traditional corporate authority with modern executive polish
Quality suggesting executive success and organizational leadership
Formal enough for board presentations and investor meetings
Polished enough for annual reports and corporate communications
Background
Solid, perfectly uniform studio background in #141414 (deep charcoal)
Alternative executive tones: #0F0F11 to #1A1A1D (formal corporate neutrals)
Absolutely seamless with zero texture, gradient, or variation
Professional subject-background separation for clean executive presentation
Background recedes completely, focusing attention on corporate leadership
Dark tone providing sophisticated contrast with executive attire
Suitable for corporate websites, annual reports, and leadership directories
Professional Lighting Setup - Executive Authority
Lighting philosophy: Bright, controlled studio lighting creating definition and dimension - suggests executive authority and corporate leadership

Key light: Large softbox or beauty dish at 30-45° angle

Loop or short Rembrandt lighting pattern for executive definition
Bright, clean illumination with controlled shadow structure
Precise light quality suggesting authority and command
Professional lighting supporting executive credibility
Light positioned to define facial structure without harsh shadows
Fill light: Measured fill creating executive shadow ratio (3:1 to 4:1 ratio)

Clean, corporate shadow control
Face clearly illuminated with defined dimensional modeling
Professional precision with corporate polish
Controlled shadows enhancing executive presence
Hair/rim light: Clean separation for executive definition

Precise edge light defining subject from background
Professional application enhancing three-dimensional presence
Adds separation and authority without excessive drama
Polish appropriate for corporate leadership
Eye light: Subtle catchlights enhancing executive presence

Eyes bright and confidently engaged
Lighting suggesting authority and vision
Single, professional catchlight in each eye
Overall lighting characteristics:

Bright, clean, precisely controlled lighting
Defined illumination with corporate polish
Professional quality appropriate for executive applications
Cool-neutral color temperature (5400-5800K)
Clean, authoritative aesthetic with professional polish
Face illuminated with clarity and executive definition
Lighting conveys authority, leadership, and corporate presence
Studio aesthetic - polished, controlled, and executive-grade
Technical Camera Specifications
Lens: 85mm prime focal length simulation (executive portrait standard)
Aperture: f/1.8 for executive subject isolation
Focus point: Exquisite precision focus on nearest eye (critical for authority)
Depth of field: Corporate shallow depth with complete facial clarity
Both eyes in critically sharp focus
Face entirely within sharp focus plane
Clean, professional falloff to shoulders and background
Refined bokeh characteristics appropriate for executive imagery
Perspective: Natural compression with executive proportions
Image quality: Premium digital capture with exceptional detail and tonal range
Technical excellence: Zero technical imperfections, maximum sharpness and clarity
Image Quality & Executive Standards
Eyes: Sharp, precise focus with authoritative presence

Visible iris detail with natural color accuracy
Individual eyelashes clearly defined
Clean, subtle catchlights suggesting vision and leadership
Eyes projecting confidence, authority, and executive vision
Skin: Natural, authentic texture with executive polish

Realistic skin texture preservation showing genuine character
Professional retouching maintaining natural appearance
Clean approach preserving executive authenticity
Healthy, vibrant skin tone suggesting leadership vitality
Character lines appropriate for executive seniority preserved
Suit fabric: Sharp, detailed texture with executive quality

Visible premium wool texture and tailoring detail
Sharp lapel edges and precise construction
Subtle fabric pattern or weave if present
Thread detail and button quality visible
Shirt: Crisp, detailed fabric with executive precision

Clean cotton texture with perfect pressing
Sharp collar edges and professional construction
Quality fabric weave visible in detail
Tie: Crisp silk texture with executive polish

Visible silk texture and quality
Perfect knot structure with precise dimple
Pattern detail rendered with clarity
Subtle sheen appropriate for executive attire
Hair: Professional grooming with executive definition

Clean, corporate styling appropriate for leadership
Individual strands with natural texture
Well-maintained appearance suggesting executive standards
Age-appropriate styling with corporate polish
Overall sharpness: Exquisite clarity with executive definition

Sharp, clear focus throughout intended plane
Professional quality supporting executive credibility
Clean, precise detail rendition with authoritative character
Color Grading & Post-Processing - Corporate Executive
Color philosophy: Clean cinematic color science with cool-neutral, polished tones appropriate for corporate leadership contexts

Temperature: Cool-neutral (5500-5900K)

Executive color balance with authoritative tone
Corporate-appropriate color temperature
Cool, confident aesthetic appropriate for leadership
Skin tones: Natural, clean, professional

Cool-neutral and professionally balanced
Natural appearance with executive polish
Accurately rendered with subtle refinement
Skin tone suggesting authority and leadership
Blues/Grays: Rich, deep, corporate

Suit rendered with dimensional detail
Rich navy or deep charcoal with subtle variation
Corporate color palette with executive sophistication
Whites: Crisp, clean, precise

Shirt rendered with perfect white balance
Detail preserved in highlights
Clean but not clinical appearance
Contrast: Corporate, defined, dimensional

Controlled with executive precision
Professional without harsh extremes
Corporate polish without artificial enhancement
Contrast suggesting authority and dimensional presence
Saturation: Controlled with corporate restraint

Clean, corporate color palette
Slightly desaturated for executive sophistication
Conservative color with subtle richness
Professional corporate color approach
Overall: clean, authoritative, refined
Executive retouching:

Clean, natural approach maintaining authenticity
Remove temporary blemishes and distractions
Preserve character lines and distinguished features
Professional polish without artificial appearance
Subtle refinement maintaining executive authenticity
Even skin tone while preserving natural variation
Clean up any minor wardrobe imperfections
Philosophy: Distinguished, polished, authoritative - enhanced but genuine
Corporate refinements:

Subtle professional vignette enhancing executive focus
Precise sharpening enhancing critical details
Optimized for corporate print and digital applications
Clean color grading suitable for corporate communication
Color Palette - Corporate Executive
Suit options:

Navy: #1A2A4A to #203055
Charcoal: #2A2A30 to #3A3A40
Shirt:

White: #FFFFFF to #F8F8F8
Tie options:

Burgundy/Red: #7A1A2C to #8A2A3C
Navy/Blue: #1A3A5F to #2A4A6F
Charcoal/Silver: #4A4A50 to #5A5A60
Background: #141414 or executive neutral tone

Skin tones: Natural, polished, authoritative

Overall palette: Clean, cool-neutral, corporate, authoritative, distinguished

Overall Aesthetic & Mood
Corporate Executive / Organizational Leadership: C-Suite Executive, Corporate Director, Senior Leadership, Board Member. Someone who leads with strategic vision and executive authority, providing organizational direction with confidence, competence, and corporate gravitas.

Visual references:

Fortune 100 annual report executive portraits
Corporate board of directors photography
Wall Street Journal executive features
Financial Times leadership profiles
Corporate website executive team pages
Bloomberg executive interview thumbnails
Leadership section of major corporate websites
Investor relations materials for major corporations
Corporate contexts:

Annual reports and shareholder communications
Corporate websites and leadership pages
Investor presentations and financial materials
Press releases and media communications
Board of directors materials and governance
Executive biographies and speaking engagements
Industry publications and business features
Corporate announcements and organizational communications
Leadership transitions and succession planning
Merger and acquisition materials
Corporate credentials and executive networking
Industry recognition and leadership awards
Emotional tone:

Executive authority with strategic vision
Corporate leadership with decision-making confidence
Organizational stability with forward-thinking capability
Professional competence with leadership presence
Stakeholder-focused reliability with command presence
Measured confidence appropriate for corporate leadership
Balanced authority - commanding without intimidating
Traditional corporate values with contemporary relevance
Key characteristics:

Authoritative without intimidating - confident but not threatening
Traditional with relevant - established leadership with current capability
Formal without rigid - structured but not stiff
Confident without arrogant - assured but not superior
Distinguished without distant - respected but not removed
Controlled without cold - measured but not detached
Corporate without generic - organizational but individually credible
Professional without artificial - polished but authentic
Corporate Applications
This portrait must excel in:

Annual reports and investor relations materials
Corporate websites and leadership directories
Press materials and media relations
Investor presentations and financial communications
Board of directors materials and governance documents
Executive biographies and speaking engagements
Industry publications and business features
Leadership announcements and corporate transitions
Professional credentials and executive networking
Organizational communications and employee materials
Corporate social responsibility reports and materials
Governance documents and regulatory filings
Platform-Specific Optimizations
Print publications: Exceptional detail and sharpness for high-quality reproduction
Digital displays: Clean, authoritative presentation across devices and screen sizes
Investor materials: Professional quality inspiring stakeholder confidence
Media applications: Executive presence appropriate for business publications
Internal communications: Leadership presence building organizational confidence
External presentations: Authority projection appropriate for public-facing contexts
Strictly Avoid
❌ Overly casual or approachable expressions
❌ Warm, friendly, or overly personable presentation
❌ Unstructured or casual attire inappropriate for executive context
❌ Bright, warm, or creative color grading
❌ Environmental backgrounds or contextual elements
❌ Artistic or creative lighting approaches
❌ Trendy or fashion-forward styling choices
❌ Poses that appear relaxed or informal
❌ Colors or patterns that appear non-traditional
❌ Grooming that appears casual or trendy
❌ Technical imperfections or focus issues
❌ Expressions appearing uncertain or hesitant
❌ Posture suggesting anything less than perfect alignment
❌ Dramatic shadows or artistic lighting effects
❌ Angles that diminish executive presence
❌ Anything that undermines corporate credibility

Quality Benchmarks
Industry standards: Fortune 100 corporations, major financial institutions, global consulting firms, international law practices, multinational organizations

Corporate applications: Annual reports, investor relations, executive biographies, leadership communications, business publications

Photography references: Executive portrait specialists, corporate annual report photographers, business publication standards, corporate communications professionals

Leadership considerations: Projects authority, conveys strategic capability, builds stakeholder confidence, establishes organizational credibility, communicates executive presence, supports corporate positioning

Final result: A polished, authoritative corporate executive portrait that immediately communicates leadership presence, strategic capability, and organizational authority. Quality and presentation worthy of Fortune 100 annual reports, major corporate websites, and executive business communications. The portrait should project the executive gravitas and corporate leadership capability that builds stakeholder confidence and establishes organizational credibility at the highest levels of business and finance.

The ultimate test: When viewed by investors, board members, or corporate stakeholders, this portrait should inspire immediate confidence in the executive's leadership capability while suggesting someone who leads with both authority and strategic vision - creating a corporate presence that advances organizational objectives and supports leadership positioning
For men who prefer a more casual, modern business look, here is a smart casual variation:
Edit this image to create a premium business casual professional headshot with the following specifications:

Core Requirements
Preserve identity: Maintain exact facial structure, bone architecture, eye shape and color, nose proportions, mouth characteristics, distinctive features, and all identifying elements of the original subject
Resolution: Minimum 2500x2500px, 300 DPI, professional-quality for modern business applications, LinkedIn, corporate websites, and professional marketing
Output format: Business casual-ready file optimized for contemporary professional platforms, personal branding, and modern business contexts
Primary objective: Project approachable expertise, modern professionalism, and authentic confidence that builds immediate trust in contemporary business environments
Composition & Framing
Modern professional headshot framing: mid-chest through crown with contemporary proportions
Subject positioned using rule of thirds with eyes at upper-middle intersection
Relaxed, natural headroom (12-15% of frame) - contemporary but professional spacing
Body positioning: Subtle angle (10-20° rotation) suggesting approachability
Shoulders positioned with relaxed confidence - professional but not rigid
Slight forward presence suggesting engagement without intrusion
Open, approachable stance indicating accessibility and collaboration
Natural posture appropriate for modern business contexts
Camera height: At eye level for peer-to-peer connection
Vertical/portrait orientation with contemporary professional proportions
Composition suggests confidence, accessibility, and modern professionalism
Framing appropriate for LinkedIn, modern corporate websites, and professional platforms
Expression & Approachable Confidence
Direct, engaged eye contact with camera - connected and present
Calm, confident expression - self-assured without arrogance
Natural, approachable expression - genuine but professionally composed
Expression projecting: approachable expertise, trustworthy competence, authentic professionalism
Eyes showing intelligence, engagement, and genuine approachability
Facial expression that builds immediate trust in professional capabilities
Balanced professional confidence with authentic warmth
Expression suggesting both "I am competent" and "I am easy to work with"
Natural elevation at corners of mouth - subtle warmth without forced smiling
Relaxed eye area with slight engagement - alert but not intense
Expression that translates well across professional contexts
Clear, natural catchlights in both eyes at 10-11 o'clock position enhancing connection
Posture & Modern Professionalism
Confident, relaxed posture with contemporary professional poise
Shoulders back but natural - confident without stiffness
Chest naturally open conveying confidence and engagement
Neck relaxed with natural head position - poised without strain
Body language communicating: "I am confident and approachable"
Professional presence that balances capability with accessibility
Overall stance: meeting-ready, team-oriented, client-friendly
Energy of someone who delivers results while building relationships
Posture suggesting both professional expertise and collaborative spirit
Wardrobe - Business Casual Professional
Well-fitted blazer in contemporary professional color

Colors:
Navy #1F3A5F to #2A4A70 (classic with modern appeal)
Charcoal #3A3A3E to #4A4A4E (sophisticated neutral)
Warm Gray #5A5A58 to #6A6A68 (contemporary professional)
Soft Blue #2A4A6A to #3A5A7A (modern business)
Deep Burgundy #6A2835 to #7A3845 (distinctive professional)
Contemporary cut with clean lines and proper shoulder fit
Structured enough for professionalism, relaxed enough for accessibility
Modern lapel width and styling (2.5-2.75")
Quality fabric with subtle texture suggesting attention to detail
Perfect fit suggesting professional polish without formality
Shirt/Top:

Option 1: Clean crew-neck shirt in complementary neutral

Colors: White #FFFFFF, Light Gray #E8E8EA, Soft Blue #D5E5F5, Heather Gray #C5C5C8
Premium fabric with clean neckline
Perfect fit - not too tight, not too loose
Contemporary styling appropriate for modern business
Option 2: Simple button-down with top button open

Colors: White #FFFFFF, Light Blue #D5E5F5, Light Gray #E8E8EA
Clean collar sitting naturally without tie
Modern fit without excessive formality
Quality fabric with professional appearance
NO TIE - essential for business casual presentation
Overall aesthetic:

Modern professional with contemporary relevance
Business casual with premium quality standards
Polished without excessive formality
Quality suggesting attention to detail without ostentation
Appropriate for contexts from team meetings to client presentations
Versatile across various industries and professional environments
Contemporary enough for startups, professional enough for established companies
Background
Solid, perfectly uniform studio background in #141414 (deep charcoal)
Alternative professional tones: #161616 to #1C1C1C (contemporary neutrals)
Clean, distraction-free backdrop appropriate for professional contexts
Completely seamless with no patterns or textures
Professional subject-background separation for clean presentation
Background recedes completely, focusing attention on professional subject
Dark tone providing sophisticated contrast with professional attire
Suitable for professional websites, LinkedIn, and business platforms
Professional Lighting Setup - Warm & Approachable
Lighting philosophy: Warm, soft studio lighting that creates a welcoming, professional impression - suggests both competence and approachability

Key light: Large softbox or octa at 30-45° angle

Loop or butterfly lighting pattern for professional clarity
Soft, diffused illumination with minimal shadow edge transition
Warm, inviting light quality suggesting trustworthiness
Professional lighting supporting business credibility
Fill light: Generous fill creating open, inviting shadow ratio (2:1 to 2.5:1 ratio)

Clean, professional shadow control
Face clearly illuminated with subtle dimensional modeling
Professional precision with contemporary warmth
Lighting suggesting openness and transparency
Hair/rim light: Subtle separation for professional definition

Clean edge light defining subject from background
Minimal application enhancing dimensional presence without drama
Adds separation without excessive stylization
Polish appropriate for modern professional context
Eye light: Natural catchlights enhancing connection

Eyes bright and genuinely engaged
Lighting suggesting attentiveness and presence
Overall lighting characteristics:

Warm, soft, professionally controlled lighting
Open illumination with contemporary polish
Clean, inviting aesthetic with professional quality
Warm color temperature (5000-5400K)
Professional quality appropriate for business applications
Face illuminated with clarity and warmth
Lighting conveys competence, approachability, and modern professionalism
Studio aesthetic - polished but naturally warm
Technical Camera Specifications
Lens: 85mm prime focal length simulation (professional portrait standard)
Aperture: f/1.8 for professional subject isolation
Focus point: Sharp precision focus on nearest eye (critical for connection)
Depth of field: Professional shallow depth with complete facial clarity
Both eyes in critically sharp focus
Face entirely within sharp focus plane
Natural, smooth falloff to shoulders and background
Smooth, aesthetic bokeh characteristics
Perspective: Natural compression with flattering proportions
Image quality: Clean digital sensor quality with excellent color accuracy and detail
Image Quality & Modern Professional Standards
Eyes: Sharp, clear focus with engaged presence

Visible iris detail with natural color accuracy
Individual eyelashes clearly defined
Natural, clean catchlights suggesting connection
Eyes projecting competence, warmth, and professionalism
Skin: Natural, authentic texture with professional polish

Realistic skin texture preservation showing genuine person
Professional retouching maintaining natural appearance
Clean approach preserving authenticity
Healthy, vibrant skin tone suggesting vitality and presence
Character and natural features maintained
Professional attire: Clean, detailed fabric texture

Visible quality fabric texture and professional construction
Natural drape and structure of business casual attire
Clean lines and contemporary professional fit
Texture suggesting quality without formality
Hair: Natural styling with professional definition

Clean, contemporary styling appropriate for modern business
Individual strands with natural texture
Well-maintained appearance suggesting attention to detail
Contemporary yet timeless approach
Overall sharpness: Clean clarity with natural detail

Sharp, clear focus throughout intended plane
Professional quality supporting business credibility
Clean, precise detail rendition with natural character
Color Grading & Post-Processing - Modern Professional
Color philosophy: Warm cinematic color science with balanced, inviting tones appropriate for contemporary business contexts

Temperature: Slightly warm (5000-5400K)

Modern professional color balance with intentional warmth
Inviting base with contemporary polish
Business casual appropriate color temperature
Balance of professional quality and human connection
Skin tones: Natural, warm, vibrant

Naturally warm and professionally balanced
Authentic appearance with healthy vitality
Accurately rendered with subtle enhancement
Skin tone suggesting competence and approachability
Contrast: Clean, contemporary, dimensional

Controlled with professional precision
Modern without harsh extremes
Business casual polish without artificial enhancement
Contrast suggesting depth and dimension
Saturation: Natural with subtle professional enhancement

Clean, contemporary color palette
Slightly enhanced for professional polish
Natural color with subtle richness
Modern business color approach
Overall: warm, clean, contemporary
Professional retouching:

Clean, natural approach maintaining authenticity
Remove temporary blemishes and distractions
Preserve character lines and natural features
Professional polish without artificial appearance
Subtle refinement maintaining genuine presentation
Even skin tone while preserving natural variation
Clean up any minor wardrobe imperfections
Philosophy: Professional, authentic, approachable - enhanced but genuine
Contemporary refinements:

Subtle professional vignette drawing focus to subject
Clean sharpening enhancing critical details
Optimized for LinkedIn and professional platforms
Warm color grading suitable for modern business contexts
Color Palette - Business Casual Professional
Blazer options:

Navy: #1F3A5F to #2A4A70
Charcoal: #3A3A3E to #4A4A4E
Warm Gray: #5A5A58 to #6A6A68
Soft Blue: #2A4A6A to #3A5A7A
Deep Burgundy: #6A2835 to #7A3845
Shirt/Top options:

White: #FFFFFF to #F8F8F8
Light Blue: #D5E5F5 to #E5F0FA
Light Gray: #E8E8EA to #F0F0F2
Heather Gray: #C5C5C8 to #D5D5D8
Background: #141414 or contemporary professional neutral

Skin tones: Natural, warm, vibrant, professional

Overall palette: Warm, clean, contemporary, inviting, professional

Overall Aesthetic & Mood
Business Casual Professional / Modern Expertise: Contemporary Business Professional, Modern Team Leader, Startup Executive, Innovation Manager. Someone who combines professional expertise with approachable authenticity, providing capable leadership with contemporary relevance and genuine connection.

Visual references:

Modern tech company leadership pages
Contemporary startup team directories
LinkedIn top profiles with high engagement
Professional service firms modern branding
Innovation-focused business publications
Forward-thinking corporate communications
Contemporary business conference speakers
Modern professional networking profiles
Business contexts:

LinkedIn profile and professional networking
Modern corporate websites and team directories
Contemporary business presentations and pitches
Professional networking events and materials
Startup and innovation focused organizations
Client-facing communications and materials
Modern team leadership and management
Professional speaking and industry events
Contemporary business publications and features
Modern project leadership and collaboration
Professional credentials in contemporary contexts
Forward-thinking organizational communications
Emotional tone:

Approachable expertise with modern relevance
Professional confidence with genuine accessibility
Contemporary competence with authentic presence
Modern leadership with collaborative spirit
Trustworthy capability with human connection
Forward-thinking professionalism with practical execution
Balanced authority - capable without intimidating
Innovative thinking with reliable delivery
Key characteristics:

Approachable with professional - accessible but capable
Modern with timeless - contemporary without trendy
Confident without arrogance - assured but humble
Polished without artificial - refined but genuine
Capable without intimidating - competent but collaborative
Contemporary without casual - modern but professional
Authentic with intentional - genuine but purposeful
Expert with relatable - knowledgeable but connected
Business Applications
This portrait must excel in:

LinkedIn profile and professional networking
Modern corporate websites and team pages
Contemporary business presentations and pitches
Professional digital platforms and directories
Industry publications and business features
Modern conference materials and speaking engagements
Professional email signatures and communications
Client presentations and business development
Team leadership and project management
Professional introductions and networking
Digital business platforms and modern applications
Forward-thinking organizational communications
Platform-Specific Optimizations
LinkedIn: Perfect square crop with face visibility at thumbnail size
Corporate websites: Clean presentation in contemporary layouts
Mobile platforms: Sharp clarity and impact at smaller sizes
Professional presentations: Quality supporting credibility with clients
Digital applications: Color accuracy across various devices and displays
Print applications: Detail resolution supporting quality reproduction
Strictly Avoid
❌ Overly formal business attire (suit and tie, executive styling)
❌ Casual or unprofessional appearance (t-shirts, overly relaxed)
❌ Rigid, stiff, or uncomfortable expressions
❌ Overly warm or excessively serious expressions
❌ Corporate coldness or rigid formality
❌ Dramatic lighting or artistic shadow effects
❌ Extreme or trendy styling that will quickly date
❌ Distracting backgrounds or environmental elements
❌ Technical imperfections or focus issues
❌ Colors inappropriate for professional contexts
❌ Excessively retouched or artificial appearance
❌ Forced or inauthentic expressions
❌ Styling that appears outdated or too conservative
❌ Posture suggesting disengagement or stiffness

Quality Benchmarks
Industry standards: Modern technology companies, contemporary professional services, forward-thinking organizations, innovative startups with professional polish

Platform applications: LinkedIn, modern corporate websites, professional directories, contemporary business communications

Photography references: Modern professional portraiture, contemporary business photography, innovative organization team imagery

Professional considerations: Projects competence, conveys approachability, builds trust, establishes credibility, creates positive first impressions, supports career advancement, translates well across modern professional contexts

Final result: A polished, contemporary business casual portrait that immediately communicates approachable expertise, modern professionalism, and authentic confidence. Quality and presentation worthy of leading innovation-focused companies, contemporary professional platforms, and modern business communications. The portrait should project both professional capability and genuine approachability that builds successful relationships in contemporary business environments - someone colleagues would want to collaborate with and clients would feel comfortable working with.

The ultimate test: When viewed on LinkedIn or a modern company website, this portrait should inspire immediate professional confidence while suggesting someone who combines contemporary expertise with authentic connection - creating a positive impression that opens opportunities in today's business landscape
For men with beards, add this phrase after the wardrobe description: “with a well-groomed beard, maintaining natural beard texture and definition.” This prevents Gemini from either removing your beard entirely or making it look artificially smooth.
For men with specific hairstyles worth preserving, add: “maintaining the natural hairstyle and texture from the uploaded photo.” Without this instruction, Gemini sometimes defaults to generic short professional haircuts.
The key difference between men’s and women’s prompts is that men’s prompts do not need the anti-beautification instruction. Corporate headshot AI results for men are typically realistic by default. The focus instead is on posture, expression, and wardrobe precision.
Both gender-specific approaches work with any of the use-case prompts from Section 5. Simply adjust the wardrobe details, add the appropriate skin texture instruction for women, and specify any personal details like jewelry, beards, or hairstyles you want preserved.
Why Your Gemini Photo Prompt Isn’t Looking Professional (And the Exact Fixes)
When your Gemini photo prompt doesn’t look professional, the problem usually falls into one of four categories: the AI generated someone who looks almost like you but not quite, the result looks too polished and fake, the expression feels stiff or unnatural, or Google Gemini refused to generate the image entirely.
One Reddit user described the first problem perfectly: “It’s like someone who looks almost the same as you but you can see it in the eyes and the smile.” That uncanny valley feeling happens when your prompt lacks specific identity-locking instructions or when your input photo quality is too low for the AI to work with accurately.
Each of these problems has a specific cause and a specific fix. Here is exactly what is going wrong and how to correct it.
Problem 1: It Doesn’t Look Like Me At All
This is the most frustrating failure mode and the most common reason people give up on AI headshots. The generated image shows a professional looking person in the right outfit and setting, but the face is clearly not yours.
Why does this happen? AI image generation interprets your prompt as instructions to create an idealized professional photo, and without explicit instructions to preserve your actual face, Gemini treats your uploaded photo as loose inspiration rather than a strict template.
The fix is the face-first framework. Every single prompt you use must start with this exact phrase:
“Edit this image. I need a professional, high-resolution headshot, maintaining the exact facial structure, identity, and key features of the person in the input image.“
That instruction tells Gemini what must stay the same before you describe what should change. Without it, the AI freely reinterprets your facial features to match whatever it thinks a professional photo should look like.
The second part of the fix is input photo quality. If your original photo is blurry, too dark, taken from a weird angle, or partially obstructed by sunglasses or a hat, Gemini cannot accurately extract your facial structure. The AI fills in what it cannot see clearly, and the result drifts away from your actual appearance.
Upload a clear, well-lit photo where your full face is visible and you are looking directly at the camera. Natural daylight works better than overhead indoor lighting. The photo does not need to be professional, but it does need to be sharp and unobstructed.
One additional tip from experienced users: upload multiple photos if face consistency is critical. Upload one front-facing photo and one side profile photo together. This gives Gemini more reference data and reduces the chance of facial feature drift.
Problem 2: It Looks Too Perfect, Too Young, or Too Edited
Another Reddit user put it bluntly: “It always gives me Botox or a glow up and makes me hate myself.” This is the over-beautification problem, and it affects women far more often than men because AI models apply automatic skin smoothing and feature idealization to female faces by default.
One woman generated what she thought was a great LinkedIn headshot and showed it to her HR professional friend for feedback. The response was harsh but honest: “It looks like you 20 years ago, not like the current version of you.” When your headshot looks significantly younger or more polished than you actually do, it creates an awkward credibility gap in real professional contexts.
The cause is simple. Gemini AI photo realistic results default to idealized beauty standards unless you explicitly tell the AI not to apply beautification filters.
The fix is equally simple. Add these two phrases to every prompt where realistic appearance matters:
“Observe natural, realistic skin texture without beautification or skin smoothing.“
“Maintain natural age-appropriate appearance.“
Those instructions disable the automatic beautification that makes AI-generated headshots look fake. The result keeps your natural skin detail, realistic texture, and actual age rather than creating a magazine-cover version of you that nobody will recognize in person.
This fix is especially critical for women but also applies to men who notice their AI headshots look suspiciously flawless compared to reality.
Problem 3: The Expression Looks Wrong or Stiff
When the facial expression in your generated headshot feels unnatural, forced, or noticeably different from how you normally look, the problem is almost always in how you described the expression in your prompt.
The specific cause is requesting a smile. AI models struggle to maintain accurate facial features when you ask them to add or change a smile. When Gemini tries to render a smile, the AI often reconstructs your mouth, cheeks, and lower face in ways that subtly change your appearance. The result looks professional but does not quite look like you.
One experienced prompt engineer confirmed this after extensive testing: “AI models are not still good at maintaining facial features like smile, so avoid that.”
The fix is to use mood-based expression descriptions instead of specific facial actions. Replace “smiling” with phrases like:
- “Natural, relaxed expression”
- “Warm, approachable expression”
- “Confident, composed expression”
- “Calm, professional demeanor”
These descriptions guide the overall feeling of the photo without forcing Gemini to alter your facial structure. Your eyes and overall posture convey warmth and confidence more reliably than a forced smile ever could.
If you absolutely want a smile in your headshot, use your input photo. Upload a photo where you are already smiling naturally, then ask Gemini to maintain that exact expression rather than creating a new one.
Problem 4: Gemini Refused to Generate the Image
Sometimes Google Gemini refuses to generate your professional headshot at all. You upload your photo and paste your prompt, hit send, and instead of an image you get a message like: “Is there another image I can try? I’m here to help you create all types of things, but can’t make images like that.”
This is frustrating but fixable. Gemini has built-in safety filters designed to prevent certain types of image manipulation, and sometimes professional headshot prompts accidentally trigger those filters.
The most common trigger is prompt language that sounds like you are asking Gemini to create a fake identity or dramatically alter someone’s appearance. Phrases like “change my face,” “make me look completely different,” or very specific cosmetic alteration requests can trip the safety system.
The fix has three parts:
First, rephrase your prompt to emphasize editing rather than transformation. Start every prompt with “Edit this image” rather than “Transform this person” or “Change my appearance.” The word “edit” signals professional photo enhancement rather than identity manipulation.
Second, always include the identity-lock phrase. “Maintaining the exact facial structure, identity, and key features of the person in the input image” tells Gemini’s safety filters that you are preserving identity, not creating a false one.
Third, try a different input photo. Sometimes the refusal is not about your prompt at all but about the input image quality or content. If your photo is extremely low resolution, heavily filtered, or includes other people’s faces in the background, Gemini may refuse to process it. Upload a clean, simple photo with just you in the frame.
If Gemini still refuses after all three fixes, try simplifying your prompt. Remove detailed wardrobe descriptions and lighting specifications and start with a basic request like “Edit this image into a professional headshot with neutral background” to see if the simpler version processes successfully. Once you confirm the basic prompt works, add detail back gradually.
When you understand why your Gemini photo prompt is not looking professional, the fixes become straightforward. Lock the face first with explicit identity preservation instructions. Disable beautification with realistic skin texture language. Use mood-based expressions instead of smile requests. And phrase your prompts as professional edits rather than transformations to avoid triggering safety filters.
Apply these four fixes and your results will improve dramatically.
Your First Result Isn’t Your Final Result: How to Refine It
Most people think Gemini image generation is a one-shot process: you paste your prompt, get one result, and either accept it or start completely over. That is not how Google Gemini actually works. After generating your first professional headshot, you can continue chatting with the AI to adjust specific elements without uploading your photo again or rewriting the entire prompt.
This iterative refinement workflow is one of the most powerful features of AI image generation, and almost nobody uses it because no one tells them it exists.
Here is how it works. After Gemini generates your first headshot, look at what you like and what you want to change. Then type a short follow-up instruction directly into the chat, exactly as if you were talking to a photo editor. Gemini will adjust only the elements you mention while keeping everything else the same.
Here are five specific refinement commands that work reliably:
“Give me another pose.” This generates a new version with a different body angle or head tilt while keeping your face, clothing, and background identical. Use this when the composition feels stiff or awkward.
“Zoom in a bit so my face shows better.” This reframes the image to bring your face closer and more prominent in the shot. Perfect when the first result framed you too far away or your face feels too small in the LinkedIn circle crop.
“Change the clothing to a white blazer” or “Change the shirt to navy blue.” You can swap wardrobe colors or styles without re-uploading your photo. Gemini adjusts only the clothing while preserving your face and the rest of the composition.
“Remove the glasses.” If Gemini added glasses you do not normally wear, or if you want to see a version without your actual glasses, this command removes them cleanly.
“Make the background lighter” or “Use a darker background.” You can adjust background tone even after the image is generated. This is useful when you realize the #141414 background feels too dark for your specific use case.
You can stack multiple refinements. Generate the first image, ask Gemini to zoom in, then ask it to change the blazer color, then ask for a slightly different pose. Each refinement builds on the previous result rather than starting from scratch.
This is basic prompt engineering in action. Professional AI users never accept the first result. They treat Gemini as a collaborative tool and refine iteratively until the output matches their vision exactly.
Generate three to four variations using different refinement commands, then choose the best one. That workflow dramatically increases the chance you end up with a headshot you genuinely love rather than one you settle for.
A Few Things Nobody Tells You Before You Start
Before you generate your first professional headshot with Gemini AI, there are three practical limits worth knowing. None of these are dealbreakers, but understanding them upfront sets realistic expectations and saves you from discovering them the hard way.
First, do not use AI-generated headshots for official government documents.
Passports, driver’s licenses, visas, and any other legal identity documents require real photographs taken by authorized professionals in most countries. Using an AI-generated image for these purposes is not just ineffective, it can create serious legal problems.
One Reddit user from Canada put it clearly: “We have to get our passport photos taken at an authorized photo location, and the place stamps the photos to authenticate them. I can only imagine what sort of legal trouble someone would be in if they submitted AI photos.” AI headshots are perfect for LinkedIn, resumes, business websites, and personal branding, but never for official identification.
Second, the uncanny valley effect is real but manageable
Some people notice a subtle quality where the AI-generated professional headshot looks almost exactly like them but feels slightly off in the eyes or expression. One user described it perfectly: “It’s like someone who looks almost the same as you but you can see it in the eyes.”
This happens when prompts lack specific face-locking instructions or when the input photo quality is too low. The fixes in Section 8 eliminate most of this issue, but be aware that extremely sensitive viewers may still detect a digital quality. For most professional contexts like LinkedIn or business websites, this is not a problem at all.
Third, always get a second opinion from someone in a professional context
Generate your headshot, then show it to a trusted colleague, mentor, or HR professional and ask one specific question: “Does this look like the current version of me?” Not “Does this look good?” but “Does this represent how I actually look right now?” One woman generated what she thought was a perfect headshot, showed it to her HR friend, and got honest feedback that changed everything:
“It looks like you 20 years ago.” That reality check saved her from using a photo that would have created an awkward credibility gap in real professional meetings. Your headshot needs to match your actual appearance closely enough that people recognize you immediately when they meet you in person.
These three limits are not reasons to avoid Gemini AI for professional headshots. They are just honest boundaries that help you use the tool appropriately and get results that actually serve your professional goals.
Start With One Prompt, Then Make It Your Own
Getting a great professional headshot with Gemini AI comes down to three steps: choose a prompt that matches your profession, follow the setup process from Section 3 exactly, and refine the result through follow-up chat until it genuinely represents you.
The right gemini prompt for a professional photo is not the one that looks most impressive on paper. It is the one you customize to your face, your industry, and the platform where your photo will live. Start with any prompt from Section 5 that fits your professional context. Run it once, see what works, then adjust the wardrobe detail, lighten the background, or zoom in through a follow-up message.
One Reddit user summed up the experience in a way that made me laugh: “AI gave me a full performance review and a promotion.” That is what a genuinely good professional headshot can feel like when the lighting, framing, and expression all come together.
Creating a google gemini professional portrait that represents your current professional self is genuinely achievable with a casual photo, the right prompt structure, and a few minutes of refinement. You do not need a camera, a studio, or a photography budget to build a personal branding asset that looks the part.
Bookmark this article for the next time you need to update your profile or switch contexts from corporate to creative. Share it with someone who keeps putting off updating their LinkedIn photo. That one update might matter more than they think.
Now go start with prompt one.
Frequently Asked Questions About Gemini Professional Photo Prompts
Which Gemini model gives the best results for a professional photo?
Gemini 3 Pro consistently produces the best face consistency results for professional headshots, based on multiple user reports across Reddit and creator communities. The Nano Banana image model within Gemini is specifically built for image generation and delivers excellent results across most professional headshot scenarios. If you do not have a subscription, Gemini 2.5 Flash handles professional headshot prompts well and is available on the free tier.
To access image generation in any version, open Google Gemini, select your preferred model, click Tools, then select Create Images before uploading your photo and prompt together. The model selection matters more than most people realize, and Gemini 3 Pro is worth using if you have access to it.
Is it free to make a professional photo with Gemini AI?
Yes, Gemini AI offers image generation on its free tier. You can create professional headshots using the Create Images feature at no cost with a standard Google account. The basic functionality is genuinely free and produces quality results without any payment required.
Some advanced Nano Banana model features and higher generation limits may be tied to a Google One subscription, but free users consistently report strong results for professional headshot generation. Downloaded images are yours to keep and use at no additional cost, making Gemini one of the most accessible free AI headshot tools currently available.
Will Gemini AI change my face or make me look like someone else?
Yes, without specific identity-locking instructions in your prompt, Gemini can alter your facial features significantly. Some users report results that look like a different person entirely, while others see subtle changes in their eyes, nose structure, or overall facial proportions.
The fix is straightforward. Add this phrase to the beginning of every prompt: “maintaining the exact facial structure, identity, and key features of the person in the input image.” This single instruction anchors Gemini to your uploaded reference photo before any professional styling is applied.
Two additional steps improve face accuracy further. First, avoid requesting a specific smile expression, as smile instructions cause AI models to reconstruct your lower face in ways that change your appearance. Second, use a clear, sharp, well-lit close-up selfie as your input photo. A blurry or obstructed input photo forces Gemini to fill in facial details it cannot see clearly, which is when face drift most commonly occurs
Can I use an AI-generated professional photo for my passport or ID?
No. AI-generated photos are not acceptable for passports, visas, national ID cards, or any other official government identification documents in virtually all countries. These documents legally require authenticated photographs taken under controlled conditions by authorized providers.
Submitting an AI-generated image for an official government document can create serious legal complications. In many countries, passport photos must be physically stamped or certified by the photographer to confirm authenticity.
AI headshots are appropriate for LinkedIn profiles, business websites, resumes, business cards, company directories, and social media only. For any official identification purpose, always use a real photograph taken in compliance with your country’s specific requirements.
Can I use these prompts in ChatGPT instead of Gemini?
Yes. The prompts in this article work in ChatGPT with DALL-E image generation as well. The technical language used throughout, including lens specifications like 85mm f/1.8, lighting descriptors like soft diffused studio lighting, and background hex codes like #141414, is understood by both AI image generation systems.
The main difference between the two platforms is navigation rather than prompt language. ChatGPT uses its built-in image generation mode, while Gemini requires you to go through Tools and then Create Images. Results vary slightly between the two systems, and some users find one platform handles face consistency better for their particular photo.
Generating versions in both systems and comparing the results is a completely valid approach and costs nothing on the free tiers of either platform.
Do I need to upload a selfie or can Gemini generate a professional photo from text alone?
You can generate a professional photo using text alone without uploading a selfie, but the result will show a fictional person that Gemini creates based on your description. The generated image will not look like you at all.
To get a professional headshot that actually represents your appearance, you must upload a clear selfie as the reference image alongside your written prompt. The combination of your uploaded photo plus your detailed prompt is what produces a personalized result. Text-only generation is useful for creating fictional characters or generic professional imagery, but it cannot produce a headshot of a real, specific person without a photo reference.
Why does my Gemini headshot make me look so much younger or over-edited?
This is one of the most common frustrations with AI-generated professional headshots. Gemini AI, like most image generation models, applies idealized rendering to faces by default. The result often looks significantly younger, smoother, or more polished than your actual appearance.
The fix requires two specific phrases added to your prompt. First, include “natural, realistic skin texture without beautification or skin smoothing.” Second, add “maintain natural age-appropriate appearance.”
Together these two instructions disable the automatic idealization that makes AI headshots look over-edited.
This issue affects women more frequently than men because AI models apply more aggressive beautification to female faces by default.
However, men occasionally notice the same problem, particularly in results where skin texture looks unusually perfect or facial lines appear reduced. Both phrases work for all genders and should be included any time realistic representation matters more than a polished look.
How many photos should I upload to get the best face consistency?
For best face consistency results, upload at least two photos rather than one. The most effective combination is one front-facing selfie where your face is looking directly at the camera and one three-quarter angle or slight side profile shot. This gives Gemini more facial data points to work with, which reduces face drift and produces outputs that more accurately match your actual appearance.
If you also want accurate body proportions or posture in the final image, adding a waist-up photo as a third reference gives Gemini additional information about your build and natural stance.
Each additional reference photo you upload improves the accuracy of the final result, particularly for features like your nose shape, jawline, and the natural proportions of your face from different angles. One photo works fine for a quick result, but two to three photos consistently produces stronger face matching.