What Can Gemini Actually Do for Photo Editing?
When I first started using Google Gemini for photo editing, I had to learn the hard way that it works completely differently than traditional editors like Photoshop or even Google Photos.
Most people searching for “gemini prompt for photo editing” don’t realize they’re actually looking at two separate features: image generation and photo editing. Let me clear up the confusion so you don’t waste time like I did.
Gemini image editing is powered by AI models called Nano Banana 2 and Gemini 2.5 Flash. These are generative AI tools, which means they don’t work like the crop-and-filter tools you’re used to.
Instead, you upload your existing photo and then tell Gemini in plain English what you want to change. It’s natural language image editing, where you type instructions like “change the background to a beach” or “remove the person in the corner,” and the AI regenerates parts of your image based on your words.
Here’s what surprised me most: Gemini cannot automatically access your Google Photos. You have to manually upload the photo you want to edit every single time. This is different from how Google Photos’ AI Enhance feature works, which lives inside the Photos app itself.
Gemini is a separate tool, and it’s designed for a different kind of editing more creative transformation than simple touch-ups.
What Gemini Actually Does Well
I’ve tested dozens of prompts, and Gemini excels at a few specific tasks:
- Background replacement: Swapping out boring or messy backgrounds with clean, professional ones
- Lighting and color enhancement: Adding golden hour glow, cinematic color grading, or dramatic shadows
- Style transformation: Turning a regular photo into a vintage look, black-and-white film aesthetic, or illustrated art style
- Object addition or removal: Adding accessories like hats or glasses, or removing distracting items from the frame
These edits go far beyond what traditional photo editing apps can do. You’re not just adjusting sliders—you’re using text to image editing to actually regenerate parts of your photo intelligently.
What Gemini Struggles With
But it’s not magic. The biggest problem I’ve run into is face preservation. Without the right prompt, Gemini will often change your facial features, skin tone, or even your entire face structure when editing. This is the #1 complaint I see from users, and I’ll show you exactly how to fix it in the next section.
Gemini also works best with high-quality reference photos. Blurry, low-light, or heavily compressed images give unpredictable results. And because it’s generative AI photo editing, it sometimes adds creative “improvements” you didn’t ask for—like changing your outfit or adding objects that weren’t in your original photo.
Gemini Image Generation vs. Photo Editing: What’s the Difference?
This is where most people get confused. Image generation means Gemini creates a brand-new image from scratch using only your text description. You don’t upload a photo—you just describe what you want, and the AI draws it for you.
Photo editing, on the other hand, starts with a photo you upload. You then write a prompt telling Gemini what to change while keeping the rest of the image intact. For example, I can upload a selfie and ask Gemini to “change my t-shirt to a black leather jacket while keeping my face and background exactly the same.”
Here’s the catch: most of those viral Gemini photos you see online the ones with dramatic cinematic looks or fantasy backgrounds are actually AI image generation, not editing. The creator uploaded a reference photo so Gemini could copy their face, but the rest of the image was generated from scratch.
True gemini prompt for photo editing means modifying specific parts of an existing photo. If you want that level of control, you need to be very specific in your prompt about what to keep and what to change. Otherwise, Gemini treats your upload as just a reference and creates something entirely new.
How to Edit Photos with Gemini AI: Step-by-Step
Learning how to edit photos with Gemini AI is surprisingly simple once you know where to click. I’m going to walk you through the exact process I use every time, whether you’re on your phone or computer. This is the complete workflow from start to finish.
Step 1: Open Google Gemini
Go to gemini.google.com on your computer, or open the Gemini app on your phone. You don’t need a paid account—the free version works perfectly fine for photo editing. Just make sure you’re signed into your Google account.
Step 2: Start a New Image Edit
Look for the plus icon or the “Upload files” button at the bottom of the chat interface. On mobile, you’ll see a small plus sign next to the text box. On desktop, click the paperclip or image icon. This opens your device’s file picker.
Step 3: Select Your Photo
Choose the photo you want to edit from your gallery or folders. I always use high-quality photos because Gemini works best when the original image is clear and well-lit. Blurry or dark photos give unpredictable results.
Step 4: Write Your Editing Prompt
This is where the magic happens. In the text box, type exactly what you want Gemini to change. For example, I might write “change the background to a coffee shop while keeping my face and outfit exactly the same.” The key is being specific about what to change and what to preserve. I’ll give you 25 ready-made prompts later in this article.
Step 5: Wait for Processing
Click send and give Gemini about 10 to 20 seconds to process your request. You’ll see a “Just a sec…” or “Generating…” message while the AI works. Don’t refresh the page or close the app during this time.
Step 6: Review Your Result
Gemini will show you the edited version of your photo. Sometimes it nails it on the first try. Other times, the result might not be exactly what you wanted. That’s completely normal with AI photo editing.
Step 7: Use the “Redo” Trick for Variations
Here’s a feature most people don’t know about: if you want a different version without retyping your entire prompt, tap the three dots in the corner of the generated image. Select the circular arrow icon (the “redo” option). Gemini will generate a completely new variation using the same prompt. I’ve gotten up to five different versions this way, and sometimes the third or fourth attempt is the best one.
Step 8: Download Your Final Image
Once you’re happy with the result, click the download icon to save the full-size version to your device. The image usually downloads at high resolution, ready to share or post.
That’s the complete process. The entire workflow takes less than two minutes once you get the hang of it. The hardest part is writing a good prompt, which is exactly what the rest of this guide will teach you.
Why Gemini Changes Your Face (And 3 Prompts That Prevent It)
You upload your photo, ask Gemini to change the background, and suddenly you don’t look like yourself anymore. Your nose is different. Your skin tone shifted. Your entire face structure changed.
I’ve been there, and it’s incredibly frustrating when all you wanted was a simple background swap.
This is the single biggest complaint I see from people trying to use Gemini for photo editing, and none of the popular tutorials address it properly. So let me explain why this happens and give you three tested prompts that actually preserve your face.
Why Gemini Keeps Changing Your Face
Gemini is a generative AI, which means it doesn’t just copy and paste parts of your image. Instead, Gemini interprets your photo and recreates it based on your prompt. When you write something vague like “improve this photo” or “make this look professional,” the AI assumes you want it to enhance everything, including your facial features.
There are three main reasons Gemini alters your face. First, your face might be too small in the frame. If your face takes up less than 30% of the image, Gemini treats it as part of the background rather than the main subject. Second, ambiguous prompts give Gemini creative freedom it shouldn’t have. Words like “enhance” or “improve” signal permission to change anything. Third, Gemini’s skin tone preservation isn’t perfect yet, so lighting changes often shift your complexion unintentionally.
The solution is simple: you need to explicitly tell Gemini what NOT to change before you tell it what to edit. Here are three prompts that work, tested by real users.
Simple Prompt: The DSLR Remaster (Copy & Paste)
This is the easiest prompt I’ve found for basic edits. A Reddit user named Pasto_Shouwa shared this, and it works because the word “remaster” tells Gemini to keep the original subject while improving technical quality.
Copy this prompt:
Remaster this image as a professional, high-resolution photograph with the following qualities:

Camera quality: Shot with a modern full-frame DSLR camera (Canon EOS R5 or Nikon Z9 equivalent)
Image specs: Razor-sharp focus, enhanced clarity, and crisp detail throughout
Technical improvements:
Optimal exposure and dynamic range
Rich, accurate colors with proper white balance
Reduced noise and grain
Enhanced texture and fine details
Professional depth and dimension
Lighting: Well-balanced, natural-looking lighting
Resolution: Maximum quality, print-ready sharpness
Constraints: Preserve original composition, subject matter, and aspect ratio
Output a clean, magazine-quality image that looks like it was captured with professional photography equipment and technique
Then add your specific edit instruction at the end, like “change the background to a beach” or “add a leather jacket.”
This prompt works well for portraits where your face is clearly visible and centered. The phrase “modern DSLR camera” gives Gemini a technical enhancement direction without granting permission to alter your facial features. Just remember that this prompt struggles if your face is too small in the frame.
Detailed Prompt: Explicit Preservation Language
If the simple version still changes your face, you need to be more direct. I combined language from multiple video creators and Reddit users to build this version. It lists every facial feature you want preserved.
Copy this prompt:
CRITICAL REQUIREMENT - FACIAL PRESERVATION:

Maintain 100% exact facial accuracy from the reference image:

Face shape and bone structure (jaw, chin, forehead proportions)
Eye shape, size, color, and placement
Nose shape, bridge, and proportions
Lip shape, size, and natural contours
Eyebrow shape, arch, thickness, and positioning
Cheekbone structure and definition
Facial asymmetries and unique characteristics
Skin texture, moles, freckles, and natural features
Exact facial expression (neutral, smiling, etc.)
PROHIBITED CHANGES:

No facial smoothing, filtering, or "beautification"
No alterations to facial proportions or symmetry
No makeup addition or enhancement
No skin tone modification
No feature refinement or "improvement"
No age progression or regression
No facial expression changes
This is a face-swap or face-preservation edit - treat the facial region as completely locked and untouchable.

ALLOWED EDIT:
[Insert your specific editing instruction here, such as: "Change the background to a modern coffee shop interior with warm lighting" or "Replace clothing with a business suit"]

Final check: The person in the output must be instantly recognizable as the exact same individual with zero facial modifications.
The key phrase here is “accurate face 100%,” which I’ve seen in dozens of successful Gemini edits. The specific feature list (eyes, nose, lips) prevents Gemini from interpreting “face” too broadly. This version handles lighting changes and background swaps much better than the simple prompt.
Replace the bracketed section with whatever you want to edit. For example: “change my outfit to a black suit” or “add cinematic lighting from the left.
Professional Prompt: The Sony A1 Formula (Advanced)
This is the most comprehensive prompt I’ve tested, shared by Reddit user Loud-Lawyer5411. It’s designed for people who want professional-quality results and understand basic photography terms.
Copy this prompt:
Enhance the portrait while strictly preserving the subject's identity with accurate facial geometry. Do not change their expression or face shape. Only allow subtle feature cleanup without altering who they are. Keep the exact same background from the reference image. No replacements, no changes, no new objects, no layout shifts. The environment must look identical. The image must be recreated as if it was shot on a Sony A1, using an 85mm f1.4 lens, at f1.6, ISO 100, 1/200 shutter speed, cinematic shallow depth of field, perfect facial focus, and an editorial-neutral color profile. This Sony A1 + 85mm f1.4 setup is mandatory. The final image must clearly look like premium full-frame Sony A1 quality. Lighting must match the exact direction, angle, and mood of the reference photo. Upgrade the lighting into a cinematic, subject-focused style: soft directional light, warm highlights, cool shadows, deeper contrast, expanded dynamic range, micro-contrast boost, smooth gradations, and zero harsh shadows. Maintain neutral premium color tone, cinematic contrast curve, natural saturation, real skin texture (not plastic), and subtle film grain. No fake glow, no runway lighting, no oversmoothing. Render in 4K resolution, 10-bit color, cinematic editorial style, premium clarity, portrait crop, and keep the original environmental vibe untouched. NEGATIVE INSTRUCTIONS: No new background. No background change. No overly dramatic lighting. No face morphing. No fake glow. No flat lighting. No over-smooth skin. No change pose same to same as it is.This prompt uses camera specifications (Sony A1, 85mm lens) to lock Gemini into a realistic photography mindset instead of a creative art mindset. The negative instructions at the end are crucial because they tell Gemini exactly what mistakes to avoid. This is professional photo editing prompt language at its best.
I only recommend this version if you’re comfortable with photography terminology and you want magazine-quality results. It takes longer to process, but the face preservation is nearly perfect.
How to Write a Gemini Prompt for Photo Editing (The 4-Part Formula)
Once you understand how to write a Gemini prompt for photo editing, you stop relying on copy-paste examples and start creating exactly what you want. I spent weeks analyzing hundreds of successful prompts to figure out what actually works, and I found a clear pattern. Every effective prompt follows the same basic structure.
The secret is breaking your prompt into four parts, always in the same order. This is the ai image prompt structure that consistently delivers the best results. Think of it like a recipe where the order of ingredients actually matters.
Here’s the creative prompt formula I use every single time.
Part 1: Preservation Instructions (Keep What You Like)
Always start by telling Gemini what NOT to change. This is the most important part of any photo editing prompt, especially if you want to preserve face in your image.
Without preservation instructions, Gemini assumes everything is fair game for modification. I learned this the hard way after losing count of how many times my face came back looking like a completely different person.
Here are the preservation phrases I use most often:
- “Keep my face exactly as uploaded”
- “Preserve my facial features 100% including face shape, eyes, nose, and lips”
- “Do not alter my expression or skin tone”
- “Maintain my exact facial structure and features”
- “Use my image with accurate face 100%”
You can also preserve other elements like clothing, poses, or specific background objects. For example: “Keep my blue jacket and sunglasses exactly the same” or “Preserve the tree in the background.”
The key is being specific about what stays untouched before you mention what changes.
Part 2: Change Instructions (What You Want Different)
Now tell Gemini exactly what to modify. This is where you describe the actual edit you want. Be direct and clear about the transformation.
Good change instructions look like this:
- “Change the background to a sunny beach with palm trees”
- “Replace my T-shirt with a black leather jacket”
- “Remove the person standing in the background”
- “Brighten the lighting to golden hour style”
- “Add a coffee cup on the table in front of me”
- “Swap the indoor setting for an outdoor park”
The more specific you are, the better. Instead of saying “improve the background,” say “change the background to a modern coffee shop interior with soft natural lighting.” Vague words like “enhance” or “improve” give Gemini too much creative freedom and often lead to unwanted changes.
This is where background removal and change background ai prompt techniques come into play most effectively.
Part 3: Style & Quality Specifications
Add style keywords to control the overall look and feel of your edited photo. This is where ai photo transformation really happens. Style words guide Gemini toward a specific aesthetic without you having to describe every detail.
I’ve built a cheat sheet of style keywords that work consistently well. Mix and match these to create your desired look:
Mood & Atmosphere:
Cinematic, moody, dramatic, dreamy, soft, warm, cool, atmospheric, ethereal, nostalgic
Visual Style:
Vintage, retro, modern, minimalist, editorial, candid, artistic, realistic, ultra realistic, photorealistic
Quality & Technical:
High detail, sharp focus, 8K, 4K resolution, high quality, professional, premium clarity, natural
Lighting:
Golden hour, soft lighting, natural daylight, dramatic lighting, studio lighting, backlit, soft shadows
Color Treatment:
Vibrant, muted, desaturated, warm tones, cool tones, neutral tones, film grain, black and white
For example, adding “cinematic moody atmosphere with soft shadows and warm tones” completely changes the feel of your edit compared to “bright vibrant colors with sharp details.”
This is where cinematic color grading prompt elements make the biggest difference.
Part 4: Technical Details (Optional for Advanced Users)
If you understand photography, adding camera settings and composition rules takes your results to a professional level. This part is optional, but it gives you much finer control.
I only use technical details when I want magazine-quality results or when I’m working on portfolio pieces. For casual edits, Parts 1 through 3 are plenty.
Camera Settings:
- Lens: 50mm f/1.8, 85mm f/1.4, 35mm f/2
- Camera specs: Shot on Sony A1, Canon R5, Nikon Z9
- Technical settings: ISO 100, f/1.6, 1/200 shutter speed
- Depth of field: Shallow depth of field, bokeh background, cinematic depth
Composition Rules:
- Rule of thirds framing
- Leading lines composition
- Centered symmetrical framing
- Portrait crop, landscape orientation
- 3:4 vertical aspect ratio, 16:9 horizontal
Lighting Types:
- Soft box lighting from the left
- Directional natural light
- Rim lighting effect
- Studio three-point lighting setup
An example professional photo editing prompt might include: “Shot on a Sony A1 with 85mm f/1.4 lens, shallow depth of field, natural golden hour lighting, rule of thirds composition.”
This level of detail tells Gemini to think like a professional photographer instead of a graphic designer.
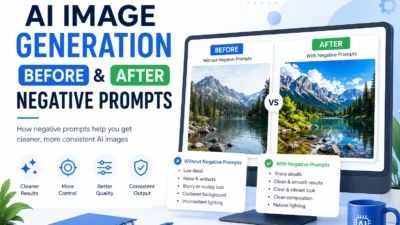
Advanced: Adding Negative Instructions
Here’s a technique I picked up from professional Gemini users: add a list of things Gemini should NOT do at the end of your prompt. Negative instructions prevent common AI mistakes before they happen.
Start a new line and write “NEGATIVE INSTRUCTIONS:” then list everything you want to avoid:
- No face morphing
- No new background elements
- No overly dramatic lighting
- No fake glow or artificial smoothing
- No over-smooth skin or plastic look
- No flat lighting
- No change to my pose or body position
- No text or watermarks
I started using negative instructions after noticing Gemini would add random objects or over-process skin texture even when I didn’t ask for it. This simple addition fixed about 80% of those unwanted changes.
Putting It All Together
A complete prompt using this formula looks like this:
FACE PRESERVATION PRIORITY: Keep my face and all facial features exactly as uploaded - 100% identical match. No facial modifications, beautification, or AI alterations whatsoever.

Scene Edit: Change the background to a modern rooftop terrace at sunset with city skyline visible in the distance.

Atmosphere & Style:

Cinematic moody atmosphere with warm golden hour lighting
Soft, natural shadows that complement the face
Ultra realistic 8K quality with sharp focus on subject
Professional color grading
Camera Settings:

Shot with 50mm f/1.8 prime lens
Shallow depth of field (background gently blurred)
Rule of thirds composition
Bokeh effect on city lights
NEGATIVE PROMPTS (avoid these):

No face changes, smoothing, or AI face enhancement
No overly dramatic or artificial lighting
No fake glow, lens flares, or over-processing
No filters or unrealistic color shifts
Result should look like an authentic professional photograph with only the background changed
Once you practice this structure a few times, writing custom prompts becomes second nature. You’ll get better results than any copy-paste example because you’re describing exactly what you want.
25 Best Gemini AI Prompts for Photo Editing (Copy & Paste)
These are the best gemini ai prompts for photo editing I’ve tested and collected from real creators who’ve gotten incredible results. I’ve organized 25 sample gemini photo editing prompts into five practical categories so you can find exactly what you need without scrolling through hundreds of random examples.
Every prompt here is ready to copy and paste. Just replace the general descriptions with your specific details, and you’ll get professional results on your first try. These google gemini prompts for photo editing come from a mix of YouTube creators, Reddit users who’ve spent months perfecting their formulas, and my own testing.
Unlike other lists that dump 60+ prompts with no explanation, I’ve curated only the ones that consistently work. Each prompt includes what it does and a pro tip to help you get even better results. Think of this as your copy paste gemini prompts library.
Category 1: Portrait & Skin Retouching Prompts
Portrait editing is where Gemini shines brightest. These portrait editing prompt gemini examples handle everything from natural skin retouching to creative stylized portraits while keeping your face exactly as it should be.
Prompt #1: Natural Skin Retouching & Enhancement
FACIAL FEATURE PRESERVATION: Keep my face exactly as uploaded with 100% accurate facial features - maintain my unique face shape, eye shape, nose, lips, eyebrows, and bone structure.

Natural Skin Retouching (subtle only):

Light blemish and minor spot correction
Maintain real skin texture and pores - no plastic/waxy smoothing
Preserve natural skin color and undertones exactly
Even out only extreme discoloration if present
Keep natural skin characteristics (freckles, beauty marks, etc.)
Lighting & Technical Enhancement:

Enhance to soft, directional natural light (window light style)
Slight boost in clarity and sharpness for professional polish
Balanced exposure with gentle shadows
Natural color temperature
Camera Specs:

Shot on modern full-frame DSLR
85mm portrait lens, f/1.8-2.0
Professional portrait quality with natural depth
NEGATIVE PROMPTS (strictly avoid):

No over-processing or heavy filtering
No fake glow, artificial skin blur, or Instagram filters
No face morphing or feature alteration
No dramatic changes - keep it natural and authentic
Goal: Professional headshot quality with minimal, tasteful retouching that respects the original face
What it does: Cleans up skin imperfections naturally while preserving your authentic look and texture
Pro tip: This is perfect for headshots and profile pictures because the retouching is so subtle that people won’t notice you edited the photo at all.
Prompt #2: Polaroid Vintage Pool Portrait (Reddit-Tested)
FACE PRESERVATION: Keep the exact face and all features from the uploaded photo in high definition - do not alter face shape, eyebrows, lips, nose, cheekbones, eyes, or any facial structure.

Format: Polaroid portrait image with characteristic white border frame

Aesthetic Style:

Dreamy cinematic composition with soft, nostalgic lighting
Muted brown/warm beige color palette with subtle vintage color shifts
Authentic film grain aesthetic and organic imperfections
Slightly faded, timeless quality characteristic of instant film
Technical Quality:

Captured with 85mm lens equivalent at f/1.4 for beautiful depth
Sharp focus on face with natural skin texture visible
Preserve natural freckles, pores, and real skin details
Soft bokeh background blur
Color & Processing:

Natural, authentic film tones - no digital over-processing
Warm, muted color grading
Organic contrast and exposure
Aspect Ratio: 3:4 (portrait orientation)

NEGATIVE PROMPTS: Zero facial alterations, no AI beautification, no plastic skin smoothing, no oversaturation

Result: An authentic-looking polaroid photograph that preserves the subject's real face with dreamy vintage film aesthetics.
What it does: Creates a vintage Polaroid-style portrait with nostalgic film aesthetics while strictly preserving facial features
Pro tip: This prompt comes from Reddit user Angel Nichelle Torain who tested it extensively. The explicit feature list at the end is what makes face preservation so reliable.
Prompt #3: Professional Headshot with Studio Quality
FACIAL ACCURACY REQUIREMENT: Keep my face exactly as uploaded - 100% accurate facial features, face shape, and natural characteristics. Zero alterations.

Setup: Professional studio portrait with neutral medium gray background (seamless backdrop)

Lighting Setup:

Soft, flattering studio lighting from 45-degree angle (Rembrandt/loop lighting style)
Diffused light source (softbox/umbrella) for smooth skin tones
No harsh shadows or extreme contrast
Subtle catchlight in eyes for dimension
Focus & Detail:

Razor-sharp focus on eyes
Natural makeup enhancement if visible (don't add makeup if none present)
Preserve natural skin texture and real pores
Crisp detail throughout face
Technical Specs:

Ultra realistic 8K quality
Shot on Sony A1 with 85mm f/1.4 GM lens
Shallow depth of field with creamy bokeh
Professional color accuracy
Style: Clean, polished, corporate-appropriate headshot

NEGATIVE PROMPTS: No AI beautification, no face morphing, no plastic skin smoothing, no artificial enhancements

Goal: LinkedIn/corporate-ready professional headshot that looks authentically photographed in a studio setting.
What it does: Transforms any casual photo into a polished professional headshot suitable for LinkedIn or business use
Pro tip: Neutral backgrounds work better than pure white for professional settings because they’re easier on the eyes and look more natural.
Prompt #4: Black and White Aesthetic Portrait
FACIAL PRESERVATION: Use my image with 100% accurate face - do not change any facial features, expression, or identity. Keep everything exactly as uploaded.

Format: Black and white aesthetic portrait with classic monochrome photography style

Lighting:

Dramatic high-contrast lighting with deep, rich shadows
Chiaroscuro technique (strong light-to-dark ratio)
Directional light source creating dimensional depth
Emphasis on facial contours and natural bone structure
Atmosphere & Mood:

Moody and artistic atmosphere
Mysterious, emotional, introspective vibe
Timeless fine art portrait quality
Texture & Grain:

Authentic film grain texture (medium grain, not excessive)
Classic silver gelatin print aesthetic
Rich tonal range from deep blacks to bright highlights
Focus & Depth:

Sharp, crisp focus on subject's face and eyes
Slightly soft background for subject separation
Natural depth and dimension
NEGATIVE PROMPTS: No face morphing, no expression changes, no feature alterations, no over-smoothing

Goal: A striking, gallery-worthy black and white portrait that preserves your exact identity with dramatic artistic lighting.
What it does: Converts your portrait to dramatic black and white with cinematic mood and lighting
Pro tip: Black and white photos hide skin imperfections naturally, so you don’t need heavy retouching. This is one of the easiest ways to make any photo look instantly more professional.
Prompt #5: Mirror Reflection Creative Portrait (Reddit-Tested)
FACIAL PRESERVATION: Keep my facial features exactly the same as uploaded - preserve eye color, facial structure, hair length, and all true characteristics. Zero alterations.

Pose & Composition:

Person lying on their side, gently placing face and hands on a pristine glossy mirror surface
Perfect reflection creates symmetrical composition with two focal points (original + mirror image)
Face and reflection balanced as dual centers of the image
Top-down or slightly angled perspective
Appearance Details:

Natural makeup with defined, enhanced eyes (mascara/eyeliner visible)
Shoulder-length hair flowing naturally
Authentic skin texture and real details
Mirror & Reflection:

Crystal-clear, flawless reflection (no distortion)
Clean glass/mirror surface with subtle reflective quality
Reflection stands out against dark background
Background & Lighting:

Deep, dark background (black or very dark gray) for dramatic contrast
Soft, even lighting that illuminates face without harsh shadows
Reflection equally sharp and clear as the original
Technical Specs:

4:5 vertical format (portrait orientation)
8K quality, ultra-realistic with authentic details
Sharp focus on both face and reflection
NEGATIVE PROMPTS: No face changes, no distorted reflection, no artificial beauty filters

Goal: A striking, symmetrical portrait with perfect mirror reflection effect
What it does: Creates an artistic mirror reflection composition for creative social media content
Pro tip: This prompt is from Reddit user Pilar Carmelita Arlando. The mirror technique works beautifully for Instagram and creates visual interest that standard portraits lack.
Category 2: Background Replacement & Effects
Background replacement is one of the most practical uses for photo retouching with gemini. These background replacement prompt gemini examples let you completely transform your setting while keeping yourself perfectly intact.
Prompt #6: Simple Nature Background Swap
PRESERVATION REQUIREMENT: Keep my face and pose exactly as uploaded - 100% identical facial features, expression, and body position. Zero changes to subject.

Background:

Lush green forest/trees filling entire background
Beautiful bokeh effect with creamy, smooth blur
Natural outdoor setting with layered depth
Rich green foliage at various distances creating dimensional blur
Lighting & Atmosphere:

Soft, natural daylight filtering through tree canopy
Cool, relaxed outdoor atmosphere
Gentle, even illumination on subject
Natural color temperature (daylight balanced)
Technical Specs:

Shot on full-frame DSLR camera
85mm lens at f/1.4-2.0 for strong background separation
Sharp focus locked on subject with high detail
Cinematic depth of field and color grading
Professional outdoor portrait quality
Style: Clean, natural portrait with dreamy forest backdrop

NEGATIVE PROMPTS: No facial alterations, no pose changes, no artificial lighting effects, no over-processing

Result: Professional outdoor portrait that seamlessly integrates subject with beautiful natural forest background
What it does: Replaces any background with blurred natural greenery for a clean outdoor portrait look
Pro tip: This is true photo editing, not generation. Gemini modifies your uploaded image element by element, which is why the results look realistic.
Prompt #7: Professional Studio White Background
PRESERVATION REQUIREMENT: Keep my entire pose, clothing, and facial features exactly as uploaded - 100% identical with zero alterations.

Background Replacement:

Clean, pure white seamless studio background (infinity curve style)
Complete removal of all original background elements
Professional studio backdrop appearance
Subject Separation:

Clean, precise cutout with natural edge definition
Smooth, anti-aliased edges without halos or artifacts
Perfect subject isolation from background
Maintain fine details (hair strands, fabric texture)
Studio Lighting Setup:

Soft, even studio lighting with key and fill light balance
No harsh shadows or hotspots
Commercial headshot quality illumination
Natural skin tones under studio lighting
Technical Quality:

High resolution 8K output
Sharp focus throughout subject
Professional studio portrait standard
Clean, polished commercial look
NEGATIVE PROMPTS: No face changes, no pose alterations, no lighting modifications on subject, no background bleeding

Goal: Professional studio headshot with seamless white background and perfect subject extraction
What it does: Removes your current background and replaces it with a clean white studio backdrop perfect for professional or e-commerce use
Pro tip: White backgrounds are essential for business headshots, author photos, and product-style portraits. This prompt works especially well when your original photo has good separation between you and the background.
Prompt #8: Urban City Street Background
SUBJECT PRESERVATION: Keep my face, expression, clothing, and pose exactly as uploaded with 100% accuracy - zero changes to subject.

Background Scene:

Blurred urban city street with modern buildings and architecture
Soft bokeh lights from street lamps, traffic, and building windows
Evening/golden hour atmosphere with warm ambient street lighting
Busy cityscape with depth - multiple layers of buildings receding into distance
Lighting & Atmosphere:

Warm street lighting (3000K color temperature)
Evening time ambiance with natural twilight tones
Subject well-lit with balanced exposure against city backdrop
Atmospheric depth with gentle light falloff
Technical Specs:

Shot on 50mm f/1.8 lens with wide aperture
Cinematic depth of field with strong background separation
Professional street photography aesthetic
Creamy bokeh quality throughout background
Focus Control:

Subject in razor-sharp focus
Everything behind subject beautifully blurred (no distracting sharp elements)
Smooth bokeh transition from subject to background
NEGATIVE PROMPTS: No subject alterations, no sharp background elements, no over-processing

Goal: Professional street portrait with dreamy urban bokeh that makes subject pop against the cityscape
What it does: Transports you to an urban city setting with professional street photography vibes
Pro tip: Urban backgrounds work great for fashion-style portraits and creative content. The blurred city lights add visual interest without distracting from your face.
Prompt #9: Outdoor Park Natural Setting
IDENTITY PRESERVATION: Keep my face and all features exactly as uploaded - preserve my exact identity with 100% accuracy.

Outdoor Setting:

Beautiful park setting with lush green grass and scattered mature trees
Natural landscape background with varied foliage and depth
Peaceful outdoor environment with organic elements
Lighting & Weather:

Sunny day atmosphere with natural daylight (5500K color temperature)
Soft, diffused shadows (no harsh direct sunlight)
Even outdoor illumination with gentle contrast
Fresh, bright natural lighting
Focus & Depth:

Subject in razor-sharp focus with crisp detail
Background beautifully blurred with natural bokeh
Smooth depth of field transition from subject to trees
Professional outdoor portrait separation
Color & Style:

Natural, true-to-life colors
Realistic outdoor photography aesthetic
Clean, unprocessed look with authentic tones
Fresh, organic feel
Technical Quality:

Shot with 85mm lens at f/2.0-2.8 for natural compression
Professional outdoor portrait standard
NEGATIVE PROMPTS: No dramatic effects, no artificial enhancements, no over-saturation, no HDR processing

Goal: Clean, natural outdoor portrait with beautiful park backdrop and authentic lighting
What it does: Creates a fresh outdoor park background that looks natural and unedited
Pro tip: Park backgrounds are versatile and appropriate for almost any use, from dating profiles to professional headshots. They feel casual but polished.
Prompt #10: Luxury Interior Background
SUBJECT PRESERVATION: Keep my face, pose, and clothing exactly as uploaded - zero alterations to subject.

Interior Background:

Luxury modern interior with dark leather furniture (sofas, chairs)
Warm ambient lighting from table lamps, floor lighting, and accent lights
Elegant decor elements (artwork, plants, modern furnishings)
Rich textures and high-end materials throughout space
Atmosphere & Mood:

Moody, sophisticated upscale atmosphere
Warm color palette (amber, bronze, deep browns)
Executive/high-end lounge aesthetic
Intimate yet professional environment
Lighting Setup:

Cinematic lighting with rich, warm tones
Balanced key lighting on subject
Editorial magazine quality illumination
Dramatic but flattering light-to-shadow ratio
Focus & Depth:

Razor-sharp focus on subject with crisp detail
Background beautifully blurred with elegant bokeh
Interior details visible but soft (recognizable furniture/decor)
Professional depth of field separation
Technical Quality:

Shot with 85mm f/1.8 lens for natural compression
Editorial magazine standard
NEGATIVE PROMPTS: No face changes, no pose adjustments, no over-dramatic lighting, no artificial effects

Goal: High-end editorial portrait with sophisticated luxury interior backdrop
What it does: Places you in an upscale interior setting for sophisticated portrait style
Pro tip: Luxury backgrounds elevate casual photos instantly. This works especially well if you’re wearing formal clothing in your original photo.
Category 3: Lighting & Color Grading
Lighting transforms photo quality more than any other single factor. These cinematic color grading prompt examples show you how to use color grading and image enhancement prompt techniques to create professional results.
Prompt #11: Golden Hour Lighting Enhancement
FACIAL PRESERVATION: Keep my face exactly as uploaded with 100% accurate facial features - no changes to face shape, eyes, nose, lips, expression, or skin tone.

Lighting Enhancement:

Golden hour lighting (warm, soft sunlight at magic hour)
Dramatic chiaroscuro with beautiful light-to-shadow transitions
Natural warm glow with honey-toned illumination
Directional sunlight creating dimensional depth on face
Enhanced lighting only - preserve all original facial characteristics
Cinematic Quality:

Professional photography aesthetic with editorial polish
Cinematic depth of field with creamy bokeh
Photorealistic rendering with authentic details
Natural skin luminosity under golden light
Technical Specs:

Ultra realistic 8K quality
Shot with 85mm f/1.4 lens equivalent
Professional portrait photography standard
Rich color grading with warm temperature balance
Processing Style:

Natural enhancement without artificial effects
Authentic golden hour color palette
Film-like quality with organic warmth
NEGATIVE PROMPTS: No facial alterations, no artificial glow, no over-processing, no digital beauty filters

Goal: Professional golden hour portrait with enhanced natural lighting while preserving exact facial identity
What it does: Transforms any lighting to professional golden hour quality with warm sunset tones
Pro tip: Golden hour lighting is the most flattering light for portraits because it’s soft, warm, and hides imperfections naturally. This prompt works on indoor photos too.
Prompt #12: Cinematic Moody Dramatic Lighting
FACIAL PRESERVATION: Keep my face exactly as uploaded with 100% accurate facial features - no changes to face shape, eyes, nose, lips, expression, or skin tone.

Lighting Enhancement:

Golden hour lighting (warm, soft sunlight at magic hour)
Dramatic chiaroscuro with beautiful light-to-shadow transitions
Natural warm glow with honey-toned illumination
Directional sunlight creating dimensional depth on face
Enhanced lighting only - preserve all original facial characteristics
Cinematic Quality:

Professional photography aesthetic with editorial polish
Cinematic depth of field with creamy bokeh
Photorealistic rendering with authentic details
Natural skin luminosity under golden light
Technical Specs:

Ultra realistic 8K quality
Shot with 85mm f/1.4 lens equivalent
Professional portrait photography standard
Rich color grading with warm temperature balance
Processing Style:

Natural enhancement without artificial effects
Authentic golden hour color palette
Film-like quality with organic warmth
NEGATIVE PROMPTS: No facial alterations, no artificial glow, no over-processing, no digital beauty filters

Goal: Professional golden hour portrait with enhanced natural lighting while preserving exact facial identity.
What it does: Adds dramatic cinematic lighting with deep shadows for an artistic moody portrait
Pro tip: Moody lighting works best for creative content and artistic portraits. It’s trending heavily on Instagram and TikTok right now.
Prompt #13: Retro Vintage Color Grading
FACIAL PRESERVATION: Keep my face and all features exactly as uploaded - preserve facial features and natural skin tone with 100% accuracy.

Vintage Aesthetic:

Retro vintage color grading with warm, muted tones and slight desaturation
Authentic 70s-90s film photography aesthetic
Kodak Portra or Fuji film stock color characteristics
Nostalgic, timeless atmosphere
Film Characteristics:

Natural film grain texture (medium grain, not excessive)
Soft focus around edges with gentle falloff
Natural vignette (subtle darkening at corners)
Organic imperfections typical of analog photography
Color Treatment:

Warm highlights with cool shadows for dimension
Faded, weathered look with reduced saturation
Vintage color shifts and subtle color casts
Authentic film processing appearance
Technical Style:

Shot on 50mm lens with vintage glass characteristics
Natural depth and organic bokeh
Film-like dynamic range and contrast
Processing Approach:

Authentic vintage film look - no digital over-processing
Organic, unpolished aesthetic
Real film photography simulation
NEGATIVE PROMPTS: No facial alterations, no digital beauty filters, no modern HDR effects, no artificial vintage filters

Goal: Authentic vintage film photograph with genuine 70s-90s analog photography characteristics.
What it does: Applies vintage film color grading for a nostalgic retro photograph aesthetic
Pro tip: Vintage styles are timeless because they hide digital photo imperfections and give a warm nostalgic feel. Try changing the decade (70s, 80s, 90s) for different vibes.
Prompt #14: High Contrast Black and White
FACIAL ACCURACY: Keep my facial features exactly as uploaded - 100% accurate with zero alterations.

Black & White Conversion:

High contrast monochrome with dramatic tonal range
Deep, rich blacks and bright, clean whites
Classic black and white photography style (Ansel Adams/Richard Avedon inspired)
Full spectrum grayscale with smooth tonal transitions
Texture & Grain:

Fine film grain texture (subtle, not distracting)
Natural skin texture preservation - no over-smoothing or digital softening
Authentic silver gelatin print aesthetic
Real pores and skin detail maintained
Focus & Quality:

Sharp, crisp focus throughout subject
Professional monochrome portrait standard
Timeless editorial magazine quality
Clean, polished finish
Technical Specs:

Shot with 85mm lens for natural compression
Optimal lighting for B&W contrast
Professional studio or natural light setup
Processing Style:

Classic darkroom-style processing
Balanced exposure with retained shadow and highlight detail
NEGATIVE PROMPTS: No facial changes, no artificial smoothing, no over-processing, no muddy grays

Goal: Museum-quality black and white portrait with dramatic contrast and timeless appeal
What it does: Converts your photo to high-contrast black and white with professional tonal balance
Pro tip: High contrast black and white is perfect for portfolio work and artistic portraits because it draws attention to composition and expression rather than color.
Prompt #15: Natural Daylight Enhancement
FACIAL ACCURACY: Keep my facial features exactly as uploaded - 100% accurate with zero alterations.

Black & White Conversion:

High contrast monochrome with dramatic tonal range
Deep, rich blacks and bright, clean whites
Classic black and white photography style (Ansel Adams/Richard Avedon inspired)
Full spectrum grayscale with smooth tonal transitions
Texture & Grain:

Fine film grain texture (subtle, not distracting)
Natural skin texture preservation - no over-smoothing or digital softening
Authentic silver gelatin print aesthetic
Real pores and skin detail maintained
Focus & Quality:

Sharp, crisp focus throughout subject
Professional monochrome portrait standard
Timeless editorial magazine quality
Clean, polished finish
Technical Specs:

Shot with 85mm lens for natural compression
Optimal lighting for B&W contrast
Professional studio or natural light setup
Processing Style:

Classic darkroom-style processing
Balanced exposure with retained shadow and highlight detail
NEGATIVE PROMPTS: No facial changes, no artificial smoothing, no over-processing, no muddy grays

Goal: Museum-quality black and white portrait with dramatic contrast and timeless appeal
What it does: Brightens and enhances natural lighting without making the photo look over-edited
Pro tip: This is the safest prompt for beginners because the changes are subtle and natural. It’s perfect for everyday photos you want to improve without making them look heavily edited.
Category 4: Style & Artistic Transformation
These trending gemini photo prompts transform your photos into specific artistic styles and creative aesthetics using ai photo transformation techniques.
Prompt #16: 90s Vintage Editorial Magazine Style
FACIAL PRESERVATION: Keep my face 100% accurate to uploaded image - preserve exact identity and features with zero changes.

90s Editorial Aesthetic:

Vintage fashion magazine portrait (Vogue/Harper's Bazaar 90s style)
Authentic period-appropriate editorial styling
Nostalgic, effortless 90s atmosphere
Classic fashion photography composition
Film Characteristics:

Shot on 35mm film camera (Kodak Portra 400 or Fuji 400H equivalent)
Natural film grain texture with organic imperfections
Soft focus around edges with gentle vignette
Authentic analog photography qualities
Color & Processing:

Muted warm color palette with vintage color shifts
Slightly faded, sun-kissed tones
Classic 90s fashion editorial color grading
Reduced saturation with warm highlights
Technical Quality:

Shot with 85mm lens on medium format or 35mm system
Natural depth of field with creamy background separation
Timeless editorial magazine quality
Professional fashion photography standard
Style Elements:

Clean, minimalist 90s editorial approach
Natural, unretouched skin appearance
NEGATIVE PROMPTS: No face changes, no digital beauty filters, no modern processing effects, no artificial vintage overlays

Goal: Authentic 90s fashion magazine editorial with genuine film photography characteristics and timeless appeal.
What it does: Transforms your photo into a 90s fashion magazine editorial shoot
Pro tip: Era-specific styling is trending massively right now. The 90s aesthetic works particularly well because it’s nostalgic but not too dated.
Prompt #17: Cinematic Movie Poster Style
IDENTITY PRESERVATION: Keep my face and expression exactly as uploaded - preserve my exact identity with zero alterations.

Movie Poster Aesthetic:

Cinematic movie poster composition with dramatic hero lighting
Epic, larger-than-life atmospheric quality
Professional film production standard
Theatrical, blockbuster presentation style
Lighting & Drama:

Dramatic key lighting with strong directional shadows
Cinematic three-point lighting setup
Rich, moody atmosphere with depth
Hollywood glamour lighting techniques
Color & Processing:

Rich color grading with enhanced saturation and contrast
Deep contrast with crushing blacks and bright highlights
Cinematic color palette (teal/orange or complementary scheme)
Professional film post-production quality
Technical Specs:

Ultra high resolution (8K) for poster-quality detail
Shot with 85mm lens at f/2.0 for cinematic compression
Razor-sharp focus on subject
ARRI Alexa or RED camera equivalent quality
Composition:

Dynamic framing with strong visual impact
Professional movie poster layout consideration
NEGATIVE PROMPTS: No face morphing, no digital beauty alterations, no over-stylization that compromises realism

Goal: Hollywood blockbuster movie poster quality with authentic cinematic production values and dramatic visual impact.
What it does: Makes you look like you’re on a professional movie poster
Pro tip: This style works incredibly well for creative social media content and gets significantly higher engagement than standard portraits.
Prompt #18: Watercolor Painting Effect
FACIAL PRESERVATION: Keep my facial features exactly as uploaded - 100% accuracy with zero changes to face.

Artistic Treatment Style:

Soft watercolor painting effect with selective application
Subject (face, hair, clothing) remains photorealistic and sharp
Background transformed to watercolor art style only
Clean transition between photorealistic subject and painted background
Watercolor Technique:

Artistic painterly background with gentle, flowing brush strokes
Wet-on-wet watercolor bleeding and blending effects
Soft pastel color palette with translucent layers
Traditional watercolor paper texture visible in background areas
Aesthetic Quality:

Dreamy, ethereal artistic illustration quality
Fine art painting meets photography hybrid
Soft, romantic atmosphere with artistic flair
Gallery-worthy artistic portrait
Technical Execution:

Precise masking to maintain subject realism
Professional digital painting techniques for background
High resolution with crisp subject detail
Seamless blend between photo and art elements
Color Treatment:

Soft pastel colors in background (blues, pinks, lavenders, warm creams)
Natural skin tones preserved on subject
NEGATIVE PROMPTS: No face changes, no painterly effects on subject, no color bleeding onto face, no loss of facial detail

Goal: Fine art portrait combining photorealistic subject with beautiful watercolor background for an elegant artistic presentation.
What it does: Keeps your face photorealistic while transforming the background into watercolor art
Pro tip: This hybrid style (realistic face with artistic background) is perfect for unique profile pictures that stand out without looking too heavily edited.
What it does: Keeps your face photorealistic while transforming the background into watercolor art
Pro tip: This hybrid style (realistic face with artistic background) is perfect for unique profile pictures that stand out without looking too heavily edited.
Prompt #19: Film Noir Classic Style
FACIAL PRESERVATION: Keep my face exactly as uploaded with 100% accurate features - zero alterations.

Film Noir Aesthetic:

Classic 1940s-1950s cinema style with authentic period characteristics
Moody, sophisticated atmosphere with mysterious undertones
Timeless classic Hollywood portrait tradition
Detective/femme fatale cinematic quality
Lighting & Shadows:

Dramatic film noir lighting with strong shadow play
Hard key lighting with minimal fill (high contrast ratio)
Venetian blind shadows or window light patterns
Classic chiaroscuro technique with deep blacks
Black & White Treatment:

High contrast monochrome with rich tonal range
Deep, inky blacks and bright, clean whites
Classic silver screen aesthetic
Authentic film noir contrast levels
Texture & Focus:

Sharp focus on subject with soft, atmospheric edges
Classic cinematic grain texture (35mm film equivalent)
Natural vignette for period authenticity
Professional studio portrait quality
Technical Specs:

Shot with 85mm lens for classic portrait compression
Film noir cinematography lighting setup
NEGATIVE PROMPTS: No facial changes, no modern digital effects, no color bleeding, no over-processing

Goal: Authentic 1940s film noir portrait with classic Hollywood glamour and dramatic shadow work
What it does: Creates a classic 1940s film noir portrait with dramatic vintage Hollywood aesthetics
Pro tip: Film noir works especially well for formal portraits and creates a sophisticated timeless look that never goes out of style.
Prompt #20: Retro VHS Tape Aesthetic
FACIAL PRESERVATION: Keep my face and features exactly as uploaded - preserve exact identity with zero changes.

VHS Aesthetic:

Authentic 80s VHS tape quality with period-appropriate home video feel
Nostalgic vintage video atmosphere
Classic analog television/camcorder aesthetic
Retro home recording vibe
VHS Technical Artifacts:

Horizontal scan lines (subtle, not overwhelming)
Slight chromatic aberration with red/blue color fringing
Natural VHS color bleeding and saturation
Analog video compression artifacts
Soft, slightly fuzzy resolution typical of VHS playback
Color & Quality:

Warm analog color palette with enhanced reds and oranges
Slightly oversaturated colors characteristic of VHS
Warm glow with soft focus effect
Vintage color temperature (warmer than digital)
Period Styling:

1980s-appropriate visual styling and mood
Classic home video lighting setup
Natural grain and analog imperfections
Technical Specs:

4:3 aspect ratio consideration for authentic VHS framing
Analog video quality simulation
Period-accurate visual characteristics
NEGATIVE PROMPTS: No face changes, no modern digital effects, no over-processing, no artificial vintage filters

Goal: Authentic 80s home video VHS quality with genuine analog tape characteristics and nostalgic period atmosphere
What it does: Transforms your photo to look like a freeze frame from an 80s VHS home video
Pro tip: The VHS aesthetic is trending heavily on TikTok and Instagram Reels right now. It’s perfect for nostalgic throwback content.
Category 5: Professional & Commercial Use
These professional photo editing prompt examples are designed for business use, LinkedIn profiles, portfolio work, and commercial applications.
Prompt #21: LinkedIn Corporate Headshot
FACIAL ACCURACY: Keep my face exactly as uploaded - 100% accurate facial features with zero alterations.
Corporate Setup:
Professional corporate headshot with clean neutral background (seamless gray or white paper backdrop)
Business-appropriate, executive-level professional quality
LinkedIn/corporate website ready presentation
Studio Lighting:
Soft, flattering studio lighting with key and fill light balance
Even illumination with minimal shadows
Professional headshot lighting setup (45-degree key light with fill)
Natural skin tones under balanced studio lighting
Focus & Detail:
Sharp focus locked on eyes with crisp detail
Natural professional appearance with authentic skin texture
Clean, polished corporate look
Technical Specs:
Shot on Sony A1 with 85mm f/1.4 GM lens
Ultra realistic 8K resolution
Editorial neutral color profile with accurate skin tones
Professional portrait photography standard
Processing:
Clean, unretouched natural appearance
Balanced exposure with neutral color temperature
Corporate-appropriate color grading
NEGATIVE PROMPTS: No beautification, no face changes, no artificial smoothing, no over-processing
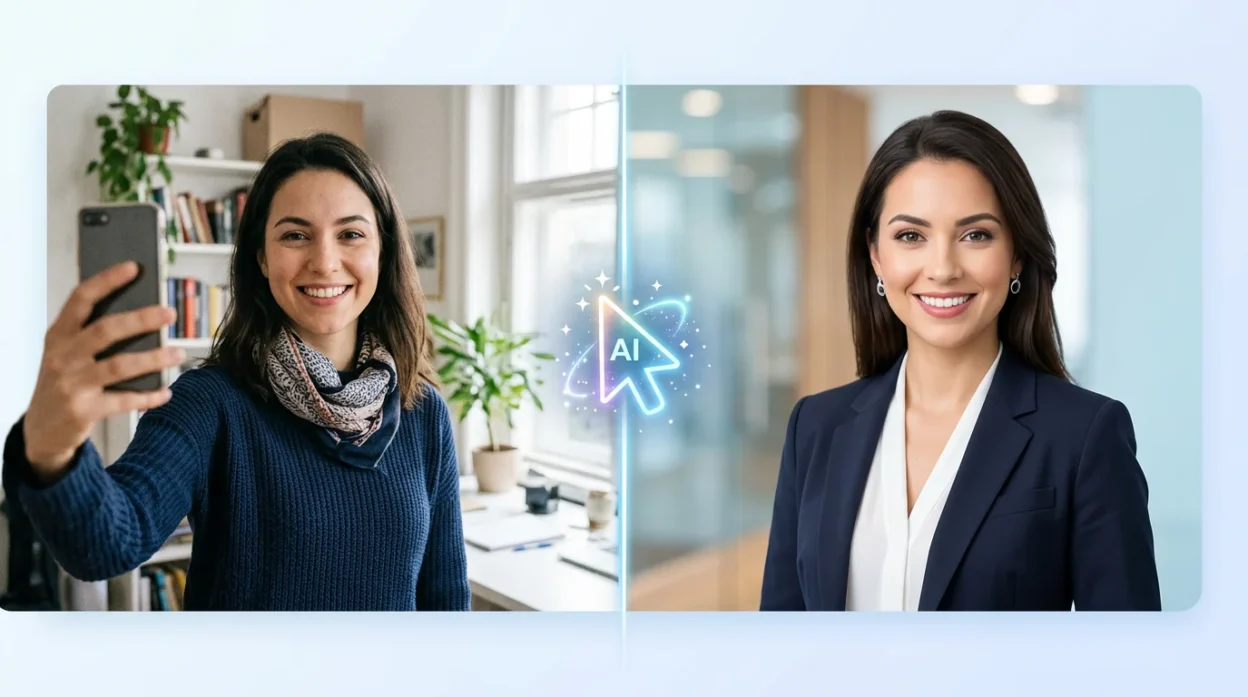
Goal: Professional executive headshot suitable for corporate use, LinkedIn profiles, and business communications.What it does: Creates a polished LinkedIn-ready corporate headshot from any casual photo
Pro tip: Professional headshots should have neutral backgrounds and clean lighting. Avoid creative effects for business use.
Prompt #22: E-Commerce Product Background Style
SUBJECT PRESERVATION: Keep subject exactly as uploaded with 100% accuracy - no face or pose changes, only background replacement.

Commercial Background:

Clean white or light gray seamless background (sweep or infinity wall)
Pure, distraction-free backdrop for commercial use
Product photography studio setup
Professional catalog-style presentation
High-Key Lighting Setup:

Even, shadowless studio lighting with multiple light sources
High-key photography aesthetic with bright, clean illumination
Soft, diffused lighting from all angles (360-degree lighting)
No harsh shadows or dramatic contrast
Commercial photography lighting standard
Focus & Quality:

Ultra sharp focus throughout entire subject
8K resolution with maximum detail clarity
Commercial product photography quality
Crisp, clean professional finish
Technical Specs:

Shot with 85mm lens at f/8-f/11 for maximum sharpness
Studio strobe lighting setup
Color-accurate white balance for commercial use
Commercial Applications:

Perfect for e-commerce product listings
Catalog photography ready
Professional business use
NEGATIVE PROMPTS: No subject alterations, no artistic effects, no mood lighting, no shadows

Goal: Clean, professional commercial photography suitable for e-commerce, catalogs, and business applications
What it does: Transforms your portrait into e-commerce product photography style with clean commercial background
Pro tip: This style works perfectly for professional headshots, author photos, speaker profiles, and any commercial application where clean presentation matters.
Prompt #23: High-End Magazine Editorial
FACIAL PRESERVATION: Keep my face exactly as uploaded with 100% accurate features - preserve exact identity with zero alterations.

High-End Editorial Quality:

Premium fashion magazine editorial aesthetic (Vogue/Harper's Bazaar style)
Sophisticated, luxury publication standard
Professional fashion photography styling
Clean, minimalist editorial approach
Lighting & Atmosphere:

Sophisticated studio lighting with refined shadows
Professional fashion editorial lighting setup (key + fill + rim light)
Elegant, polished illumination
Premium aesthetic with controlled contrast
Technical Specs:

Shot on medium format camera (Fujifilm GFX or Hasselblad equivalent)
80mm lens equivalent for natural portrait compression
Cinematic shallow depth of field with creamy bokeh
Magazine-ready premium clarity and detail
Color & Processing:

Editorial neutral color grading with balanced tones
Professional fashion magazine post-production
Clean, sophisticated color palette
High-end commercial photography standard
Style Quality:

Magazine cover/spread ready presentation
Timeless editorial elegance
NEGATIVE PROMPTS: No face morphing, no digital beauty alterations, no over-stylization, no amateur processing

Goal: Premium fashion magazine editorial with sophisticated styling and professional luxury publication quality
What it does: Elevates your portrait to high-end fashion magazine editorial quality
Pro tip: Editorial style is perfect for portfolio work, creative professionals, and anyone in the fashion or creative industries.
Prompt #24: Commercial Advertising Style
FACIAL PRESERVATION: Keep my face and features exactly as uploaded - 100% accurate with zero changes.

Commercial Advertising Style:

Professional advertising photography aesthetic
Polished, premium commercial appeal
Brand campaign quality with marketing-ready presentation
Clean, contemporary advertising look
Lighting Setup:

Clean, bright studio lighting with even illumination
Commercial photography lighting (key + fill lights for shadow control)
Fresh, energetic lighting quality
Bright, optimistic commercial atmosphere
Color & Processing:

Vibrant, natural colors with enhanced saturation
Commercial color grading with punchy, appealing tones
True-to-life skin tones with commercial polish
Brand-friendly color balance
Technical Quality:

Sharp focus throughout entire subject
High resolution 8K for print and digital campaigns
Shot with 85mm f/2.8 lens for commercial portrait standard
Professional advertising photography quality
Commercial Applications:

Advertising campaign ready
Marketing materials suitable
Brand campaign quality
Print and digital advertising use
Style Approach:

Natural professional look without artificial enhancement
Authentic, relatable commercial appeal
NEGATIVE PROMPTS: No face changes, no over-processing, no artificial beauty filters, no dramatic artistic effects

Goal: Premium commercial advertising photography suitable for brand campaigns, marketing materials, and professional advertising use.
What it does: Creates commercial-quality portraits suitable for advertising and marketing use
Pro tip: Commercial style should look polished but natural. Avoid heavy artistic effects and stick to clean, professional aesthetics.
Prompt #25: Author or Speaker Profile Photo
FACIAL PRESERVATION: Keep my face exactly as uploaded with 100% accurate features - maintain authentic approachable look.

Professional Context:

Professional author or speaker profile photo
Trustworthy, credible professional aesthetic
Friendly, approachable atmosphere for public-facing use
Executive/thought leader presentation quality
Lighting Setup:

Warm, approachable studio lighting (3200K-4000K color temperature)
Soft key light with gentle fill to minimize harsh shadows
Natural, flattering illumination for professional headshot
Confident yet welcoming lighting quality
Background & Composition:

Neutral background (soft gray, warm beige, or cream tones)
Softly blurred background with elegant bokeh
Clean, undistracting backdrop for professional focus
Technical Specs:

Shot on 85mm f/1.8-2.0 lens for natural portrait compression
Shallow depth of field with smooth background separation
Ultra realistic 8K quality with crisp detail
Professional headshot photography standard
Style & Processing:

Natural smile and expression preserved exactly
Authentic, unretouched professional appearance
Warm, inviting color grading
Book jacket/speaker bio quality
NEGATIVE PROMPTS: No face changes, no artificial beauty filters, no over-processing, no cold corporate lighting

Goal: Professional author/speaker headshot suitable for book covers, speaking engagements, and media appearances.
What it does: Creates a warm professional profile photo perfect for author bios, speaker profiles, and professional introductions
Pro tip: Author and speaker photos should feel approachable and trustworthy rather than overly corporate. This prompt balances professionalism with warmth perfectly.
Pro Tips: 5 Secrets to Better Gemini Photo Edits
After spending months testing Gemini photo editing, I’ve discovered five power-user techniques that dramatically improve results. These are insider secrets I learned from real creators and Reddit users who’ve mastered the platform. None of the popular tutorials mention these tricks, but they make a massive difference.
Secret #1: Use the “Redo” Button for Multiple Variations
Most people don’t know Gemini has a hidden redo function. After Gemini generates your edited photo, tap the three dots in the corner of the image and select the circular arrow icon. This regenerates a completely new version using the exact same prompt without you having to retype anything.
I’ve used this to get up to five different variations from a single prompt. Sometimes the first result looks off, but the third or fourth attempt is perfect. The redo function saves enormous time and often produces better compositions than the original generation.
Secret #2: Upload Multiple Reference Photos for Couples or Groups
When editing couple photos or group shots, upload both people’s individual photos as separate reference images before entering your prompt. Gemini uses both references to preserve each person’s face accurately instead of guessing from a single group photo where faces might be small or partially hidden.
In your prompt, specify which reference matches which person. For example: “Use the first uploaded image for the man’s face and the second uploaded image for the woman’s face.” This technique comes straight from creators making viral couple edits, and the face preservation is dramatically better.
Secret #3: Reverse-Engineer Prompts from Photos You Like
Here’s a genius trick from Reddit user Emma Galvan that most people gatekeep. When you see a Gemini edit you love, save the image, upload it to Gemini, and ask “Give me a prompt for this image so I can use it to edit my own photo.” Gemini will analyze the style and generate a detailed prompt you can copy and adapt.
This works incredibly well for learning prompt structure and discovering style keywords you wouldn’t have thought of on your own. I’ve built my entire prompt library this way.
Secret #4: Control Image Dimensions in Your Prompt
Add aspect ratio specifications directly in your prompt to control the output size. Include phrases like “aspect ratio 3:4 vertical” for portrait orientation, “16:9 horizontal” for landscape, or “1:1 square” for Instagram posts.
Without aspect ratio instructions, Gemini defaults to whatever it thinks fits best, which is often wrong for your intended use. Specifying dimensions in the prompt ensures you get usable results the first time without cropping later.
Secret #5: Use Professional Camera Terminology for Quality Boost
This is the secret weapon professional photographers use. Including camera specifications in your prompt forces Gemini into a higher-quality photography mode instead of generic image generation mode. Add phrases like “shot on Sony A1,” “85mm f/1.4 lens,” “ISO 100,” or “shallow depth of field.”
Even if you don’t understand photography terminology, copying these technical phrases dramatically improves image sharpness, lighting quality, and overall realism. The difference is immediately visible. Professional camera language tells Gemini you want photorealistic results, not cartoon-style art.
When Prompts Don’t Work: Troubleshooting Guide
Even with perfect prompts, Gemini photo editing sometimes produces frustrating results. I’ve run into every problem you can imagine, and I’ve learned exactly how to fix each one. Here are the most common issues and their solutions.
Problem: Gemini Changes My Face Every Time
This is the most frustrating problem, and it usually happens for one specific reason: your face is too small in the original photo. If your face takes up less than about 30% of the frame, Gemini treats your face as part of the scenery rather than the main subject.
The solution is simple but not obvious. Crop your reference photo closer before uploading it so your face fills more of the frame. This immediately improves preserve face in ai photo editing accuracy.
If cropping isn’t an option, switch to one of the Reddit-tested prompts from Section 3 that include explicit preservation language. The detailed prompt with the feature list (face shape, eyes, nose, lips, eyebrows, cheek bones) works significantly better than generic “keep my face the same” instructions.
Also check your reference photo quality. Blurry, low-light, or heavily compressed photos confuse Gemini’s face recognition. Use the clearest, highest-resolution photo you have as your reference, even if it’s not the exact pose you want to edit.
Problem: Results Look Fake or Low Quality
When your edited photos look artificial, cartoon-like, or blurry, the problem is almost always missing quality specifications in your prompt. Gemini defaults to a more artistic, illustrated style unless you explicitly tell it to stay photorealistic.
Add these quality keywords to any prompt that’s producing fake-looking results: “ultra realistic,” “photorealistic,” “8K quality,” “sharp focus,” “high detail,” and “natural skin texture.” These specifications force Gemini into photography mode instead of illustration mode.
Your reference photo quality matters too. If you upload a low-resolution or grainy original photo, even the best prompt can’t magically create high-quality results. Gemini can enhance lighting and style, but it can’t invent detail that doesn’t exist in your source image.
For advanced users, adding professional camera terminology like “shot on Sony A1 with 85mm f/1.4 lens” dramatically improves realism and technical quality.
Problem: Can’t Get Variations, Same Result Repeats
If Gemini keeps generating the exact same edit every time you submit your prompt, you’re not using the redo function correctly. Don’t keep clicking the send button with the same prompt expecting different results.
Instead, after Gemini generates the first version, tap the three dots in the corner of the image and select the circular arrow icon. This tells Gemini to regenerate using the same prompt but with different creative choices. Each redo produces a genuinely new variation.
If you want more dramatic differences, slightly modify your prompt by changing style keywords. Swap “cinematic moody” for “bright vibrant” or change “vintage film grain” to “clean modern.” Small keyword changes produce surprisingly different results while keeping the core edit the same.
Gemini vs. Alternatives: When to Use What
Google Gemini isn’t the only AI photo editing tool available, and honestly, it’s not always the best choice for every situation. I use multiple tools depending on what I’m trying to accomplish, and understanding when to use each one saves enormous time and frustration.
When to Use Google Photos AI Enhance
If you just want to quickly improve a photo with one click, Google Photos has an AI Enhance feature that’s faster and simpler than Gemini. Google Photos automatically adjusts lighting, color, and sharpness without you writing any prompts. I use this for casual snapshots I want to post quickly without detailed editing.
The downside is you have zero control over what changes. Google Photos makes all the decisions for you, which is convenient but limiting.
When to Use Gemini
Google Gemini is best for creative transformations where you want specific changes using natural language. Gemini excels at background replacement, style transformations, and artistic edits that would take hours in traditional software. The fact that Gemini is completely free and requires no technical skills makes it perfect for photo editing without photoshop.
I reach for Gemini when I want to describe exactly what I want in plain English, like “change the background to a coffee shop” or “make this look like a 90s vintage photo.”
When to Use Photoshop AI
For professional work where precision matters, Photoshop’s AI tools still outperform Gemini. Photoshop gives you pixel-level control, layer-based editing, and professional-grade output quality. If you’re editing photos for print, commercial use, or client work, Photoshop is worth the investment.
The learning curve is steep and the subscription costs money, but the control and quality are unmatched.
When to Use ChatGPT or DALL-E
ChatGPT with DALL-E works similarly to Gemini for prompt-based image generation, but I’ve found Gemini better at preserving faces from reference photos. ChatGPT is stronger for creating entirely new images from scratch without reference photos.
When to Use Canva AI
Canva’s AI tools are optimized for social media graphics and quick edits with templates. If you need to create Instagram stories, Facebook posts, or branded graphics, Canva’s template library makes the process faster than Gemini. But for photo editing specifically, Gemini produces more realistic results.
My Personal Workflow
I use Google Photos for quick one-click improvements, Gemini for creative photo transformations and background changes, and occasionally Photoshop when I need professional precision. Most people will find Gemini handles 80% of their photo editing needs without paying for anything.
Frequently Asked Questions About Gemini Photo Editing
These are the questions I get asked most often about using Google Gemini for photo editing. I’ve answered each one based on real testing and user experiences from the Reddit community.
Can Gemini edit existing photos or only create new images?
Gemini can do both. To edit existing photos, upload your image first, then use google gemini prompts for photo editing that describe what to change, like “change background to a beach” while specifying what to keep with phrases like “keep my face exactly as uploaded.” However, Gemini is primarily designed for image generation, so the editing capabilities are more limited than traditional photo editors like Photoshop.
How do I prevent Gemini from changing my face when editing?
Always include explicit preservation language in your prompt. Use phrases like “keep my face exactly as uploaded,” “accurate face 100%,” or “preserve my facial features including face shape, eyes, nose, and lips.” Also ensure your face is large and clear in the reference photo because small or blurry faces are much more likely to be altered by the AI. I cover three tested prompts that work perfectly in Section 3.
What are the best prompts for Gemini photo editing?
The best gemini ai photo prompts combine four essential elements: preservation instructions that keep your face the same, change instructions describing what to modify, style specifications like cinematic or vintage, and quality settings such as 8K or sharp focus. I’ve provided 25 tested copy-paste prompts in Section 5, organized across categories including portraits, backgrounds, lighting adjustments, and professional business use.
Can I use Gemini for professional photo editing?
Yes, Gemini works well for creative enhancements and quick transformations. I’ve successfully used Gemini for LinkedIn headshots, product photography backgrounds, and editorial styling when including professional camera terminology in prompts like “Sony A1, 85mm f/1.4 lens, studio lighting.” However, for precise pixel-level control needed in high-end commercial work, Photoshop remains the industry standard. Check Section 5 Category 5 for professional-grade prompts.
How do I get different variations without rewriting my prompt?
Use Gemini’s hidden redo function. After the AI generates your image, tap the three dots menu in the corner of the result and select the redo icon, which looks like a circular arrow. This generates a completely new version while keeping your exact prompt unchanged, allowing you to explore multiple variations efficiently without typing the same instructions again.
Does Gemini work on mobile or only desktop?
Gemini works perfectly on both the mobile app and desktop web browser. The mobile app is available on Android and iOS devices and offers the same photo editing features as the desktop version. Most of the creator videos I researched show people using the mobile interface successfully, which proves the mobile experience is just as capable.
Can I edit multiple people in one photo with Gemini?
Yes, you can edit photos with multiple people. Upload separate reference photos for each person in the scene, then write your prompt describing where each person should be positioned and what they’re doing. Include the phrase “face 100% match from uploaded image” for each subject to ensure all faces are preserved accurately. I explain the multi-person technique in detail in Section 6.
Why do my Gemini edits look fake or unrealistic?
This usually happens because your prompt lacks quality specifications. Always include descriptors like “ultra realistic,” “8K quality,” “sharp focus,” “high detail,” and “natural skin texture” to force Gemini into photorealistic mode. Also ensure your reference photo is high resolution because low-quality input photos produce low-quality output no matter how good your prompt is. Section 7 covers troubleshooting steps for this exact problem.
Final Thoughts: Start with These 3 Prompts
If you’re feeling overwhelmed by all the gemini prompts for photo editing in this guide, don’t worry. I recommend starting with just three simple prompts that work consistently well for beginners.
Your First Three Prompts to Try
Start with Prompt #6 from Section 5, the simple nature background swap. This teaches you the basics of background replacement without complicated settings. Just upload your photo, copy the prompt, and watch Gemini transform your setting in seconds.
Next, try Prompt #11, the golden hour lighting enhancement. This one shows you how dramatically lighting changes can improve any photo, and you’ll start understanding how style keywords affect results.
Finally, test Prompt #3, the professional headshot creator. This demonstrates how the best gemini ai prompts for photo editing can turn casual snapshots into polished professional images suitable for LinkedIn or business use.
Your Learning Path Forward
Once you’ve tried these three copy-paste prompts and seen what Gemini can do, go back to Section 4 and start creating your own custom prompts using the four-part formula. The progression from copying to understanding to creating is how you master any new skill.
Remember that prompt quality improves with practice and iteration. My first dozen attempts with Gemini produced mediocre results. Now I can write prompts that nail exactly what I want on the first or second try. The difference is simply experience and experimentation.
Bookmark this guide and come back to it whenever you need a specific prompt or troubleshooting help. The 25 prompts in Section 5 will handle most situations you encounter, and the formula in Section 4 covers everything else.
Start experimenting today. Upload a photo, copy one of the three beginner prompts, and see what happens. You’ll be surprised how quickly you go from confused beginner to confident creator.